Chatting with Your Attack Paths: An MCP for BloodHound
TL;DR In an effort to learn about Model Context Protocol servers, I created a MCP server that allows Claude Desktop to access and analyze data contained with a running instance of BloodHound Community Edition. This MCP is recommended to be used with Lab or Example data. Future releases will have Local LLM support.
Introduction
During one of my first internal penetration tests as a consultant, I successfully ran SharpHound and dropped the results into BloodHound. As the various data points, graphs, and edges started to populate, I began to panic. “Holy cow. This is a lot to look at! Where do I start?” I am sure many of you have experienced the same feeling.

BloodHound has revolutionized Active Directory (AD) security assessments by visualizing complex identity relationships as attack paths. However, with its power comes a steep learning curve, especially for the large majority of IT and security teams without the resources or time to dedicate solely to AD expertise. Even experienced professionals face the challenge of analyzing the large datasets and complex graph relationships within BloodHound.
This technical gap prompted me to explore how Model Context Protocol (MCP) servers could help democratize the usage of BloodHound by closing the divide with natural language queries to a large language model (LLM). My goal was to develop an MCP server that enables LLMs like Claude or ChatGPT to directly work with the data in BloodHound CE’s database. Providing end users with the capability to “chat with their attack paths” and receive security recommendations in natural language.
From an implementation perspective, the project required solving several key technical challenges:
- Creating a robust client for BloodHound’s “REST” API
- Implementing the Hash-based Message Authentication Code (HMAC) authentication mechanism
- Building an MCP server that maps natural language queries to the API endpoints
- Handling the transformation of graph-based data structures into relevant responses
By solving these challenges, the project demonstrates how users with foundational AD knowledge can leverage AI assistants to gain actionable insights into securing (or exploiting) their network.
Technical Foundation: The Model Context Protocol

The MCP represents an advancement in how LLMs can interact with external systems and the data they contain. At its core, the MCP provides a standardized communication layer that allows LLMs (Claude, ChatGPT, Ollama, etc) to make use of external tools and APIs.
MCP Architecture and Principles
The architecture of an MCP server follows a pattern that enables the structured communication between the LLM and external services:
- User asks the LLM a question that an external tool can solve
- LLM recognizes that it needs the external tool
- MCP Server requests the wanted data from the external API
- The external tool provides the requested data back to the MCP server
- The LLM uses the MCP server to interpret the data
- The LLM provides the user with a response containing the data

This architecture creates a bidirectional communication channel where natural language queries are transformed into structured API calls. The resulting data is processed and presented back to the user in a language they understand.
The key components of this architecture include:
- MCP Server: Acts as an intermediary that translates the natural language of the LLM and the API calls required by external services
- Tool Definitions: Functions exposed to the LLM that map to specific API endpoints with defined parameters and return types
- Resource Definitions: References that provide the LLM with the necessary context about the external system
- Prompt Engineering: Instructions that guide the LLM on how to use the provided tools in ways that match the user queries
When Anthropic released their MCP SDK in late 2024, they significantly lowered the barrier to creating these interfaces. This opened the floodgates for developers to connect LLMs to various external services.
Technical Implementation with FastMCP
I chose to use FastMCP, a Python library that streamlines the implementation of MCP Servers. FastMCP handles the complex aspects of communication between the LLM and the external data, while allowing me to focus on defining the tools, resources and prompts.
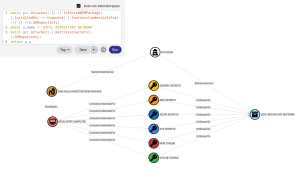
@mcp.tool()
def get_domains():
    try:
        domains = bloodhound_api.domains.get_all()
        return json.dumps({
            "message": f"Found {len(domains)} domains in Bloodhound",
            "domains": domains
        })
    except Exception as e:
        logger.error(f"Error retrieving domains: {e}")
        return json.dumps({
            "error": f"Failed to retrieve domains: {str(e)}"
        })
This pattern allows for clean separation between the communication layer and the API client. Each tool function follows a consistent pattern that handles the parameters, API calls, response transformation, and error handling.
Authentication Implementation Challenge
When I began working on the BloodHound MCP, my initial research led me to using the JSON web tokens (JWTs) for authentication with the BloodHound API. This is a common pattern similar MCP projects used; however, as I thought about the use-case and goals for the tool, I began to realize that JWTs were not the appropriate solution. JWTs are temporary by design and require re-acquisition when sessions expire. Due to this design, they would be a barrier to my idea of this being a persistent tool with limited configuration.
The Solution: HMAC-Based Authentication
Thankfully, the BloodHound team accounts for use cases outside of temporary JWTs with their implementation of HMAC. The implementation of this feature was specifically for its API integrations, making it the ideal solution to my initial problem.
The implementation of HMAC authentication is more complex than simply including a JWT in the headers of a request. It requires a multi-step crypto process to generate a unique signature for each API request:
- Create the initial Digester: This initializes an HMAC-SHA-256 hash object using the API secret as the key
- Generating the OperationKey: The first input to the HMAC is a combination of the HTTP method and the request URL; this ensures that the signature is specific to both the endpoint and the operation
- Chaining the HMAC Operations: After generating the first input, the output is used as the key for a new HMAC operation
- Adding Time-Based Security: The signature includes a timestamp in an effort to add a time-based component that will add security against potential replay attacks
- Body Signing for Data Integrity: If applicable, the body content is added to the signature to ensure that the data is not tampered with
- Putting together the Signed Request: This is the final step and it assembles the HTTP request with the necessary headers

The authentication function was added to the API client in an effort to make it reusable across all of the API endpoints. The function also includes other functionality to make the authentication process as easy as possible for the end user.
With this implementation, it negated the need to consistently obtain JWTs and users could instead provide the domain of their BloodHound instance, a token ID, and a token key in a “.env” file, therefore lowering the barrier to entry. Additionally, this authentication mechanism laid the groundwork for future plans to provide the MCP with a persistent identity within BloodHound allowing it to evolve from an analyst to a full-on BloodHound admin.
API Client Development
When first brainstorming my idea of an MCP for BloodHound, I initially wanted to just give the LLM access to a large catalog of known cypher queries. Although this would work in theory, I felt that cypher queries were too narrow of a focus and would leave gaps in the LLM’s ability to access the entirety of the data stored in BloodHound.
This would mean that users would have to stick to pre-defined questions such as “Who are the Domain Admins?”. To me, this was unacceptable and would be no different than just using BloodHound itself. I wanted users to truly be able to converse with their data, not stick to a conversation on rails.
Design Decision: API-First Approach
Rather than limiting the LLM to predefined queries, I decided to embrace the true nature of BloodHound being an “API-First product” and create my own client that would give the LLM full access to all of the necessary BloodHound APIs. This client would allow the LLM to:
- Access any entity or relationship data in the database
- Navigate complex relationships between entities
- Analyze security principals across different contexts
- Construct targeted queries based on specific needs
This approach is more in line with how I have learned to use BloodHound. The LLM would have the ability to conduct exploratory analysis that follows the data where it leads, instead of using a limited set of canned questions.
Technical Implementation: BloodHound API
The client I built mirrors the BloodHound’s own organization, with the main BloodhoundAPI class serving as the entry points:
This class serves as the switchboard operator, connecting calls to the right department. When the MCP needs data on a user, it goes to the users client. Need to know about a computer? The computers client handles that. This organization keeps the code clean and makes it easy to find the specific functionality.

The meat and potatoes of the functionality occurs in these specialized client. We will use the UserClient as an example:
Each method maps directly to a specific API endpoint. The get_info (1) fetches basic information about a user, while the get_admin_rights (2) retrieves the domain objects that they have administrative access over. The client handles the formatting of the URL, adding query parameters, and processing the response.

This pattern repeats itself across all the resource clients, each with its own specific functionality related to the endpoint. For example, ComputerClient has methods such as get_sessions to active sessions of users and GroupClient has methods such as get_memberships to find the objects that are in the specified group. Every aspect of BloodHound’s extensive data model becomes accessible through these clients and their respective methods.
Technical Implementation: Complex API Endpoints
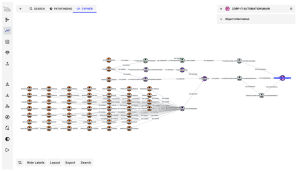
The initial endpoints from the BloodHound API were fairly simple to interact with and implement. They essentially boiled down to a “GET” request with a GUID for the target object passed as a parameter. As I started to work my way into more complex endpoints it became a lot less repetitive. We will use the implementation of the GraphClient’s get_shortest_path method as an example.
The get_shortest_path method finds the shortest attack path between any two objects in the domain. I have predominantly used this functionality in client work when trying to map a path from a compromised user to another target that will help me achieve my objective. However, the diagram presented in BloodHound can be complex and requires lots of clicking on edges and objects to get the full picture. With its implementation through the MCP, the LLM can explain each step of the process and even recommend fixes or commands to exploit the path.


The ultimate functionality that I implemented is within the CypherClient. This client contains methods that allow the LLM to execute cypher queries directly against the Neo4j database that powers BloodHound, giving users the ability to turn complex questions into queries against their data without having an in-depth knowledge of the query language.

In addition to the ability to run new cypher queries, I added methods within the CypherClient to manage the cypher queries within the BloodHound GUI, starting to pave the way for the LLM to become more than a tool, but a team member.
The CypherClient was by-far the most complex part of the API to implement, and I will discuss the challenges and solutions in a later section.
API Client Conclusions
The client gives the LLM complete freedom to explore the relationships of objects that may not be apparent when using the GUI. I found that, with the flexibility of the API, the LLM can piece together insights in a similar way as someone who is an expert in BloodHound usage. The API-First approach stays true to the vision of the development team and gives the LLM an almost “emergent intelligence.” It was interesting to watch it reason through questions I gave it by pulling data from various APIs.
Although building the client took a large portion of my time, I feel that the time was well-spent. Instead of constantly updating predefined queries as BloodHound or use-case evolves, the client adapts to the API changes. As new capabilities are added to BloodHound, I can simply expand the client with methods and it won’t disrupt the existing functionality.
MCP Server Construction
When I first set out to build an MCP server for BloodHound, I began with FastAPI: a popular Python framework for building APIs. It seemed like a logical choice given its performance and flexibility. Little did I know I was about to learn a valuable lesson in not reinventing the wheel.
The FastAPI approach quickly turned into a kerfuffle. I needed to build custom natural language processing (NLP) capabilities to interpret what the LLM was asking for, create complex proxy mechanics to interface with Claude Desktop, and write mountains of boilerplate code just to handle basic request and response patterns. The complexity was spiraling out of control and I was spending more time on the MCP infrastructure than on the actual BloodHound integration.
I was beginning to want to throw in the towel until I spotted a tweet from Adam Chester (a fellow Specter) showcasing a Mythic command and control (C2) MCP he had built. What caught my eye wasn’t the Mythic integration itself; rather, it was the tool he used: something called FastMCP.
Looking through his code and the documentation of FastMCP, I realized FastMCP was exactly what I needed.
Technical Implementation: MCP Tools
Building of the MCP server changed dramatically when I switched to FastMCP. Instead of complex request handlers and NLP components, I could focus on creating straightforward tool functions that would be directly exposed to the LLM. Take, for example, the get_user_info MCPTool. I simply need to specify the parameters that it needs and the LLM can use it to perform the query.

The MCPTools consist of the actual code and some docstrings. What I found fascinating is that the docstrings are actually needed, unlike in normal Python (yes, I know they are good for readable code). What I found is that the LLM reads and uses them to understand when and how to use each tool. This meant I could provide guidance to the LLM and explain what each tool does and how it fits into security analysis workflows.
Technical Implementation: MCP Resources
Another feature of the FastMCP Python library is MCP Resources; these function as reference material provided to the LLM during the conversation. Although I overlooked these when going through the initial implementation, they became very relevant when I implemented the cypher query tooling.
Unlike tools, they are meant to be actively called to retrieve or process data. Resources are passive sources of information and the LLM can reference them when needed without requiring an explicit function call. The implementation of resource is pretty straightforward:
- Create a function
- Provide the documentation in a variable
- Return the variable in a string
The resource is then assigned a URI like identifier (“bloodhound://cypher/examples”) that the LLM can use to reference.
Although they seem simple, MCP resources were crucial in getting the more complex things like Cypher queries to function as intended by providing known-good examples.
In practice, this means Claude can say to itself, “I need to write a Cypher query to find domain admins. Let me check the example resource first,” and then reference the provided examples to construct a syntactically correct query. This dramatically improves reliability compared to relying solely on the LLM’s pre-trained knowledge.
I found that resources work best when they:
- Focus on specific domains or tasks (like Cypher queries)
- Provide concrete examples rather than just abstract concepts
- Include explanatory notes about key principles
- Are formatted in a clear, readable structure
Resources complement tools perfectly. Tools give the LLM the ability to take actions, and resources provide the knowledge needed to take those actions effectively. They work in harmony to create a more capable and reliable system.
The Art of Prompt Engineering
Beyond the individual tool definitions, the MCP server needed an initial prompt. In my code, the initial prompt is defined in the bloodhound_assistant method contained under the @mcp.prompt(). This prompt started simple; however,as I grew the functionality of the project, I found that I needed to continue expanding it to get the best results.

What surprised me was how the LLM’s response varied greatly when I made subtle changes to the prompt. I could shift the output of the LLM from a defender’s perspective to an attacker’s perspective with the modification of a few words. I feel as though users can modify my initial prompt to tailor the MCP with their exact goals in mind.
Bringing It All Together
The final step was connecting the MCP to Claude Desktop. This required creating a simple configuration file that told Claude where to find the MCP server and how to run it:
{
  "name": "bloodhound_mcp",
  "command": ["python", "main.py"],
  "directory": "/path/to/bloodhound_mcp",
  "isProduction": true
}
When properly configured and after restarting Claude, a small hammer icon appears in the interface to show that the MCP is connected. This moment was particularly satisfying: seeing that icon meant the MCP server was ready to help analyze BloodHound data. In the most recent update of the Claude Desktop application, the hammer icon is removed and MCPs moved to the “Search and Tools” button.


The first time I asked Claude about my BloodHound domains and got a comprehensive response with accurate information, I knew the approach was working. From identifying Domain Admins to mapping out attack paths, Claude could now leverage the full power of BloodHound’s data model through natural language conversation.
What’s remarkable about this approach is its extensibility. When BloodHound adds new features or API endpoints, I can simply add corresponding tool functions to the MCP server without changing the underlying architecture. The prompt can be refined over time to improve Claude’s understanding of security concepts and we can add new tools to expand its capabilities.
This flexible foundation allows the MCP to grow from basic entity information retrieval to supporting complex graph operations, AD Certificate Services (AD CS )analysis, and custom Cypher queries – all while maintaining a simple, conversational interface that security teams can use without becoming BloodHound experts themselves.
AI Generated Cypher Query Challenge
Hands-down the most frustrating and difficult challenge encountered in this project had very little to do with the BloodHound API nor the MCP Server implementation, but instead was the very nature of how LLMs function.
To put it simply, LLMs are trained on large amounts of data up to a certain point in time. Generally, this means that they don’t have live access to up-to-date data and can even weight out-of-date information higher due to the large amount of its historical data. This created a massive problem with cypher queries.
As BloodHound grew, its cypher queries changed as well, particularly in the move to the current docker deployment of Bloodhound. I have seen countless projects that convert previous cypher queries to the new ones, and I have also become confused at times. When I connected Claude to BloodHound and asked Claude about cypher queries, they would all fail because Claude defaulted to the old cypher query.
An example of what I was seeing when asking about Domain Admins:
Claude would generate:
MATCH p=(u:User)-[r:MemberOf*1..]->(g:Group {name:"DOMAIN ADMINS@DOMAIN.COM"})
RETURN p
But the current syntax needed:
MATCH p=(u:User)-[r:MemberOf*1..]->(g:Group)
WHERE g.objectid ENDS WITH "-512"
RETURN p
Not only were there syntax differences, but the actual query approach had changed. The newer query is more robust, using the SID suffix pattern for Domain Admins rather than relying on a specific group name format.
The Solution: a Reference Library for Claude
After struggling with this issue, I dug into the FastMCP documentation and found that it offers a feature called “Resources”. As discussed above, these are reference materials provided to the LLM during the conversation.
Instead of trying to teach Claude all the current syntax or (shiver) train my own model, I could give it a reference library of current; working queries that it could consult before generating its own queries. Essentially, I gave Claude its own little cheatsheet.
I created two main resources:
- Example working queries
- Query patterns to use as templates
Each resource focuses on a specific aspect of query construction, examples for guidance and patterns for structure. Together they assist Claude in creating its own queries and ensuring they are up to date.
The beauty of this approach is that I didn’t need to “fix” Claude’s knowledge. Instead, I simply provided it with additional context that it could incorporate into its reasoning.
Technical Implementation: The Query Runtime
Having a reference library is great, but I also needed a way for Claude to actually execute queries and learn from the results. This led to the implementation of the run_cypher_query tool.

This tool serves as both an execution engine and a feedback mechanism. When the LLM generates a query, it can immediately execute it against the database and see if it works. If the query fails, Claude gets error information that it can use to refine its approach.
It’s pretty cool to challenge the LLM to give you a cypher query to find something and watch it try and try until it gets it right (just keep in mind that it burns a lot of tokens).
Technical Implementation: Claude Becomes a Team Member
As I started to have Claude generate working queries, I realized that this was the opportune time to onboard it to the team, per se. I next set out to give Claude the capability to save its queries into BloodHound (partially because I was tired of burning so many tokens). To do this, I added additional tools that allowed the LLM to add, update, and remove cypher queries to the BloodHound server.
The Results: From Frustration to Great Team Member
The transformation was remarkable. With these resources and tools in place, Claude went from generating queries that consistently failed to producing sophisticated and functional queries that extracted valuable insights from the BloodHound database.
What I found most fascinating was watching Claude’s learning process through a conversation. It would often start with a simple query, note the results or errors, and refine it to extract more relevant information. The process Claude used to learn the query language was similar to my own!
This capability transforms the MCP from a simple query interface into a genuine security analysis assistant that can explore complex attack paths, identify security risks, and provide actionable recommendations all while giving you the tools inside of BloodHound for later use.
Conclusion: The BloodHound MCP
When I started this project, I had two goals in mind:
- Learn About MCPs
- Create something that will democratize the use of BloodHound
Looking back at my progress, I am pleased with the current state but not entirely satisfied (nor will I ever be).
The current version of BloodHound MCP gives an LLM access to a large portion of the BloodHound CE API including:
- Domains
- Users
- Groups
- Computers
- GPOs
- Shortest Path
- Edges
- ADCS
- Cypher
- Azure (covered in Cypher)
To be honest, this is a lot more than what I had originally intended; however, as I continued to work on it, I could see the value in including as much as I can. Although I achieved my intended vision, I now want to continue to add onto this project as much as possible. There is some functionality that is locked behind BloodHound Enterprise that I am hoping to get access to soon as well some other features that I hinted at during this post, but will have to wait and investigate further.
Building this MCP has given me a much deeper understanding of both BloodHound’s internals and the potential of MCPs. The combination of a powerful security tool with a conversational AI interface creates something greater than the sum of its parts: a security assistant that can make advanced AD security assessments accessible to everyone on the team.
For security professionals who have struggled with BloodHound’s learning curve, or those who simply want to work more efficiently, this MCP opens new possibilities. It demonstrates how AI assistants can serve as practical tools for security teams, especially those without dedicated AD specialists. By enabling natural language interaction with complex security data, the BloodHound MCP helps bridge the expertise gap while providing actionable insights.
The code for this project is available on GitHub at https://github.com/mwnickerson/bloodhound_mcp, and I welcome contributions and feedback. Whether you’re interested in extending the capabilities to include additional BloodHound features, improving the prompt engineering aspects, or reporting issues, there is ample room for collaboration.
For security teams looking to make the most of their BloodHound data without becoming Cypher query experts, this MCP provides a new way to interact with and understand their AD security posture. It’s not just about making security analysis easier; it’s about making it more accessible, more insightful, and ultimately more effective in keeping organizations secure.
Please keep in mind that in its current state, the MCP server is just for use with Claude Desktop, implying that any data contained within the BloodHound host that the MCP accesses is sent to Anthropic. Please do not send production data to Anthropic. In upcoming releases, I am planning to include support for Local LLMs.