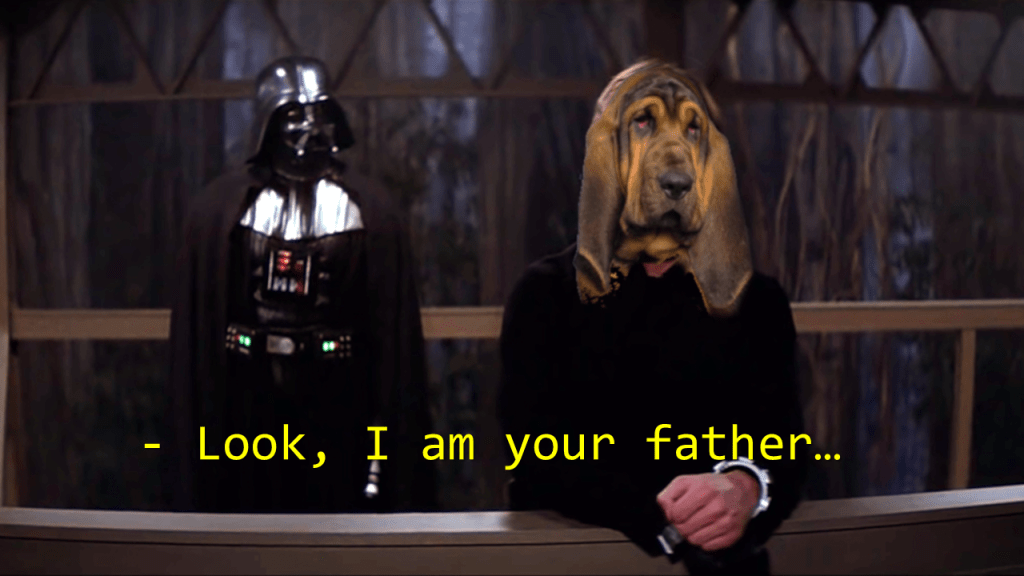
BloodHound Operator: The Six Degrees Of Master Yoda
A Technical Dive Into BloodHound OpenGraph With BloodHound Operator & Master Yoda…
TL;DR: The latest version of BloodHound introduces BloodHound OpenGraph. This new feature allows for ingestion of any type of custom data into BloodHound. This post describes the OpenGraph functionality and demonstrates the new PowerShell cmdlets added to the BloodHound Operator module to work with the OpenGraph feature. PowerShell code to ingest StarWars data can be found at the end of this post.

Intro
Heard the news?! The BloodHound team released a new feature called OpenGraph and it is absolutely wild: You can now ingest any type of data into BloodHound – and when I say any, it really means any! To showcase this feature and the OpenGraph PowerShell cmdlets newly added to the BloodHound Operator module, I will demo how to ingest data from the StarWars wiki REST API.
A link to the script used to fetch the StarWars data will be provided further down this post if you want to play along while reading.
This is what you should get at the end: A BloodHound Graph of the StarWars universe.
BloodHound OpenGraph
BloodHound OpenGraph is about adding custom data to BloodHound, so the first thing you’re gonna need is data and a clear picture of how you want to model it in BloodHound (i.e., What becomes a node? What becomes an edge?).
In real life, most of the hard work goes into designing the model. Once you have that well thought on paper, ingesting it will be a breeze. For this post, I’ll assume we have that first part done already, and I will focus on the technical aspects for creating the ingest payload.
If you want to know more about BloodHound data modeling and the thinking process that goes with it, I highly recommend this post by Andy Robbins, followed by that post by Chris Thompson. These should give you all the keys you need before diving into your first custom collector for ingesting whatever you like in BloodHound.
Once you have data (and in order to ingest it into BloodHound), all you have to do is shape it into a specific JSON format. This JSON can then be ingested into BloodHound (via the data upload page or the REST API) just like regular AD or Azure data.
Before we look at StarWars data, and in order to understand the OpenGraph format, let’s first create an ingest payload for the following simple graph:

In this very basic graph, we have two nodes (Alice and Bob), and one edge where “Bob Knows Alice”.
OpenGraph Node Format
The following JSON format must be used for a node object:
{
  "id": "ObjectIDGoesHere",
  "kinds": [
    "PrimaryKindGoesHere","OtherKindIfAny"
  ],
  "properties": {
    "name": "NameGoesHere",
    "objectid": "ObjectIDGoesHere",
  }
}
And the following specs must be respected for the JSON to be valid at ingest:
- Node must have an id and kinds attribute
- Node must have a minimum of 1 label (a.k.a., kind or node type)
- Nodes can have a maximum of 3 labels
- The first label in the kinds attribute (also called “primary kind”) determines what icon the UI displays
- Node id attribute must be of same value as objectid in properties
- Node id/objectid must be unique across node types
- Properties included in the properties attribute must be of type string, integer, boolean, or an array of a single of these basic types
The JSON for our Bob&Alice nodes would look something like this:
[{
  "id": "123",
  "kinds": [
    "Person"
  ],
  "properties": {
    "name": "BOB",
    "objectid": "123",
    "age": 21
  }
},
{
  "id": "321",
  "kinds": [
    "Person"
  ],
  "properties": {
    "name": "ALICE",
    "objectid": "321",
    "age": 23
  }
}]
OpenGraph Edge Format
The following format must be used for an edge object:
{
  "kind": "EdgeTypeGoesHere",
  "start": {
    "value": "StartObjectIDGoesHere"
  },
  "end": {
    "value": "EndObjectIDGoesHere"
  },
  "properties": {}
}
The following rules have to be respected for the JSON to be valid:
- Edges must have a start and end(node) attribute in valid format value / [match_by] / [kind]
- Edges must have a kind (=edge type) and can have only one
- Edges can have properties
- Edges can match start node and end node by id or name independently at ingest (defaults to id if not specified)
- If no node match on edge ingest: the unmatched node will be created and show a question mark icon until the kind is known (so you can ingest edges first and nodes later, or the opposite; it shouldn’t matter)
- When matching by name: Edge will not be created in case of multiple node match.
In our Bob&Alice example, this is what our ‘Bob Knows Alice’ edge would look like with an (implicit) id match:
{
  "kind": "Knows",
  "start": {
    "value": "123"
  },
  "end": {
    "value": "321"
  },
  "properties": {}
}
And as an example, this is what it would look like with a name match for the target Alice:
{
  "kind": "Knows",
  "start": {
    "value": "123"
  },
  "end": {
    "value": "ALICE",
    "match_by": "name"
  },
  "properties": {}
}
OpenGraph Ingest Payload
Now that we have our nodes and edges properly formatted, we can create the final payload for ingest. The basic structure is as follows:
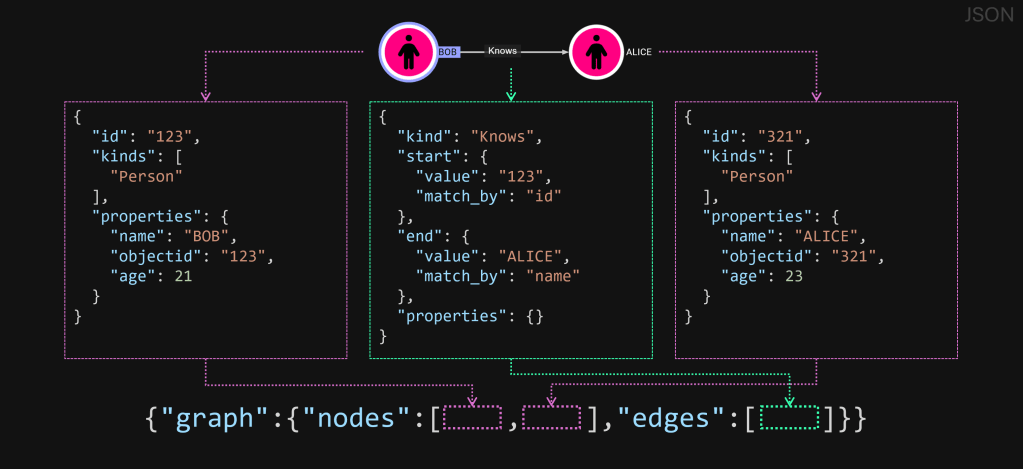
Our final payload for the Bob&Alice example now looks like this:
{
  "graph": {
    "nodes": [
      {
        "id": "123",
        "kinds": [
          "Person"
        ],
        "properties": {
          "name": "BOB",
          "objectid": "123",
          "age": 21
        }
      },
      {
        "id": "321",
        "kinds": [
          "Person"
        ],
        "properties": {
          "name": "ALICE",
          "objectid": "321",
          "age": 23
        }
      }
    ],
    "edges": [
      {
        "kind": "Knows",
        "start": {
          "value": "123"
        },
        "end": {
          "value": "321"
        },
        "properties": {}
      }
    ]
  }
}
OpenGraph Ingest
Ingesting OpenGraph data is no different than ingesting the regular AD or Azure data. This can be done via the UI (or the API) in the exact same way you previously used.
OpenGraph Node Icons
Last but not least, we want our custom nodes to look just like regular nodes, with colors and icons. For this, we can POST custom node definitions to a new endpoint /api/v2/custom-nodes with the following JSON body:
{
  "custom_types": {
    "PrimaryKindGoesHere": {
      "icon": {
        "name": "IconNameGoesHere",
        "type": "font-awesome",
        "color": "HexColorGoesHere"
      }
    }
  }
}
Deleting OpenGraph data
At some stage in the process, you might want to delete your custom data. To do so, you can go to the Database Management tab under the Administration page, and select the data you want to delete. Enter the phrase “Delete this environment data” to confirm the action, and say good-bye to Bob and Alice.
OpenGraph with BloodHound Operator
Now that we have seen the basics of creating an OpenGraph ingest payload, let’s see how to do all this from the command line with BloodHound Operator. In this second part, we will be building a custom BloodHound collector for some StarWars data.
Check out this page if you need instructions on getting started with the BloodHound Operator module.
Building a custom collector for BloodHound involves three basics steps:
- Get data from somewhere
- Format objects according to data model (nodes and edges)
- Output JSON payload for ingest
For step 1, I’ll be using this PowerShell script to collect StarWars data from the starwars API.
With this script, we can fetch all the data in one go with the following command:
$SW = Get-StarWarsAnd this is what lists of objects we got in return:
films
people
planets
species
starships
vehicles
We can check what a film object looks like with the following command:
$SW.films[0]This should return the following object:
title : A_New_Hope
episode_id : 4
opening_crawl : It is a period of civil war.
[...]
and restore freedom to the galaxy....
director : George Lucas
producer : Gary Kurtz, Rick McCallum
release_date : 1977-05-25
characters : {https://swapi.dev/api/people/1/, https://swapi.dev/api/people/2/, https://swapi.dev/api/people/3/, https://swapi.dev/api/people/4/…}
planets : {https://swapi.dev/api/planets/1/, https://swapi.dev/api/planets/2/, https://swapi.dev/api/planets/3/}
starships : {https://swapi.dev/api/starships/2/, https://swapi.dev/api/starships/3/, https://swapi.dev/api/starships/5/, https://swapi.dev/api/starships/9/…}
vehicles : {https://swapi.dev/api/vehicles/4/, https://swapi.dev/api/vehicles/6/, https://swapi.dev/api/vehicles/7/, https://swapi.dev/api/vehicles/8/}
species : {https://swapi.dev/api/species/1/, https://swapi.dev/api/species/2/, https://swapi.dev/api/species/3/, https://swapi.dev/api/species/4/…}
created : 12/10/2014 2:23:31 PM
edited : 12/20/2014 7:49:45 PM
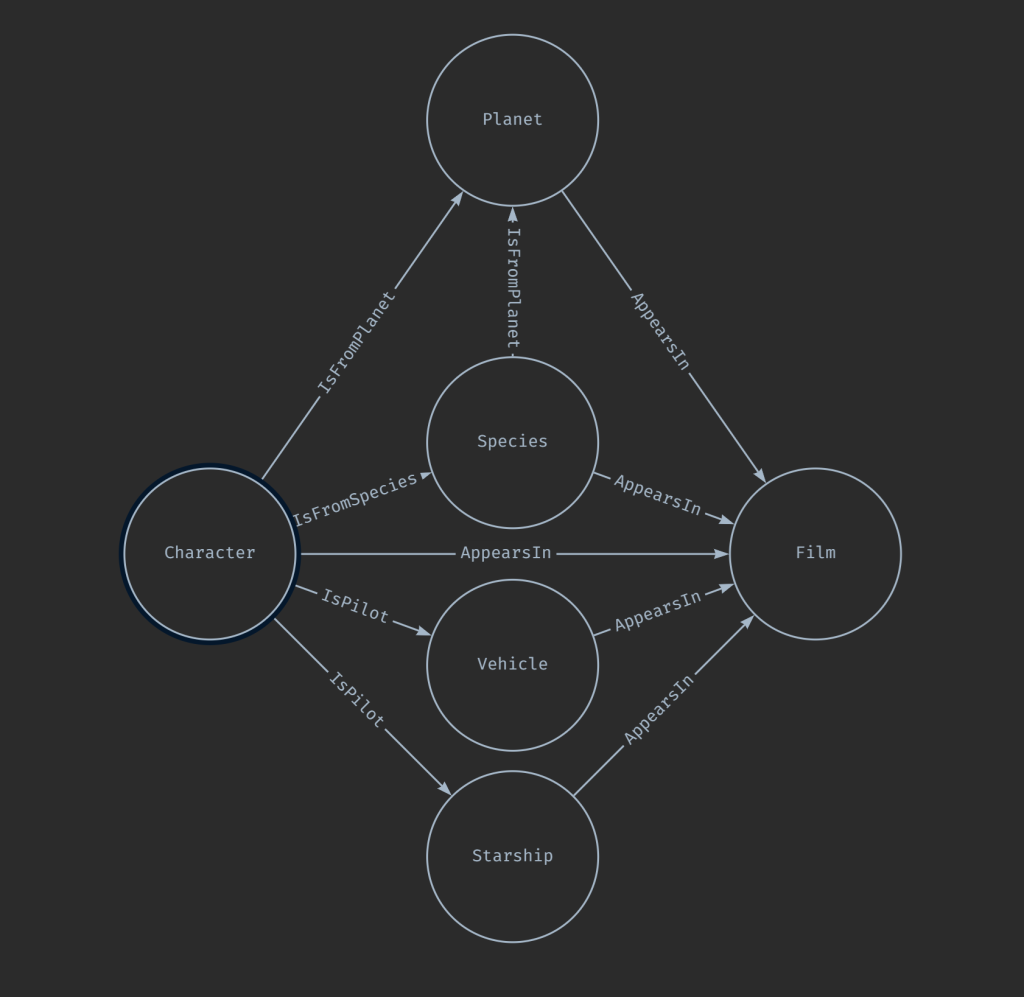
url : https://swapi.dev/api/films/1/if we inspect our data further, we see that for each type of objects, some of the properties of the nodes are actually hyperlinks to other type of objects in our dataset. We will be using this later to build the edges of our graph.
For now, using https://arrows.app , I created a quick overview of our data model (in the shape of Admiral Ackbar):
And, as any true security researcher would, I also made a meme to go with it.

Defining Custom Node Types
Now that we know what type of objects we have, let’s take care of our custom node definitions.
Let’s say we want to do the following icons and colors for our StarWars node types:
| NodeType | Icon | Color |
| Film | film | #123456 |
| Character | person | #FE9876 |
| Planet | earth-americe | #FE9876 |
| Species | people-group | #777777 |
| Starship | rocket | #871256 |
| Vehicle | truck-monster | #567123 |
Note: Icon can be any of the font-awesome free/non-branded solid icon names (without “fa-” prefix).
Color must be specified in HEX format
BloodHound Operator includes four new cmdlets to work with custom node definitions:
# List Custom Node Defintion
Get-BHOpenGraphNodeType

# Create Custom Node Definition
New-BHOpenGraphNodeType

# Update Custom Node Definition
Set-BHOpenGraphNodeType

# Delete Custom Node Definition
Remove-BHOpenGraphNodeType
To create the node definitions, we will use the New-BHOpenGraphNodeType.
The cmdlet syntax is as follows:
New-BHOpenGraphNodeType [-NodeType] <string> [[-Icon] <string>] [[-Color] <string>]The example for the first node type would look like this:
New-BHOpenGraphNodeType -NodeType Film -Icon film -Color '#123456'Under the hood, this is the API call being made:
POST /api/v2/custom-nodesAnd this would be the body for this first example:
{
  "custom_types": {
    "Film": {
      "icon": {
        "name": "film",
        "type": "font-awesome",
        "color": "#123456"
      }
    }
  }
}
We can repeat the process for each of the other node types we want to create:
New-BHOpenGraphNodeType -NodeType Character -Icon person -color "#FE9876"
New-BHOpenGraphNodeType -NodeType Planet -Icon earth-americas -color "#FE9876"
New-BHOpenGraphNodeType -NodeType Species -Icon people-group -color "#777777"
New-BHOpenGraphNodeType -NodeType Starship -Icon rocket -color "#871256"
New-BHOpenGraphNodeType -NodeType Vehicle -Icon truck-monster  -color "#567123"
To verify our node definitions, we can use the Get-BHOpenGraphNodeType cmdlet:
Get-BHOpenGraphNodeTypeTHis will return a list of all the defined custom node types:
id kindName  config
-- --------  ------
 1 Film      @{icon=}
 2 Character @{icon=}
 3 Planet    @{icon=}
 4 Species   @{icon=}
 5 Starship  @{icon=}
 6 Vehicle   @{icon=}
To check the config for a specific node type, you can do the following:
Get-BHOpenGraphNodeType Film -ConfigThis will return the following:
type         name color
----         ---- -----
font-awesome film #123456
If needed, use Set-BHOpenGraphNodeType or Remove-BHOpenGraphNodeType to update or delete a custom node definition.
(See Get-Help <cmdletname> for syntax details and examples)
Formatting Custom Data
Now that we know what our data looks like when the API returns it, we need to massage it into the OpenGraph format. We added the following cmdlets to the module to generate the OpenGraph payload:
# Convert Objects to BH OpenGraph node format
ConvertTo-BHOpenGraphNode

# Convert Objects to BH OpenGraph node format
ConvertTo-BHOpenGraphEdge

# Create JSON OpenGraph ingest payload
New-BHOpenGraphIngestPayload
ConvertTo-BHOpenGraphNode
This cmdlet can be used to format random objects into the OpenGraph node format.
Syntax is as follows:
ConvertTo-BHOpenGraphNode [-NodeType] <string> [-InputObject] <psobject[]> [[-ExtraType] <string[]>] [-ObjectIDfrom <string>] [-NameFrom <string>] [-SelectProps <string[]>] [-ExcludeProps <string[]>] [-RandomID]For our film objects, we would do the following:
$SW.films | ConvertTo-BHOpenGraphNode -NodeType Film -NameFrom title -ObjectIDfrom url -ExtraType StarWars -ExcludeProps title,url,created,edited,characters,planets,starships,vehicles,speciesWe use the -NodeType switch to set the primary kind of node and the -ExtraType for any extra label we would want to add. The -NameFrom and -ObjectIDFrom switches to rename those selected fields. Finally we use -ExcludeProps to remove any property we do not want on our object (including the ones we renamed).
Repeating the same logic, our full node object formatting step would look like this:
# Nodes
$SW_Nodes = $(
    $SW.films     | ToBHOGNode -NodeType Film      -NameFrom title   -ObjectIDfrom url -ExtraType StarWars -ExcludeProps title,url,created,edited,characters,planets,starships,vehicles,species
    $SW.people    | ToBHOGNode -NodeType Character -ObjectIDfrom url -ExtraType StarWars -ExcludeProps url,created,edited,homeworld,films,species,vehicles,starships
    $SW.planets   | ToBHOGNode -NodeType Planet    -ObjectIDfrom url -ExtraType StarWars -ExcludeProps url,created,edited,residents,films
    $SW.species   | ToBHOGNode -NodeType Species   -ObjectIDfrom url -ExtraType StarWars -ExcludeProps url,created,edited,homeworld,people,films
    $SW.starships | ToBHOGNode -NodeType Starship  -ObjectIDfrom url -ExtraType StarWars -ExcludeProps url,created,edited,pilots,films
    $SW.vehicles  | ToBHOGNode -NodeType Vehicle   -ObjectIDfrom url -ExtraType StarWars -ExcludeProps url,created,edited,pilots,films
    )
Note: Check Help ConvertTo-BHOpenGraphNode for more examples on how to use this command
Our Nodes are now properly formatted, so let’s take care of the edges.
ConvertTo-BHOpenGraphEdge
This cmdlet is used to create edges. Syntax is as follows:
ConvertTo-BHOpenGraphEdge [-EdgeType] <string> [[-Start] <string>] [[-End] <string>] [[-SelectProps] <string[]>] -InputObject <psobject[]> [-ExcludeProps <string[]>] [-SourceByName] [-SourceKind <string>] [-TargetByName] [-TargetKind <string>] [-AllowOrphans]Looking at our film objects, if we want to create the edge to Character objects, we can do something like this:
# (Character)-[AppearsIn]->(Film)
Foreach($Film in ($SW.Films|? characters)){Foreach($Obj in $Film.characters){[PSCustomObject]@{source=$Obj;Edge='AppearsIn';target=$Film.url}| ToBHOGEdge * -ExcludeProps *}}
This time, we first use PowerShell to build a simple list of objects with a source, edge, and target property. We then pipe that list into the ConvertTo-BHOpenGraphEdge cmdlet with a * to indicate the objects hold what we need.
Repeating the same logic for the other objects, our commands to create all our edges looks like this:
$SW_Edges = $(
    # Film
    Foreach($Film in ($SW.Films|? characters)){Foreach($Obj in $Film.characters){[PSCustomObject]@{source=$Obj;Edge='AppearsIn';target=$Film.url}| ToBHOGEdge * -ExcludeProps *}}
    Foreach($Film in ($SW.Films|? planets)){Foreach($Obj in $Film.planets){[PSCustomObject]@{source=$Obj;Edge='AppearsIn';target=$Film.url}| ToBHOGEdge * -ExcludeProps *}}
    Foreach($Film in ($SW.Films|? starships)){Foreach($Obj in $Film.starships){[PSCustomObject]@{source=$Obj;Edge='AppearsIn';target=$Film.url}| ToBHOGEdge * -ExcludeProps *}}
    Foreach($Film in ($SW.Films|? vehicles)){Foreach($Obj in $Film.vehicles){[PSCustomObject]@{source=$Obj;Edge='AppearsIn';target=$Film.url}| ToBHOGEdge * -ExcludeProps *}}
    Foreach($Film in ($SW.Films|? Species)){Foreach($Obj in $Film.species){[PSCustomObject]@{source=$Obj;Edge='AppearsIn';target=$Film.url}| ToBHOGEdge * -ExcludeProps *}}
    # People
    Foreach($Char in ($SW.people|? homeworld)){Foreach($Obj in ($Char.Homeworld)){[PSCustomObject]@{source=$Char.url;Edge='IsFromPlanet';target=$Obj}| ToBHOGEdge * -ExcludeProps *}}
    Foreach($Char in ($SW.people|? species)){Foreach($Obj in ($Char.species)){[PSCustomObject]@{source=$Char.url;Edge='IsFromSpecies';target=$Obj}| ToBHOGEdge * -ExcludeProps *}}
    Foreach($Char in ($SW.people|? vehicles)){Foreach($Obj in ($Char.vehicles)){[PSCustomObject]@{source=$Char.url;Edge='IsPilot';target=$Obj}| ToBHOGEdge * -ExcludeProps *}}
    Foreach($Char in ($SW.people|? starships)){Foreach($Obj in ($Char.starships)){[PSCustomObject]@{source=$Char.url;Edge='IsPilot';target=$Obj}| ToBHOGEdge * -ExcludeProps *}}
    # Species
    Foreach($Spec in ($SW.species|? homeworld)){Foreach($Obj in ($Spec.Homeworld)){[PSCustomObject]@{source=$Spec.url;Edge='IsFromPlanet';target=$Obj}| ToBHOGEdge * -ExcludeProps *}}
)Note: Check Help ConvertTo-BHOpenGraphEdge for more examples on how to use this command
Now that we have our nodes and edges in the OpenGraph format, let’s generate the JSON payload.
New-BHOpenGraphIngestPayload
This cmdlet is used to generate the JSON OpenGraph payload for ingest.
Syntax is as follows:
New-BHOpenGraphIngestPayload [-NodeList <psobject[]>] [-EdgeList <psobject[]>] [-NoJSON] [-Compress] [-CollectorName <string>] [-CollectorVersion <string>] [-CollectionMethod <string[]>]Using the nodes and edges we formatted in the previous steps, we can generate our payload with the following command:
$SW_Payload = New-BHOGPayload -NodeList $SW_Nodes -EdgeList $SW_EdgesNote: Check Help New-BHOpenGraphIngestPayload for more examples on how to run this command
You can pipe that variable to the Out-file command if you want to save it to a file for later ingestion via the UI or ingest it directly via the API.
Ingesting Custom Data
To ingest our data on the fly with BloodHound Operator, we can use the following command:$SW_Payload | BHDataUploadJSON
Give it a minute and your data should be ingested.
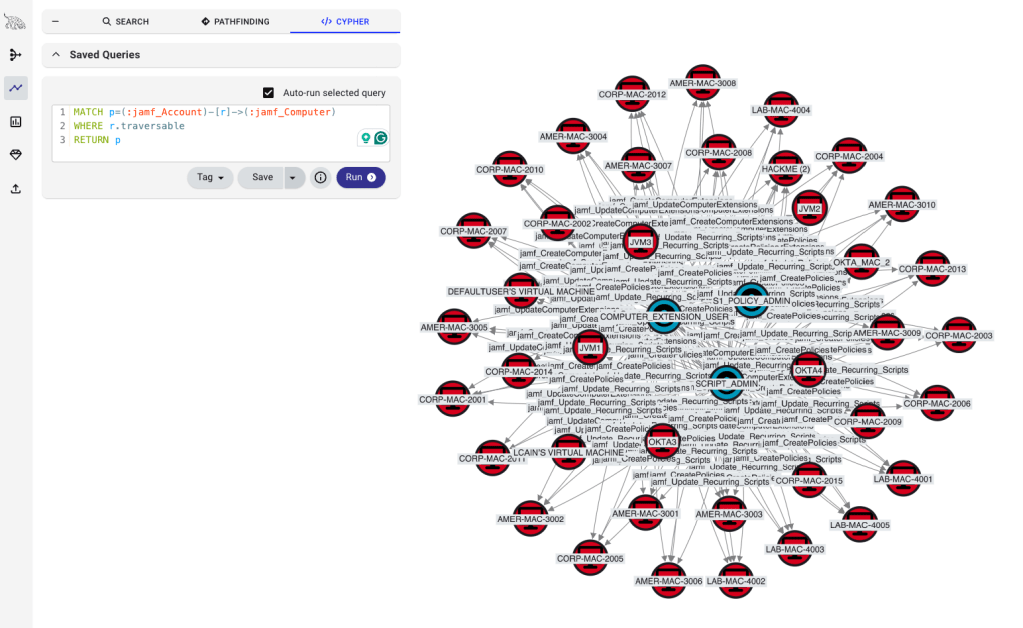
For this initial release, OpenGraph data can only be queried via the Cypher tab. Things will change in the future, but for now, you can’t use the Search or Pathfinding tabs to interact with OpenGraph data.
A good approach for OpenGraph would be to save custom queries relating to your custom data directly in BloodHound as custom searches. You could even have some degree of post-processing happening if you save mutation queries in your custom searches and invoke them once ingestion is done. That might be a bit too far out for this post, so I’ll just leave the idea here, but you could totally do all that from the command line with BloodHound Operator.
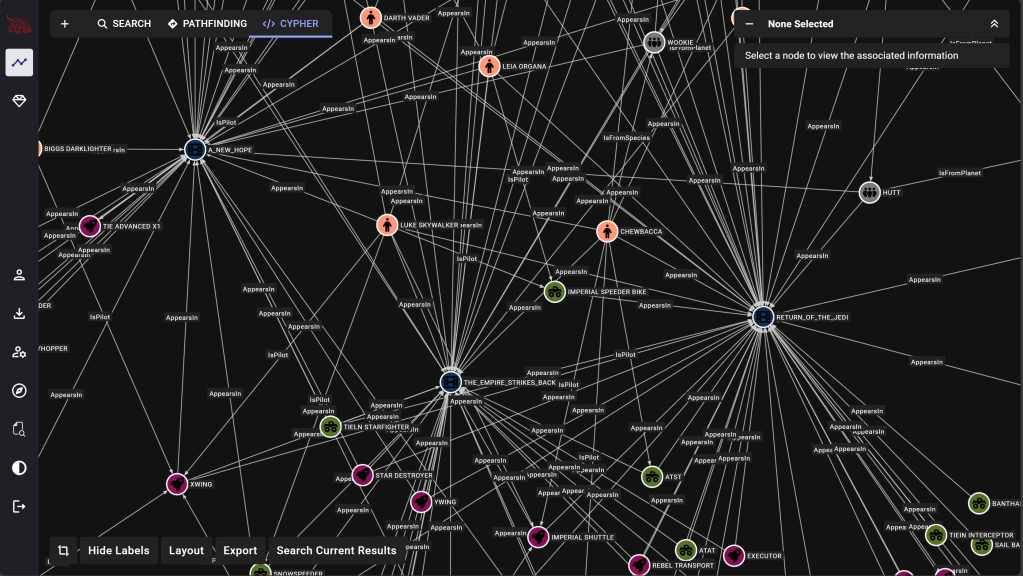
For now, if you simply go to the CYPHER search tab on the EXPLORE page of the UI, and run the following:
MATCH p=(:StarWars)-->(:StarWars) RETURN pYou will be presented with a BloodHound graph of the Star Wars galaxy.
And if you want to know everything about Master Yoda, you can run the following query:
MATCH p=(x:Character)-[*1..]->(y:StarWars)
WHERE x.name CONTAINS 'YODA'
RETURN p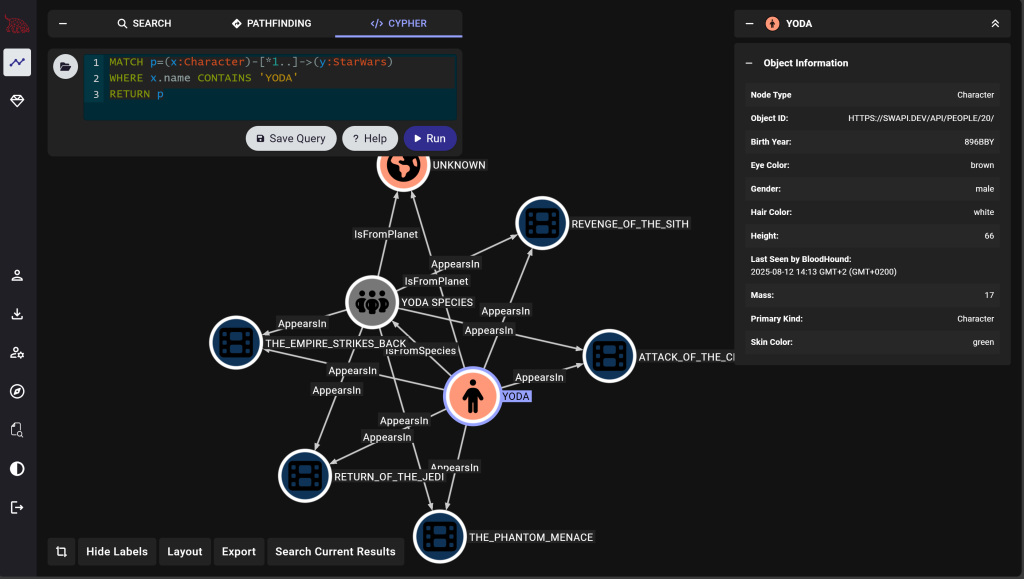
From OpenGraph, the Force you feel…
Outro
That’s it. We’ve ingested Star Wars data in BloodHound using OpenGraph and BloodHound Operator. Hope you found it useful.
You now know most of what there is to know about the new BloodHound OpenGraph ingest format, and the associated BloodHound Operator PowerShell cmdlets.
The next step is to build a collector for whatever you want. Truly wild.
If you do build anything cool with OpenGraph and want to share it with the community, let us know via the BloodHound Slack and we will highlight it on the OpenGraph library page.
Feel free to ping me on that same Slack if you have any questions or feedback about BloodHound Operator or the content of this post.
Release the Hounds! Arrooo!
@SadProcessor
Full Script
## Bloodhound OpenGraph - BHOperator vs. StarWars ##
# https://github.com/SadProcessor/BloodHoundOperator
# Requires Get-StarWars:
# https://gist.github.com/SadProcessor/43dde2ca423064b3fc481093e78c5d84

# Collect StarWars Data
$SW = Get-StarWars

# Create Icon Definitions
New-BHOGtype -NodeType Film      -Icon film           -color "#123456"
New-BHOGtype -NodeType Character -Icon person         -color "#FE9876"
New-BHOGtype -NodeType Planet    -Icon earth-americas -color "#FE9876"
New-BHOGtype -NodeType Species   -Icon people-group   -color "#777777"
New-BHOGtype -NodeType Starship  -Icon rocket         -color "#871256"
New-BHOGtype -NodeType Vehicle   -Icon truck-monster  -color "#567123"

# Format Nodes
$SW_Nodes = $(
    $SW.films     | ToBHOGNode -NodeType Film      -NameFrom title   -ObjectIDfrom url -ExtraType StarWars -ExcludeProps title,url,created,edited,characters,planets,starships,vehicles,species
    $SW.people    | ToBHOGNode -NodeType Character -ObjectIDfrom url -ExtraType StarWars -ExcludeProps url,created,edited,homeworld,films,species,vehicles,starships
    $SW.planets   | ToBHOGNode -NodeType Planet    -ObjectIDfrom url -ExtraType StarWars -ExcludeProps url,created,edited,residents,films
    $SW.species   | ToBHOGNode -NodeType Species   -ObjectIDfrom url -ExtraType StarWars -ExcludeProps url,created,edited,homeworld,people,films
    $SW.starships | ToBHOGNode -NodeType Starship  -ObjectIDfrom url -ExtraType StarWars -ExcludeProps url,created,edited,pilots,films
    $SW.vehicles  | ToBHOGNode -NodeType Vehicle   -ObjectIDfrom url -ExtraType StarWars -ExcludeProps url,created,edited,pilots,films
    )

# Format Edges
$SW_Edges = $(
    # Films
    Foreach($Film in ($SW.Films|? characters)){Foreach($Obj in $Film.characters){[PSCustomObject]@{source=$Obj;Edge='AppearsIn';target=$Film.url}| ToBHOGEdge * -ExcludeProps *}}
    Foreach($Film in ($SW.Films|? planets)){Foreach($Obj in $Film.planets){[PSCustomObject]@{source=$Obj;Edge='AppearsIn';target=$Film.url}| ToBHOGEdge * -ExcludeProps *}}
    Foreach($Film in ($SW.Films|? starships)){Foreach($Obj in $Film.starships){[PSCustomObject]@{source=$Obj;Edge='AppearsIn';target=$Film.url}| ToBHOGEdge * -ExcludeProps *}}
    Foreach($Film in ($SW.Films|? vehicles)){Foreach($Obj in $Film.vehicles){[PSCustomObject]@{source=$Obj;Edge='AppearsIn';target=$Film.url}| ToBHOGEdge * -ExcludeProps *}}
    Foreach($Film in ($SW.Films|? Species)){Foreach($Obj in $Film.species){[PSCustomObject]@{source=$Obj;Edge='AppearsIn';target=$Film.url}| ToBHOGEdge * -ExcludeProps *}}
    # People
    Foreach($Char in ($SW.people|? homeworld)){Foreach($Obj in ($Char.Homeworld)){[PSCustomObject]@{source=$Char.url;Edge='IsFromPlanet';target=$Obj}| ToBHOGEdge * -ExcludeProps *}}
    Foreach($Char in ($SW.people|? species)){Foreach($Obj in ($Char.species)){[PSCustomObject]@{source=$Char.url;Edge='IsFromSpecies';target=$Obj}| ToBHOGEdge * -ExcludeProps *}}
    Foreach($Char in ($SW.people|? vehicles)){Foreach($Obj in ($Char.vehicles)){[PSCustomObject]@{source=$Char.url;Edge='IsPilot';target=$Obj}| ToBHOGEdge * -ExcludeProps *}}
    Foreach($Char in ($SW.people|? starships)){Foreach($Obj in ($Char.starships)){[PSCustomObject]@{source=$Char.url;Edge='IsPilot';target=$Obj}| ToBHOGEdge * -ExcludeProps *}}
    # Species
    Foreach($Spec in ($SW.species|? homeworld)){Foreach($Obj in ($Spec.Homeworld)){[PSCustomObject]@{source=$Spec.url;Edge='IsFromPlanet';target=$Obj}| ToBHOGEdge * -ExcludeProps *}}
    )
# Generate Ingest Payload
$SW_Payload = New-BHOGPayload -NodeList $SW_Nodes -EdgeList $SW_Edges

# Ingest data
$SW_Payload | BHDataUploadJSON

#EOFNote: The following meme was rejected during peer review and is therefore not included in this blogpost.