Nemesis 2.2
TL;DR: Nemesis 2.2 introduces a number of powerful new features focusing on large container processing, data processing agents, enhanced DPAPI support, and a host of performance improvements.
It’s been several months since we released Nemesis 2.0: our ground-up rewrite of the Nemesis file enrichment project. Since then, @tifkin_ and I have worked hard on another substantial development sprint, culminating in the recent release of Nemesis 2.2. There are more additions, changes, and fixes than we have time to realistically cover here, but we wanted to highlight some of the most important updates we implemented over the last few months. As always, our CHANGELOG.md has more granular details.
One of the meta-goals with this development cycle was to build functionality into Nemesis that would make it useful from a defensive perspective. Specifically, if a system is compromised or we get access to exfiltrated data, we want to triage all the data and determine the “risk” it represents, i.e., what kind of data does an attacker have access to and what additional access could the attacker gain using the data (e.g., credentials or lateral movement opportunities). Nemesis 2.2 can help provide answers to that, and it provides collaborative analysis workflows (as a team or with AI) to help with the triage. We want to thank the United Kingdom’s National Cyber Security Centre (NCSC) for helping to fund this development effort that produced all this great new defensive functionality!
While this is actually a surprisingly similar goal as the offensive use case of finding that information in the first place, there are a few operational differences, specifically with scale and acquisition. Most of the new functionality was ultimately built to support this use case, from the performance optimization to DPAPI functionality, reporting to agents (and more that we’ll cover in this post), but most of this new functionality also has offensive applications.
The rest of this post will cover the major Nemesis functionality that we’re particularly excited about!
Large “Container” Processing
An obvious requirement for processing disk images is…getting them submitted and into Nemesis in the first place. Up until now, the main way to interact with Nemesis has been via its REST API to submit files for processing, and then using the web frontend to see processing results or Hasura to query the raw backend data. However, when dealing with disk images that are dozens to hundreds of gigabytes, a normal REST API fails to scale how we need it to.
So Nemesis 2.2 introduces a new way to process large “containers”, i.e., large files that contain other files to be processed (rather than processing the large container file directly itself). These can be traditional things like zips, or forensic filesystem images that can be handled by the Python bindings for the SleuthKit (.dd images, etc.). Instead of submitting these large files directly to the Nemesis API, setting a MOUNTED_CONTAINER_PATH ENV variable to a local path on the host running Nemesis, before starting Nemesis itself, will mount that local folder path into Nemesis. A monitoring loop in the web_api container continuously runs that waits for the file to be “stable” (i.e., that bytes have stopped being written to it for long enough to deem the file complete). This is to support the case where a disk image might be SCP’ed to the MOUNTED_CONTAINER_PATH folder on the Nemesis host.
After the file is stable, Nemesis will start carving out the files from within the container (preserving path information if it can) and will submit each file for processing via Nemesis. Once the container is complete, it’s moved to a ./completed/ subdirectory in the MOUNTED_CONTAINER_PATH.
Anyone who’s used Nemesis before probably has a similar question: without a web API, how do we supply additional metadata about the disk image, like the project name, agent name, or the new source field (the originating hostname). Additionally, we might only want to process specific files from the image, or exclude specific directories (e.g., C:\Windows\*). To account for this, Nemesis will attempt to find a YAML-based config file in the current, or parent folders of the disk image. If there are multiple config files up a nested tree, Nemesis will use the one closest to the hierarchical level of the file. The config has the format:
metadata:

  project: project123

  agent: collector

  source: HOST1

file_filters:

  pattern_type: regex

  include:

    - "^(?:[A-Za-z]://|/)?[Ww]indows/[Ss]ystem32/config/"

  exclude:

    - "^(?:[A-Za-z]://|/)?[Ww]indows/"
The optional file_filters allow you specify which extracted/carved files to include, or not include, for processing.
The logic for inclusion varies based on which patterns are provided:
- No filters: Include everything
- Only include patterns: Only include files matching include patterns (allowlist mode)
- Only exclude patterns: Include everything except files matching exclude patterns (blocklist mode)
- Both include and exclude: Include everything, apply excludes, then re-include matches from include patterns (exception mode)
You can also create sub-directories in the submission folder, for example:
MOUNTED_CONTAINER_PATH  /   settings.yaml

                        /   disk1.dd

                        /   windows /

                                    / settings.yaml

                                    / windows_disk.dd
In this case, the settings.yaml closest to the hierarchy of the file takes precedence. The “windows_disk.dd” will use the settings.yaml in its current folder, but would use the MOUNTED_CONTAINER_PATH/settings.yaml file if one wasn’t present lower down. This lets you create a nested structure with multiple config options depending on where you drop your disk image.
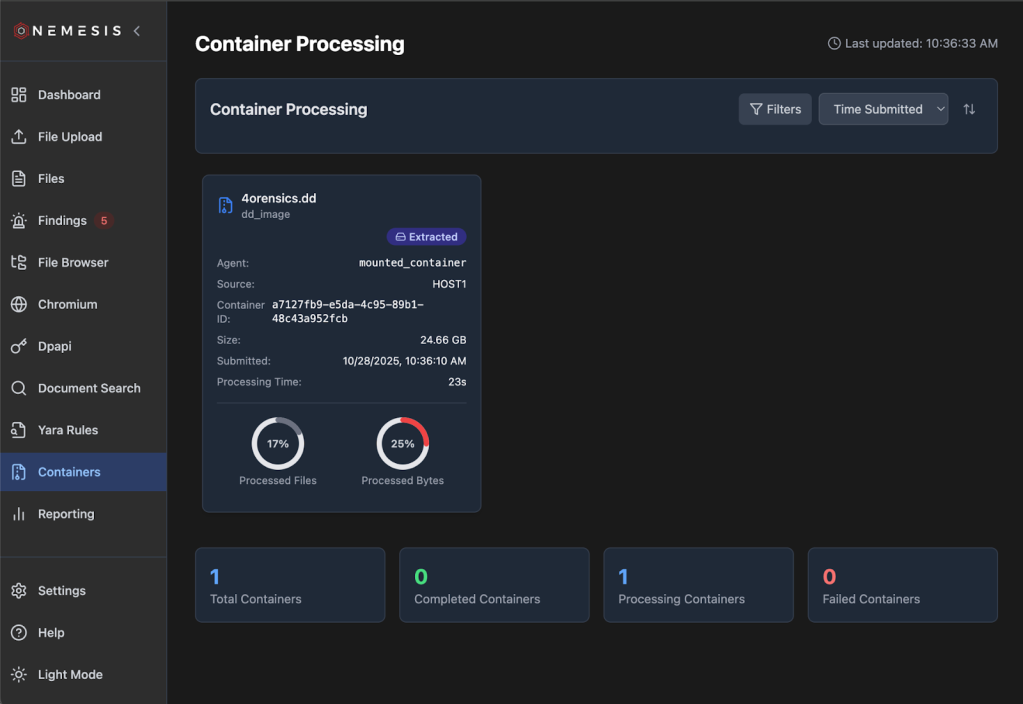
After a container is submitted and starts processing, it will show up in the Containers tab on the left as the container is extracting:
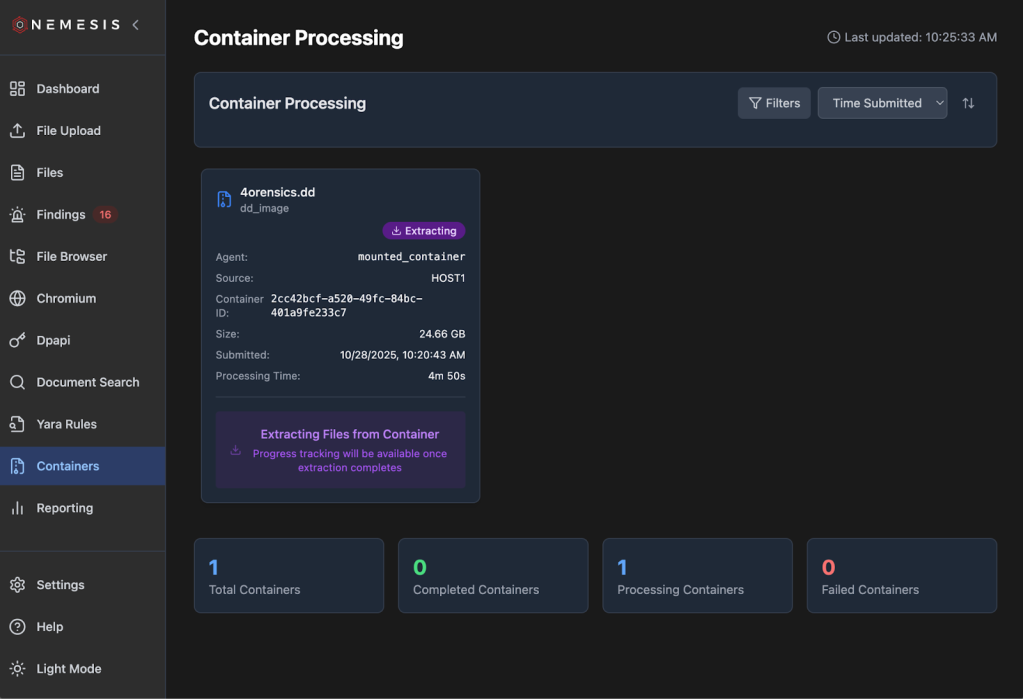
Once the processing code finishes extracting all of the files from the container and submits everything to the Nemesis queue, the container status will be properly updated:
Nemesis container processing is also documented on the Nemesis documentation site.
LLM Agents
With scale comes our old foe: the false positive problem. When dealing with a few hundred to maybe a few thousand files collected from an implant, false positives aren’t a huge issue; we’d rather cast a wider net with a higher false positive rate and manually review things so we don’t miss something interesting. When dealing with hundreds of thousands to millions of files, it can become intractable to manually review thousands of findings and alerts, resulting in alert fatigue.
To help address this, we’ve integrated basic LLM agents into Nemesis as an optional set of functionality. To enable any LLM-powered agents, you first need to configure one or more models in ./infra/litellm/config.yaml. You can use any model provider that LiteLLM supports (more details here) but ensure you at a minimum have a model called “default”. In the agents section of compose.yaml you can adjust the MAX_BUDGET (default $100) and BUDGET_DURATION (default 30d) environment variables as wanted. Then launch the “llm” profile for Nemesis by supplying –llm to the ./tools/nemesis-ctl.sh script. Service keys/tokens for the backend service you’re using should be configured in your local .env file and can be used in ./infra/litellm/config.yaml as the current example demonstrates. With this all configured the Agents tab on the left will dynamically appear:

As you can see in the above screenshot, we also track costs and tokens that all the agents collectively use. If you want more details, the LiteLLM interface route is listed on the Help menu.
Our agents are built with Pydantic AI and contained in the agents container/project, and below are some brief details on each.
Findings Validator
First up is the first agent we built: the findings validator. Nemesis has the ability for operators to “triage” findings as they come in, marking them as false positives, true positives, or “needs review”.
As findings come in, the findings validator will try to assess if a finding fits one of these three categories, taking into account the finding details as well as the originating file path. If the module triages a finding, a small little robot icon will appear next to the triaged value. You can filter these with All Triage Sources / Automated Triage Sources / Human Triage Sources. If a human triages a finding as a different value, that will override the automated triage value. Mousing over the robot icon will give a brief explanation for the decision and a confidence score:

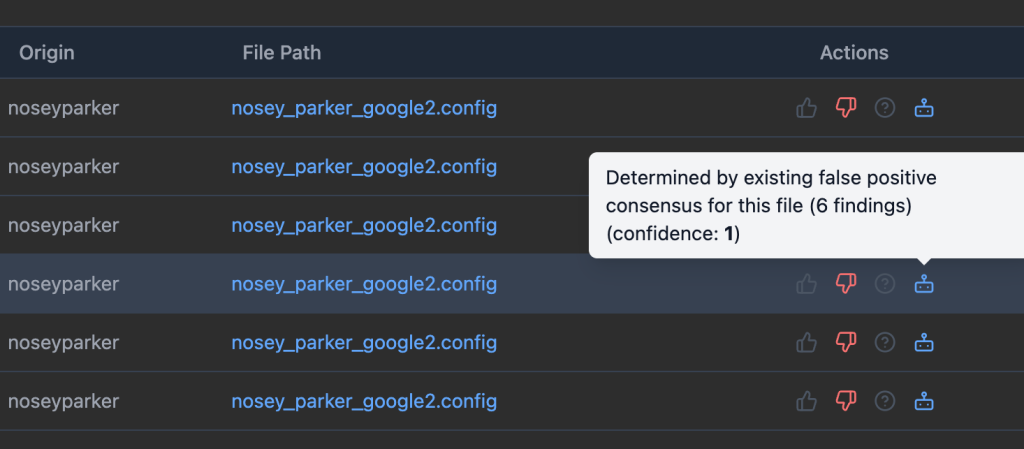
We can sometimes run into cases where many (hundreds+) of findings originate from a single file, due to data formatting colliding with some more permissive regexes. To help address this as best as we could work out, Nemesis uses the concept of “triage consensus”. If a certain number (default of 3 but this can be modified with the TRIAGE_CONSENSUS_THRESHOLD ENV variable for the agents container) of findings in a row are independently triaged as the same value from a file, then all the other findings (from only that file) are marked with the matching value. Findings with this overlap are noted in the mouseover:
The findings validator is the only agent that runs automatically.
Credential Analyzer
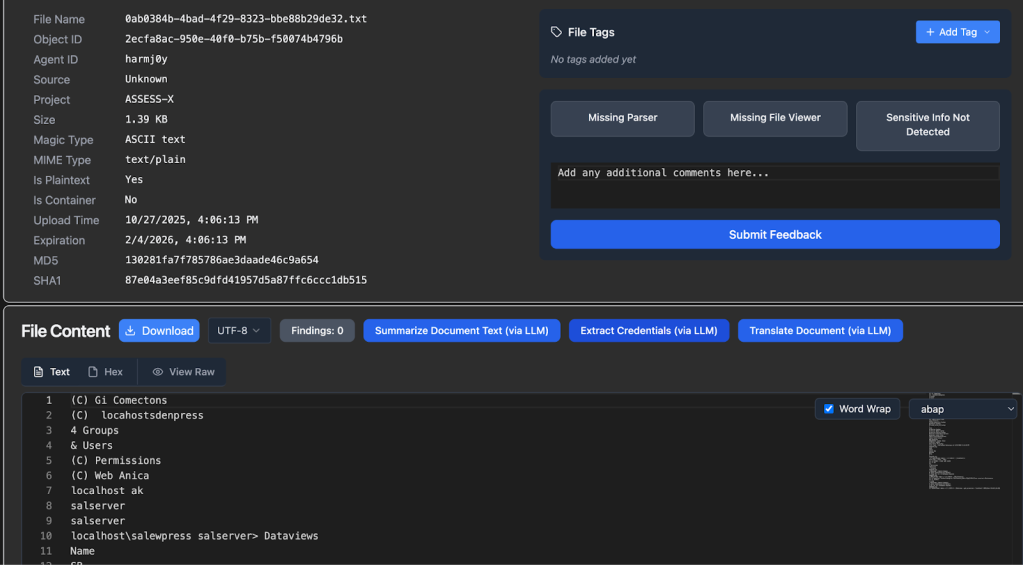
While we run Nosey Parker scans against all plaintext files and files that can have plaintext extracted, generic password/credential detection is a tough problem to solve in the general case. This task is a great application for an LLM. For any plaintext file or file that has extracted plaintext, if LLM functionality is enabled, an Extract Credentials (via LLM) will appear:
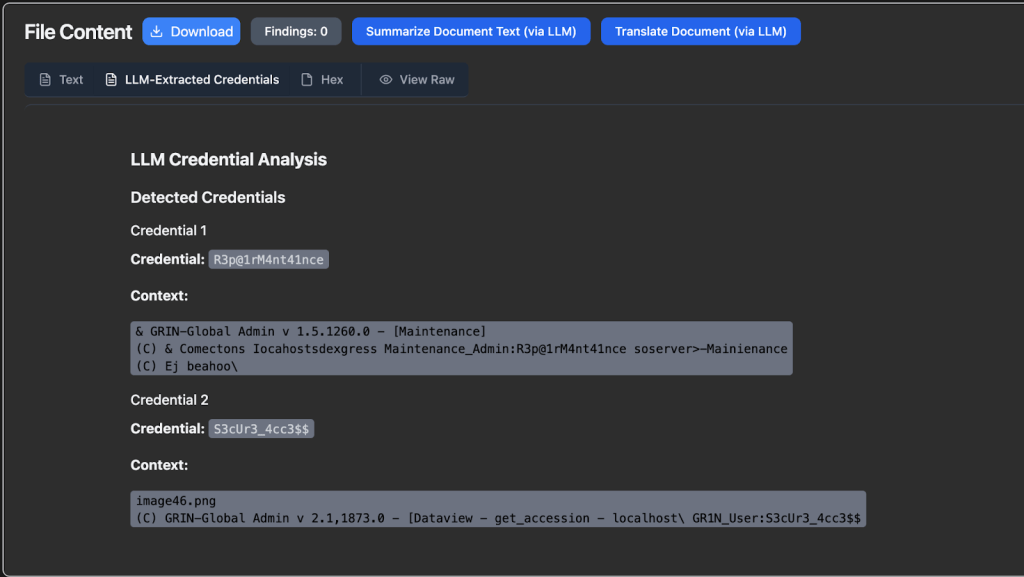
After pressing this button and the LLM analysis is complete, any results will populate as a new transform (as shown this this synthetic data):
Summarizer
Similar to the Credential Analyzer agent, you can manually trigger the Summarizer agent for a plaintext file which creates a document summary that will appear once summarization completes:
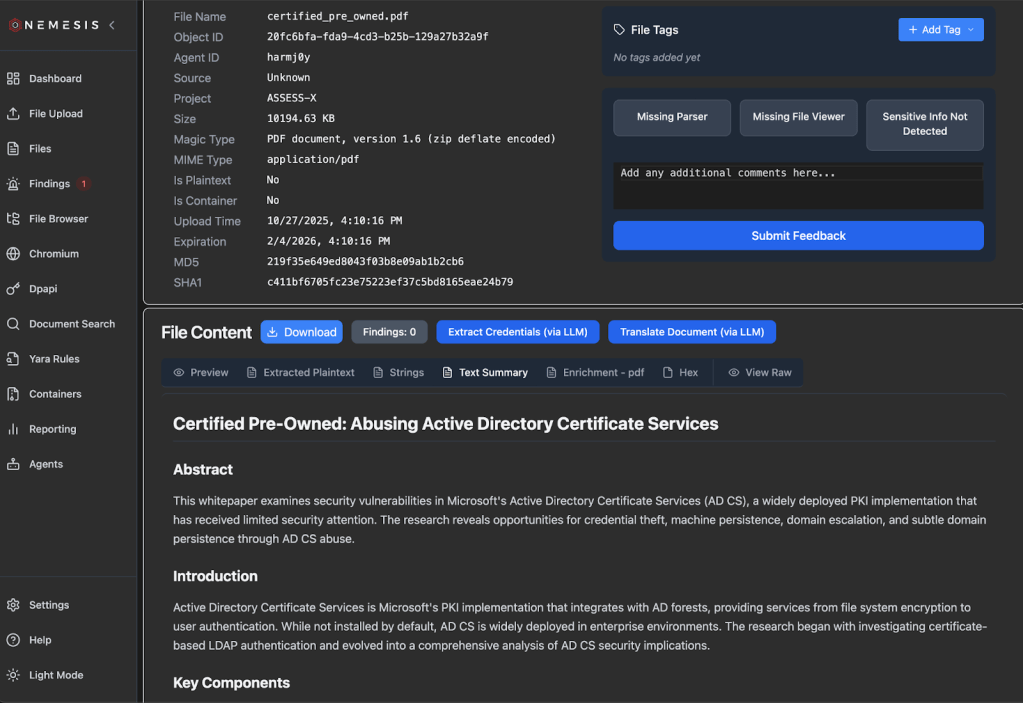
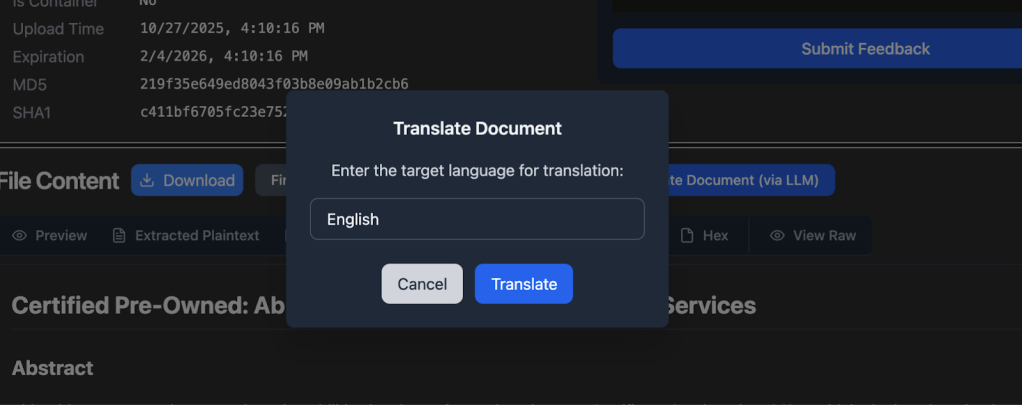
Translator
And almost the same as the summarizer, the Translator can be manually triggered for appropriate documents, but has a target language to translate the entire document to:
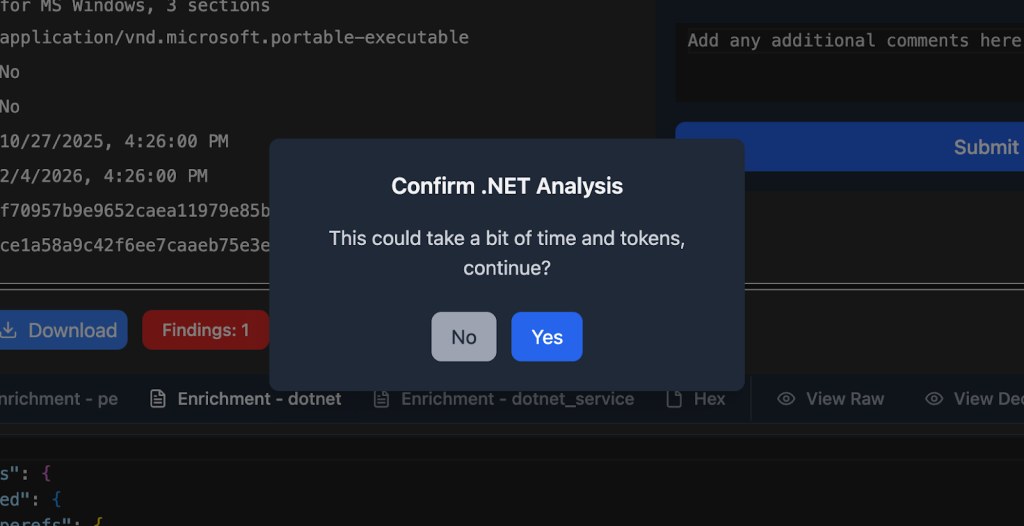
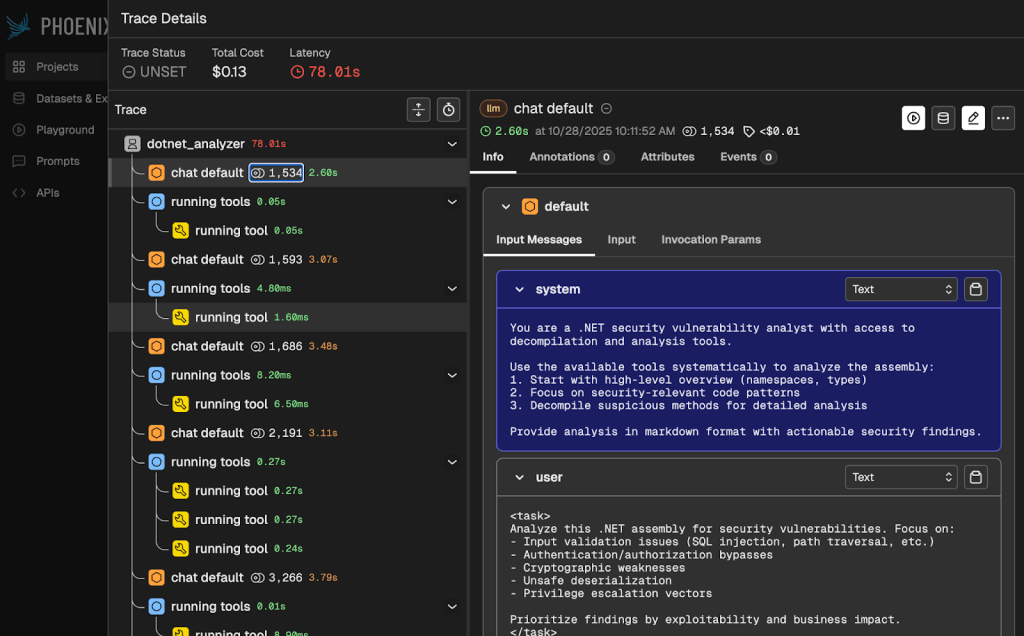
.NET Analyzer
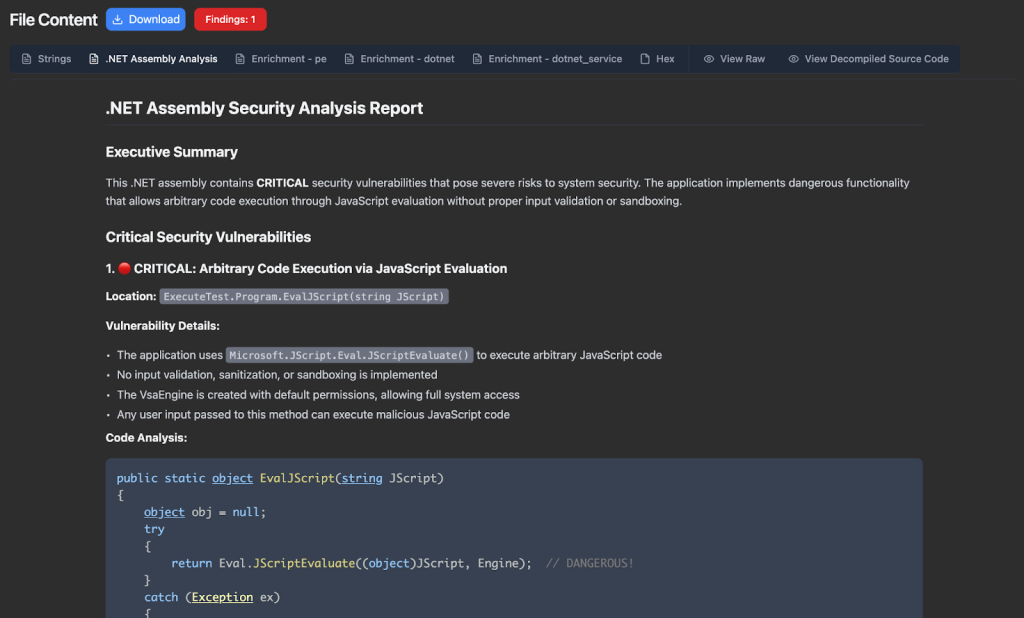
The awesome team at Dreadnode recently released a number of example agents on GitHub. One that’s of particular interest to us is the dotnet_reversing agent, which we ported to our system. A button will appear for .NET assemblies, and will also warn you that this might take a bit of time and tokens depending on the assembly sizes (as multiple tools are used):
Results will appear as a .NET Assembly Analysis tab:
We’ll cover the Host Reporting agent in the Host Reporting section.
LLM functionality introduces an element of non-determinism into our system which can complicate debugging. To help with this process, the –llm flag also starts the open source LLM tracing and evaluation project Arize Phoenix. This lets us track LLM traces for our agents and help understand or diagnose any issues:
Nemesis agents are also documented on the Nemesis documentation site.
Nemesis Chatbot
We have one bonus agent that we didn’t cover: the “chatbot” agent. This agent drives the new “Chatbot” functionality that you can access from the similarly named button in the navigation panel.
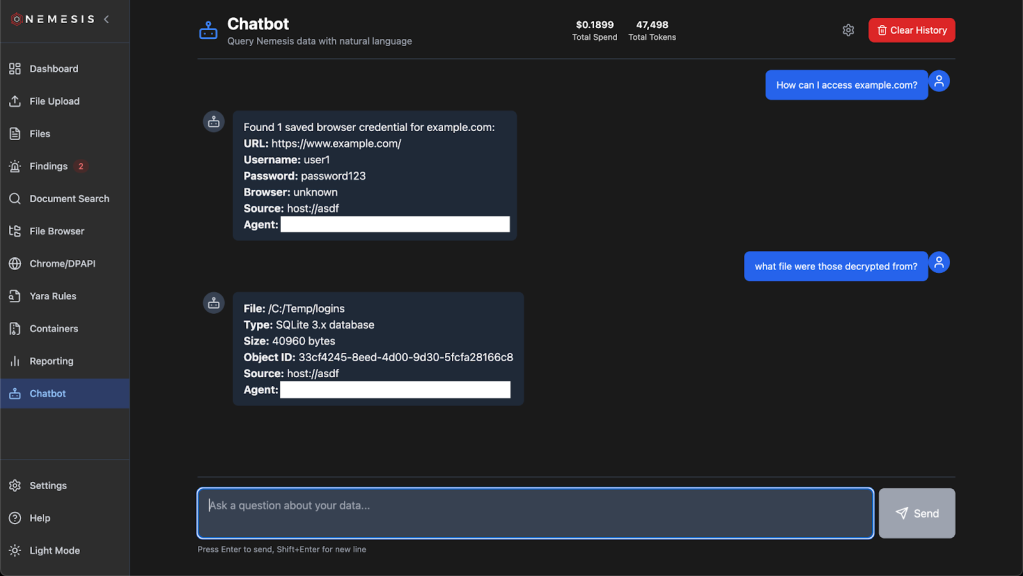
The Nemesis chatbot is powered by the Google genai-toolbox MCP that interfaces with the Nemesis PostgreSQL backend. This MCP is defined by a number of tools defined at ./projects/agents/agents/mcp/tools.yaml. These tools allow for read-only access to the Nemesis datastore so we can start to answer more interesting questions about our dataset.
Additionally, the MCP that drives the Nemesis chatbot is also exposed over the /mcp route. For demonstration purposes, we’ve also included a bridge at ./tools/mcp_bridge.py and can be used with Claude Desktop with the following config:
{

  "mcpServers": {

    "nemesis": {

      "command": "python3",

      "args": ["/Users/User/path/to/Nemesis/tools/mcp_bridge.py"]

    }

  }

}
NOTE: we strongly recommend using privacy-verified LLM providers when interacting with Nemesis data! This is the reason we use LiteLLM in Nemesis to allow for easy customization of providers.
Performance Optimizations

We’ve put a huge amount of work behind the scenes to try to optimize Nemesis’ performance. We paid very little attention to performance when first rewriting Nemesis (capabilities > speed) and there’s still more work to be done, but this section will cover some of the big wins we’ve had so far and a future post may dive into some nitty gritty details. To get a pulse of the impact of the changes, on our test machine (8 cores, 16GB RAM) we went from processing one text file every 1.5 to 4 seconds to processing 10 to 30 text files per second (and there’s still plenty more room to improve).
Side note: caveats abound here since workloads can vary massively (# of files, types of files, and sizes of files), everyone’s hardware will perform differently, and other applications may run alongside Nemesis on the host stealing resources.
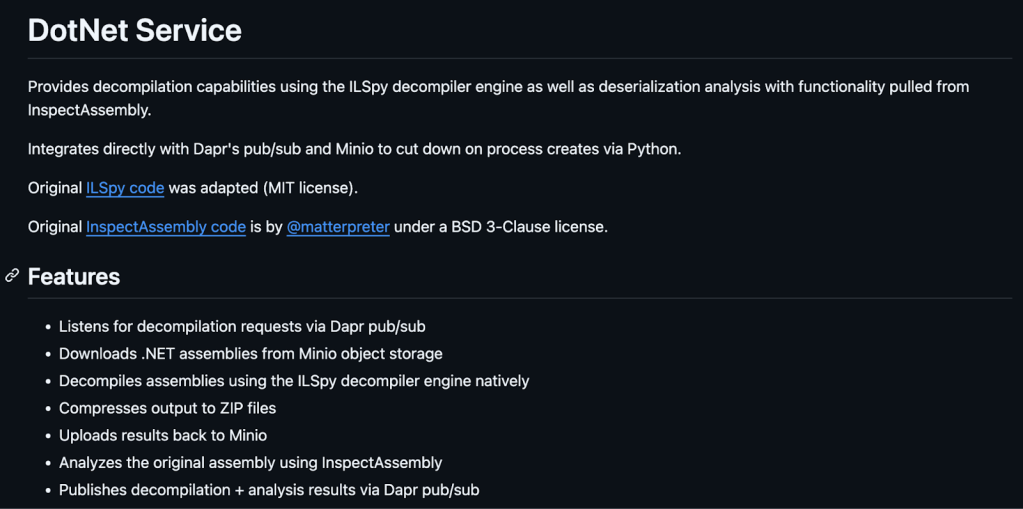
First, we updated the dotnet_service and noseyparker-scanner projects to standalone .NET and Rust applications, respectively. Both use Dapr SDKs to handle input and output via message queues, downloading files directly from Minio. The noseyparker-scanner still uses the default Nosey Parker rules (and any custom ones), but no longer writes results to a local database. The application uses Nosey Parker as a crate instead of launching the binary each time, which caused huge perf hits due to the slow startup of the large Rust binary.
Similarly, the dotnet_service is no longer a web API that simply runs the InspectAssembly and ILSpy CLI tools. Instead, we integrated InspectAssembly’s and ILSpy’s functionality into the dotnet_service and now all analysis happens in-process as each file is dequeued.
We also made significant improvements in our document_conversion service, whose job (amongst others) is to extract text from documents to make their content searchable. We use Apache Tika for text extraction, which optionally supports using Tesseract to OCR text from standalone images or images embedded in documents – a feature we enabled by default. This however has very significant impacts on performance as Tesseract’s OCR model runs completely on the CPU, and is compounded since Tika spins up multiple tesseract instances to OCR images in parallel. Nemesis now disables OCR by default (it’s configurable!), and also adds CPU limits to the Tika container so it doesn’t run away consuming all the available CPU on the host (we added CPU limits to the noseyparker-scanner as well for the same reason). We also switched from using the pypdf Python library to using PyMuPDF after performing some benchmarks that showed it performed 4x faster.
Database operations were also greatly optimized significantly (indexes, purging, LRU caching, query optimization, etc.). As a whole, there’s still many opportunities for performance improvements at the code level. In the meantime, check out the Performance Tuning doc for strategies to adjust Nemesis to your hardware and needs!
DPAPI Functionality
Attackers care about browser cookies and saved logins, so we need to care about this as well from a defensive perspective. On Windows hosts, Chromium based browsers rely heavily on the Data Protection API (DPAPI), something SpecterOps blogged about all the way from 2018 to modern Chromium protections this year. We have an entire, in-depth Offensive DPAPI With Nemesis post we’re drafting that dives into all the technical details for Nemesis’ approach, so we’ll be brief here but will cover the main points.
Tl;dr: Nemesis now handles all major methods that Chromium-based browsers use to store cookies and logins. This ranges from class DPAPI, to the DPAPI protected AES key in Local State, app-bound encryption, and the newest v3 of app-bound encryption that completes with Cryptography API: Next Generation(CNG) protection of the final secret value.
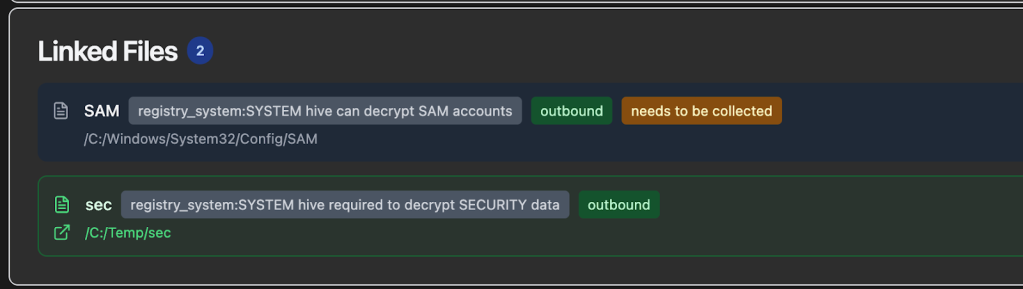
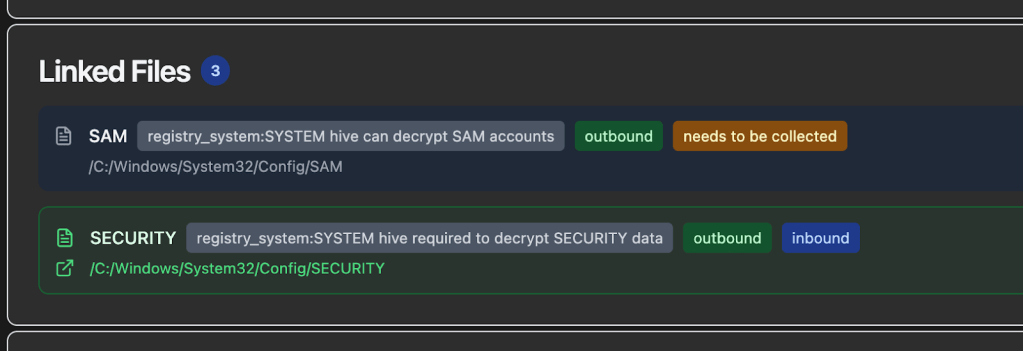
System DPAPI masterkeys can either be carved from a LSASS dump, or decrypted with the DPAPI_SYSTEM LSA secret extracted from the SECURITY hive (via the boot key from the SYSTEM hive). Luckily Nemesis handles both cases, carving any DPAPI masterkeys from LSASS dumps via the new registry_hive file enrichment module, as well as carving/saving DPAPI_SYSTEM secrets from submitted registry hives (the hives are auto-linked together by Nemesis). These hives will be recognized and linked together even if they have different names and don’t originate from the C:\Windows\System32\Config\ path. Here’s the Linked Files section for an uploaded SYSTEM hive:
User DPAPI masterkeys can also be carved from LSASS, but otherwise need a domain DPAPI backup key, user password, user NTLM hash (or for local users a SHA1 of the password), or user credential key. Users can submit all of these credential material components to Nemesis via Chrome/DPAPI -> Submit Credential Material:
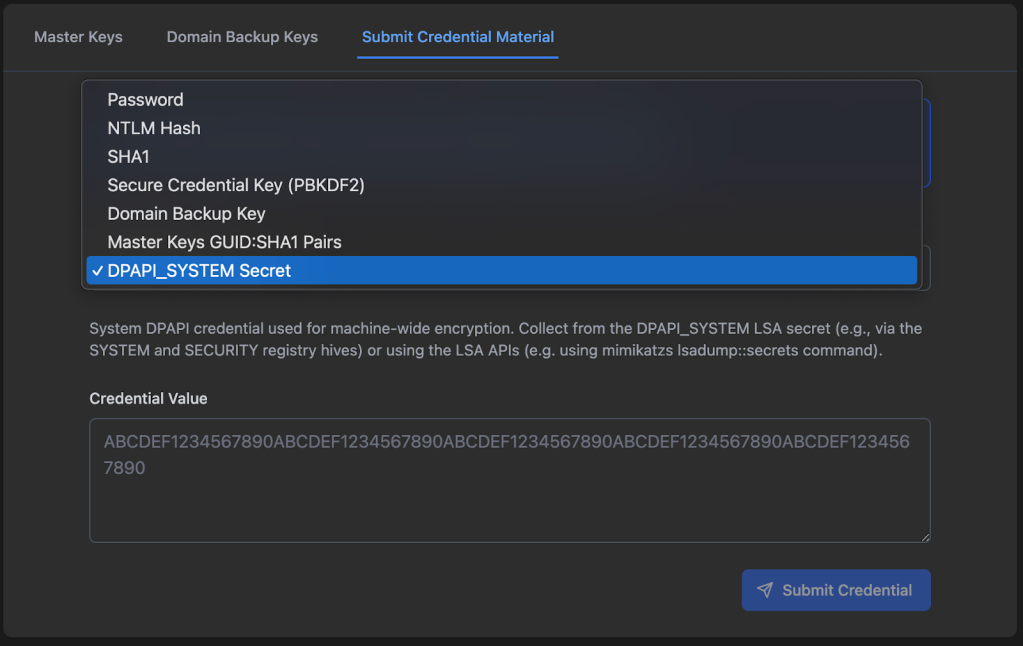
NOTE: Submitted material will decrypt any existing user DPAPI masterkeys, BUT WILL NOT BE SAVED FOR FUTURE MASTERKEY DECRYPTION, WITH THE EXCEPTION OF THE DOMAIN BACKUP KEY! This means that you will need to resubmit user credential material if new DPAPI masterkeys are submitted that need that specific material. However, any decrypted DPAPI masterkey blob keys will be saved persistently for future decryption.
User DPAPI masterkey files will be automatically detected, and Nemesis will attempt to use any existing decrypted DPAPI masterkeys to decrypt the masterkey files themselves.

CNG files are something else that’s needed for version 3 of Chromium’s app-bound-encryption approach. The specific file we care about is at C:\ProgramData\Microsoft\Crypto\SystemKeys\<hash>_<machineGuid> where the <hash> is calculated with this function and the private key is protected with SYSTEM DPAPI masterkeys. The new cng_parser module will recognize this type of file and decrypt the private “Google chromekey1” CNG key if the appropriate decrypted DPAPI masterkey is in the existing DPAPI cache.
And finally we get to Chromium, so we get to show this masterfully generated piece of AI art:

The sensitive values from Chromium Cookies and Login Data files have been protected a number of different ways over the years, and at the time of this post, uses version 3 (Chrome 137+) of their app-bound-encryption scheme. In a nutshell, the AES key used to protect these values is first encrypted with the “Google Chromekey1” in the CNG Key Storage Provider (KSP), then protected with a user’s DPAPI masterkey, and finally protected with a SYSTEM DPAPI masterkey (decryption works in reverse of this process).
So if our ultimate goal is say, Chromium Cookies file decryption for a modern browser based purely off of file decryption (i.e., no code execution directly on host), as a review the files we’ll need are:
- The Chromium Cookies file itself
- The Chromium Local State file from the same Chromium install (Chrome, Edge, etc.)
- The user masterkey key blob from:
- The specific user masterkey file + Domain DPAPI backup key, user password, NTLM hash, etc.
- Raw carved user masterkey from an LSASS dump
- The SYSTEM masterkey key blob from:
- SECURITY + SYSTEM hive carving of the DPAPI_SYSTEM secret, along with the specific SYSTEM masterkey file to decrypt
- Raw carved SYSTEM masterkey blob from an LSASS dump
- The Google Chromekey1 CNG file from C:\ProgramData\Microsoft\Crypto\SystemKeys\<hash>_<machineGuid>
Luckily, Nemesis can now handle all of these files, assuming you can acquire them. And even better, the order of submission doesn’t matter, as Nemesis will handle forward AND retroactive decryption of these sets of files, allowing you to get to those delicious, delicious cookies and logins:
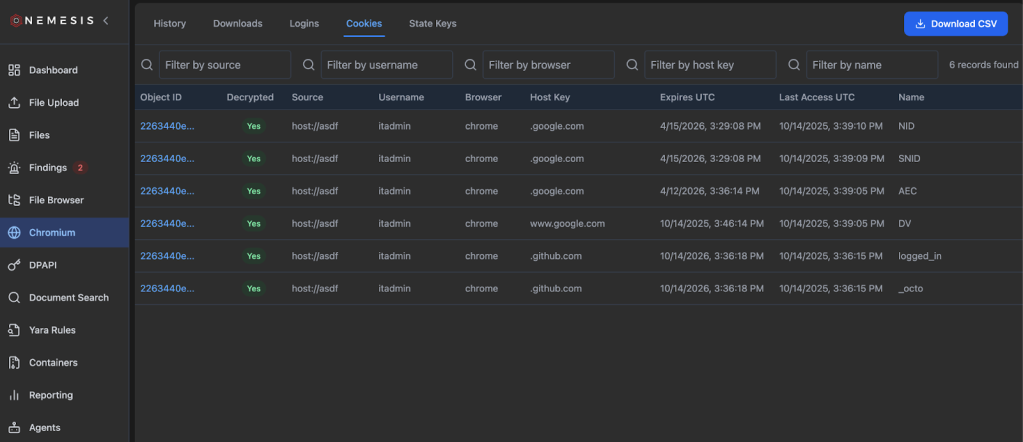
Note: clicking the “Download CSV” button on the top right will down the complete cookies file with decrypted values.
There is some basic documentation on Chromium functionality on the Nemesis documentation site, and as mentioned we have an Offensive DPAPI With Nemesis post that should be out soon with more details.
Data Model Modifications
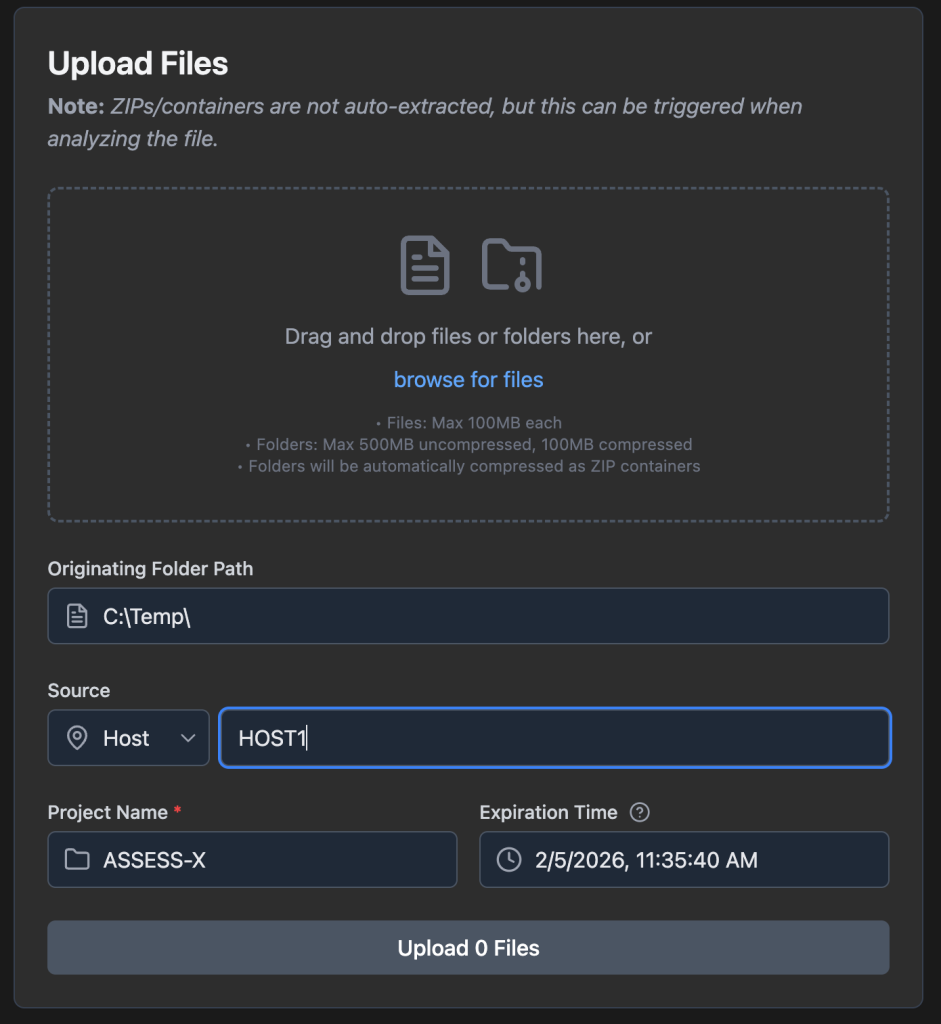
With Nemesis 2.0, all files existed in isolation, processed independently. With some of the tasks we wanted to achieve, specifically around DPAPI, we needed a way to link multiple files together (e.g., registry hives and system masterkey files, etc.). To support this we added a (optional) source field into the file ingestion (and processed backend) data model. This source field can be specified as well in the File Upload page of the UI:
This lets us group files together that come from the same source/host, something that’s necessary for the more complex DPAPI file functionality described in the previous section. It also lets us build some neat things like a virtual File Browser (left nav bar):
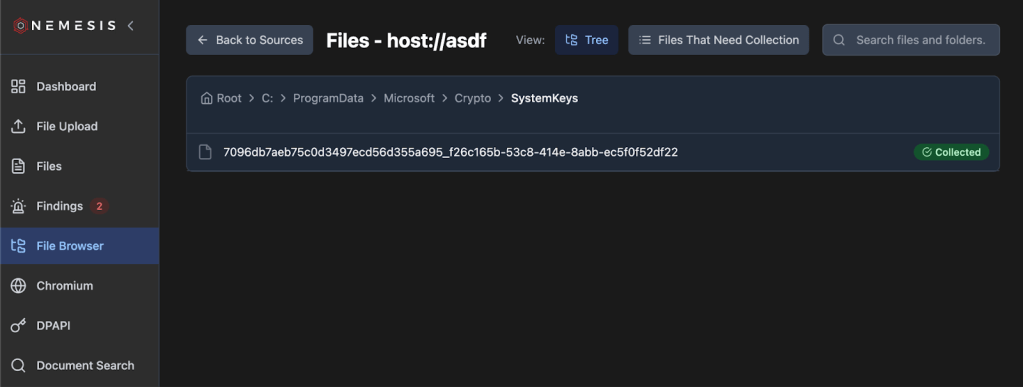
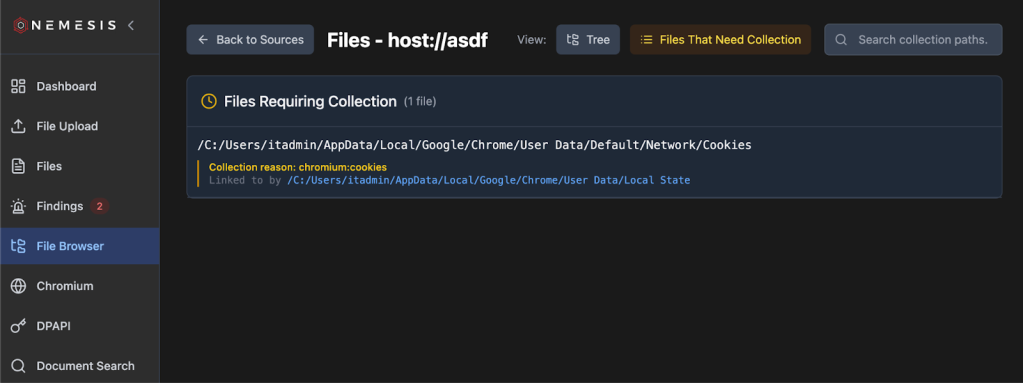
This lets us browse existing downloaded files as shown above, as well as show suggested files to download by clicking the Files That Need Collection button:
How does this system work? Well, if we have files that imply the location of other files, like a SYSTEM DPAPI masterkey file indicating a SYSTEM/SECURITY hive would be needed, Nemesis now has a file linking system. Links for files to download, or files that were already downloaded and related, are displayed at the bottom of the file details page (we will as the previous file browser display):
Host Reporting
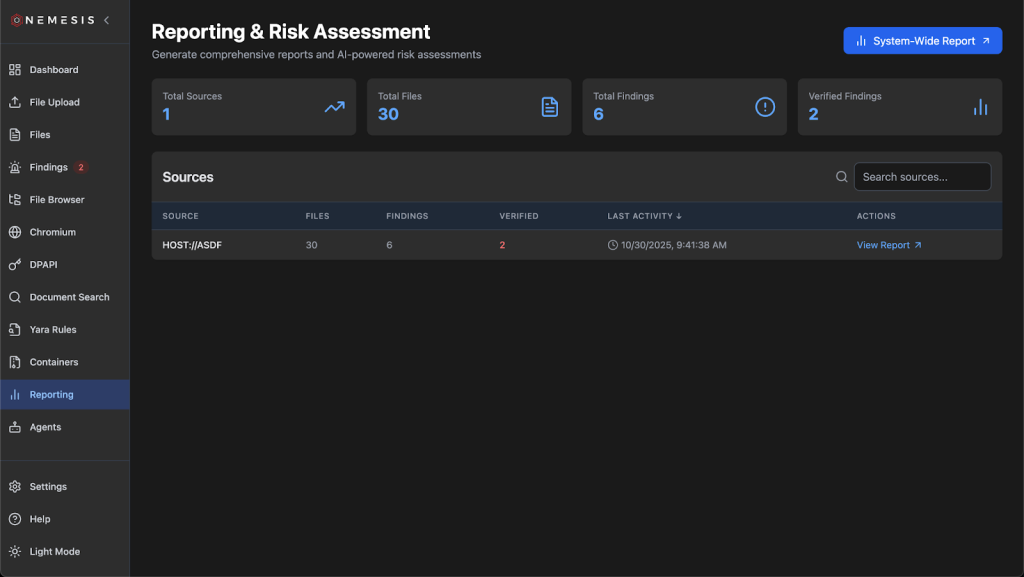
With the source field now allowing us to correlate information and findings for a specific host, we wanted to produce some basic reporting functionality that brings together information in Nemesis about a specific target. The Reporting tab on the left will take you to the main reporting page, where you can specify if you want a report across all data in Nemesis or specific hosts:
Clicking a specific host takes you to its host-specific reporting page that has live-updated data on each refresh:
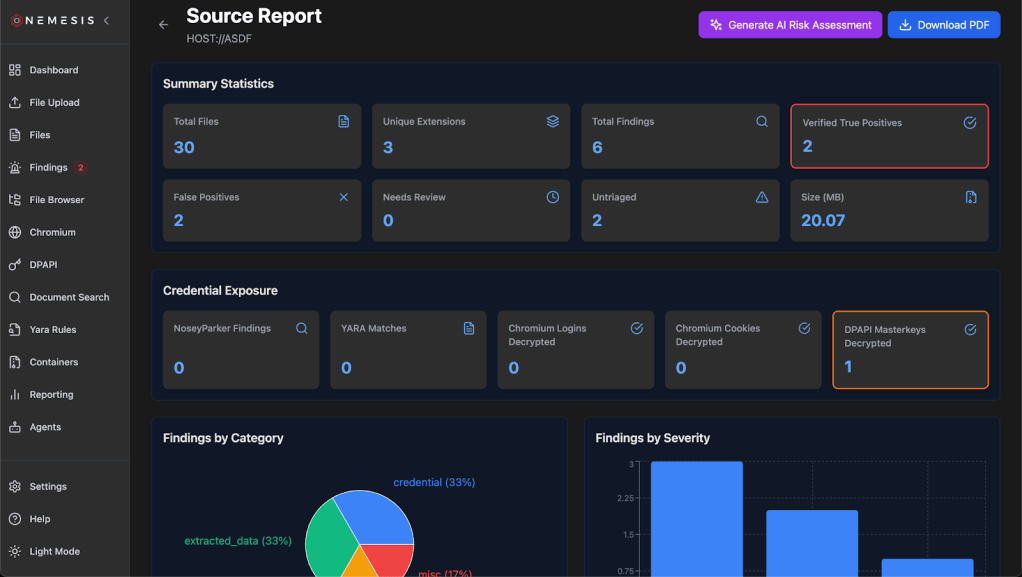
Clicking the Download PDF button on the top right will download the report as a PDF. If you’ve enabled LLM integration with –llm , there will be a Generate AI Risk Assessment button that will take host based data and use the “Report Generator” agent to produce a summary. Note that this report is not saved, and needs to be generated everytime it’s viewed, however clicking the download PDF button will include the LLM analysis in the final report.
Miscellaneous Enhancements
There are a number of other useful additions and changes we made to Nemesis that don’t fall into quite as big buckets, so this section will be a clearing house for some miscellaneous changes.
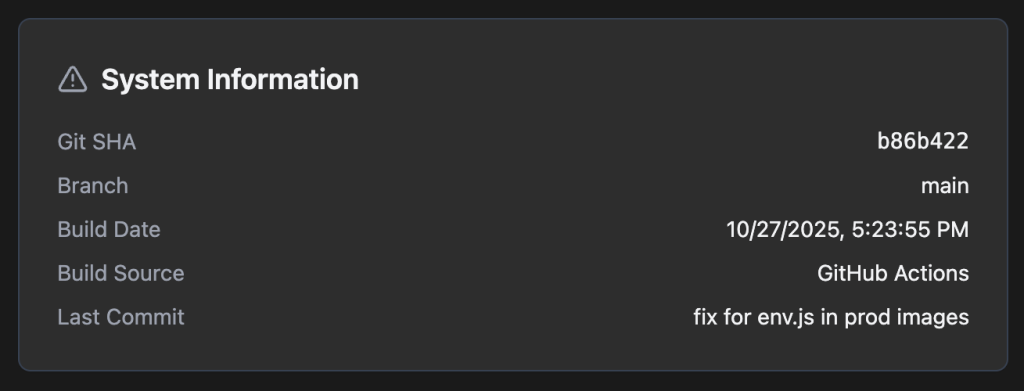
When troubleshooting, it really helps to know exactly which version of the codebase someone is running. Since we know have development and production versions of Nemesis containers, with local and GitHub action build sources, we now have a version tracker in the main frontend UI under the Settings page on the left:
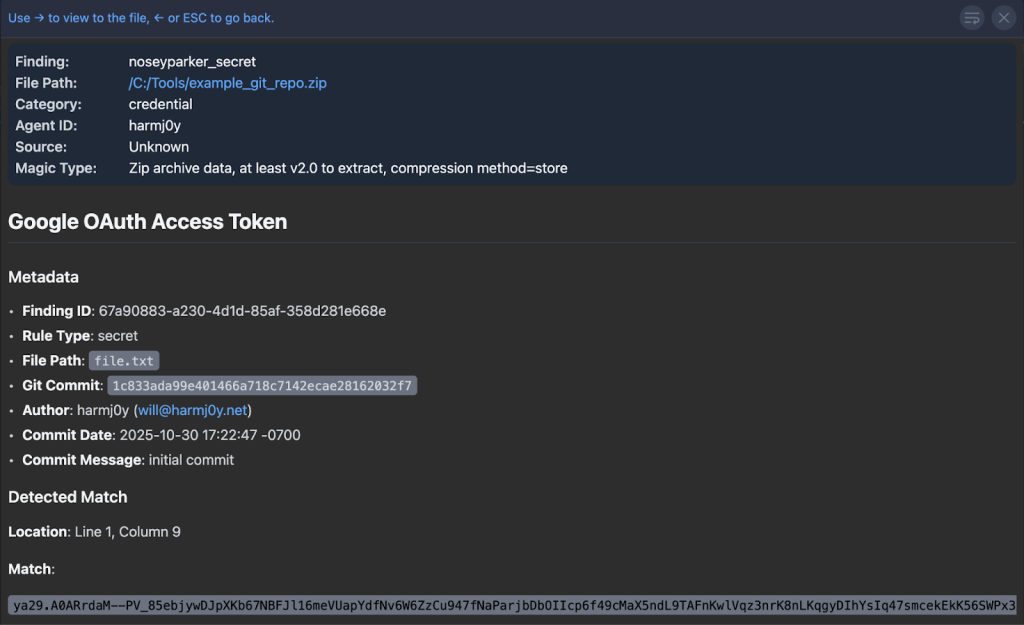
As mentioned previously in the Performance section, Nemesis 2.2 changed Nosey Parker to run as a standalone Rust application. In addition, Nemesis can now extract and scan ZIP containers (including .git commit history) if the DECOMPRESS_ZIPS variable is set to true (which it is by default in the compose.yaml). This lets you scan git repos or containers of files for Nosey Parker results without having to extract and process every file in the container:
Also to help process ZIPs, you can now drag-and-drop a folder onto the file upload page. This will compress the folder and process it as a ZIP file (i.e., the contents aren’t extracted and processed individually unless you trigger that through the UI):

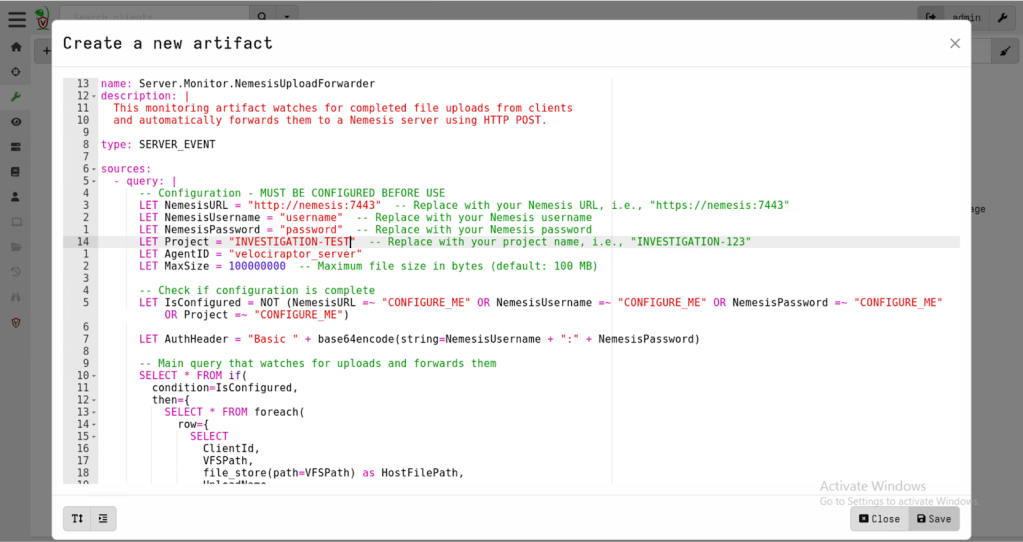
Some of you may be familiar with the Velociraptor forensic project (some attackers certainly are!). We wanted to build a “collector” for Velociraptor that let us send files acquired via Velociraptor to a Nemesis instance and, luckily for us, Velociraptor has an API! We started going down the route of building a collector similar to our cli implementations for Mythic and Stage1, until we found Velociraptor’s “Server Monitoring” monitoring functionality that uses their VQL query language. Fortunately, there’s a http_client function that lets us POST data, so the entire collector ends up being just 80 lines!

Finally, false positives are a fact of life, and types of files on your operation may create a large number of false positives. To help with this, Nemesis’ alerting system can now be dynamically enabled/disabled and configured after Nemesis is deployed via the Settings page on the left navigation bar:

Wrapup
This has been a substantive development effort and @tifkin_ and I are really excited to get all these new features into everyone’s hands! As a reminder, all of this code is now live in the main branch of Nemesis and tagged with the 2.2.1 release tag, and GitHub Actions have rebuilt the production Docker containers for prod deployments.
With an update of this size, we know there are some bugs that must have snuck in. Join us in the #nemesis-chat channel in the BloodHound Slack for any questions or feedback and feel free to report any issues on GitHub.