Leveraging Tailscale Keys
TL;DR: This post introduces red team operators to Tailscale concepts and tradecraft that can be leveraged in the reader compromises Tailscale keys in their target environment.
Over the past year, we started coming across Tailscale authentication keys in Continuous Integration/Continuous Deployment (CI/CD) pipelines during Red Team assessments. Tailscale keys could play a critical role in achieving Red Team objectives, so it is advantageous to understand the implications of discovering Tailscale keys during an assessment. In this article, I provide a basic overview of Tailscale, cover key identification and usage, and offer guidance on Tailnet enumeration.
What is Tailscale?
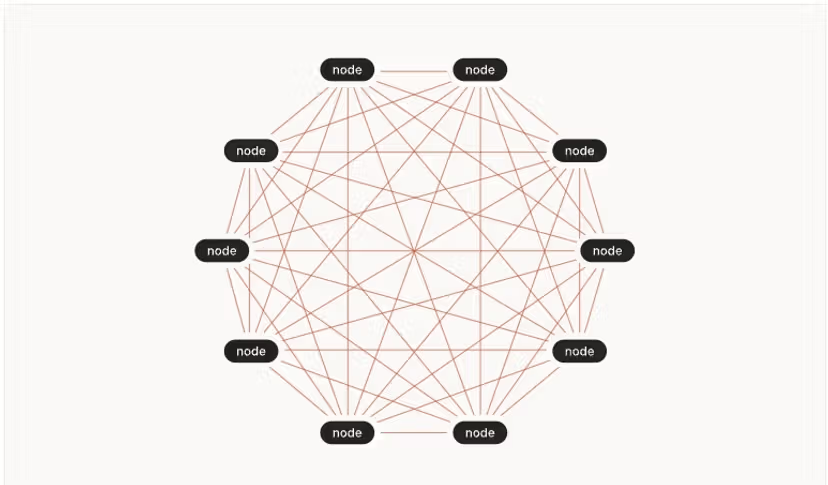
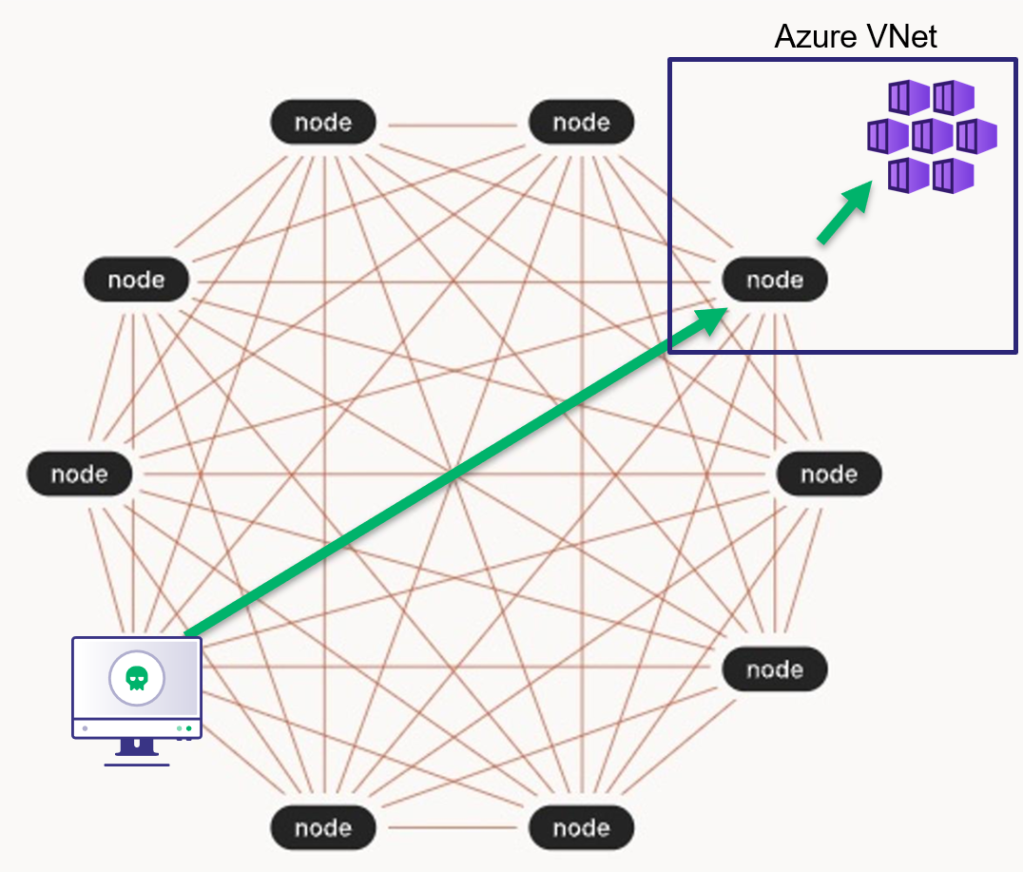
Tailscale is a “mesh VPN” solution, which means that all machines (i.e., nodes) connected to the mesh network, called a Tailnet, can communicate with each other. All Tailscale nodes connect out from their location, with their assigned Tailnet IP address, to a Tailscale control server for intercommunication regardless of how many layers of NAT translation they sit behind. This configuration is a bit different from the traditional VPN situation where a VPN server is exposed to the internet so that clients can communicate through it with internal systems. What makes this interesting from a Red Team perspective is that each node can then provide Tailnet access to systems and networks on its local area network (LAN).
Types of Nodes

There are several node types to be aware of, two of which are subnet routers and exit nodes. Both of these require administrator approval, creating an indicator of compromise in the Tailscale admin console that prompts a call for attention in the UI. While regular nodes do not create an eye-catching alert on the admin console, they do show up in the Tailnet’s machine list, so it is important to align your node’s hostname and operating system to those of the target Tailnet to avoid detection.
Regular Node
In a default access control configuration, a Tailscale node can access (and is accessible by) all other nodes on the Tailnet. For example, a node can port scan and interact with another node’s open ports via its Tailnet IP address. When you discover Tailscale keys and connect a machine to the associated Tailnet without additional configuration, this will be the type of node you will operate as.
Subnet Router
Nodes that advertise and provide access to internal networks are called subnet routers. If your connected node has access, these advertised routes to internal networks and the systems therein will be available and configured for you. For example, my Ludus node advertises its internal interface and the IP space of its deployed range. When I connect my MacBook to the Tailnet, I can immediately SSH to range systems in a split tunnel-like VPN configuration without further configuration. If my MacBook didn’t have access to the Tailnet access control policy, I would not see the advertised routes.
Exit Node
An exit node allows other nodes to proxy internet-bound traffic through it. Any node on the Tailnet can connect to the exit node, passing all network traffic through it, akin to a “full tunnel” VPN. Tailnets can have multiple exit nodes that can be listed and subsequently used as you like. Note that exit nodes only route internet-bound traffic, meaning they do not provide access to internal networks like subnet routers. Exit nodes are valuable because they can enable access to IP-restricted cloud (e.g., AWS, Azure) resources from a target environment’s exit point.
Node Identity
All nodes on a Tailnet have an owner (i.e., identity), which determines their access level. A node’s identity is either:
- The identity of the user that connected the node (e.g., a developer connects their MacBook via Tailscale single sign-on [SSO])
- The identity of a tag configured on the node before it connected
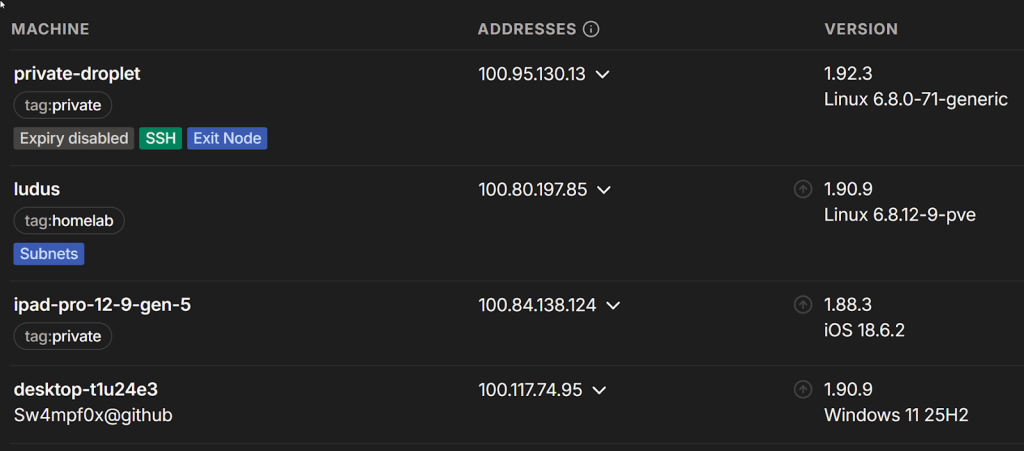
In the screenshot above, I used Tailscale SSO via GitHub to join desktop-t1u24e3 to the Tailnet. As a result, that node shares my identity, and any access controls applicable to my identity apply to the node. A node joined with a tag, such as the ludus node above, assumes the identity of the specified tag rather than that of the user connecting it. Access controls applied to that tag would apply to any nodes using that tag. A tag-identity node may even have access to multiple tags, all of which may have different access control configurations. It is important to evaluate Tailnet access for all available identities (users and tags) to understand what is accessible to you with the compromised Tailscale key.
Tags and Access Control Lists
Tailscale uses tags to group nodes, much like Active Directory groups group users. Tailscale administrators can then allow or restrict access based on tags in the Tailnet’s access controls.
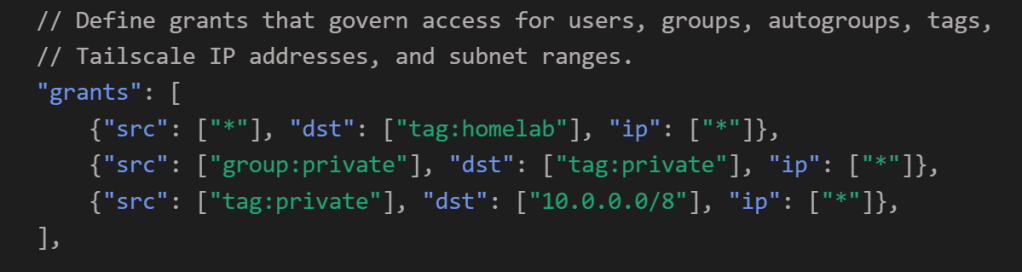
For example, in the screenshot below, nodes with the private tag can access the advertised 10.0.0.0/8 subnet in the Tailnet’s access control policy. A node joined with the private tag would have access to this subnet; however, if the user simply joined the node as their user account, they would not have that access and would not even see that the node is advertising the subnet. In that case, the user would still be granted access to nodes tagged with homelab based on the wildcard src in the first access control list (ACL) in the grant array.
Note that there is also a “group:” prefix is used in the following grants. This indicates a user group for role-based access control purposes. Here, users in the private user group can access any node joined with the private tag.
The tags, groups, SSH settings, and aliases are also defined in the Tailnet’s access control policy, providing the full picture of who can access what in the Tailnet. As such, it is worth trying to gain access to the access control policy compared to attempting to enumerate a Tailnet with the limited perspective of a single node. You can exfiltrate the access control policy file:
- From the Access Controls section of the admin console
- Via an API call to /tailnet/[tailnet_id]/acl?details=true
- From the target’s GitHub/Gitlab, if stored as Infrastructure as Code (IaC)
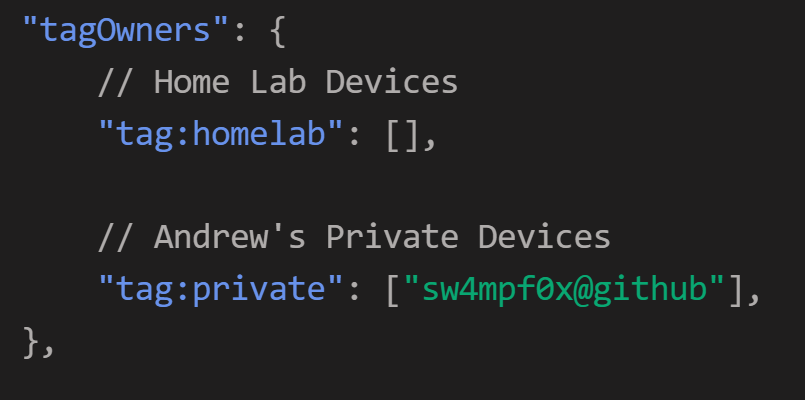
The tagOwners definition is of particular interest because it defines who can use (i.e., join a node with) a given tag. If you don’t have access to the access control policy, search adjacent CI/CD configuration files, scripts, and Tailscale CLI usage in the location where you found the Tailscale keys to understand which tags you can access.
Tailscale Keys
Trusted Keys
When talking about Tailscale keys, we are referring toTailscale “Trusted Keys”, which are composed of an OAuth client ID and client secret associated with the Tailscale account that provisions them. If you are provisioning these yourself for testing purposes, the functionality can be found in Tailnet Settings > Trust Credentials page in the Tailscale admin console.
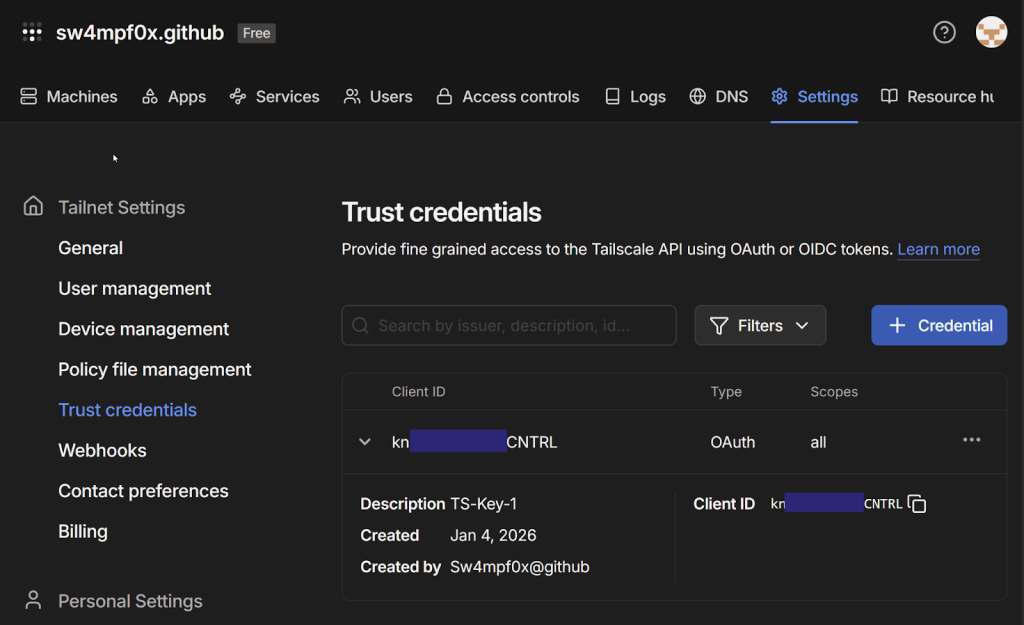
With Trusted Keys, you can access the Tailscale API and provision auth keys via the API that you can use to connect a machine to the associated Tailnet programmatically (more about auth keys is below).
Depending on the user role that created the Trusted Keys and the key’s scope, you may have some beneficial access to the Tailscale API to enumerate information or even make configuration changes. If you want to manually interact with the Tailscale API, you can find the OpenAPI spec here. The spec that can be imported into something like Postman for easier interaction. To generate an API access token, use your discovered Trusted Keys with the following curl command:
curl -d "client_id=[CLIENT_ID]" -d "client_secret=[CLIENT_SECRET]" "https://api.tailscale.com/api/v2/oauth/token"When triaging secrets, Tailscale Trusted Keys can be easily identified by their format. Note that the client ID is within the client secret in case you find a client secret that isn’t paired with its client ID.
# Client ID
[client_id]

# Client Secret
tskey-client-[client_id]-[client_secret]
Trusted key example:
Auth keys
As mentioned, Pre-authentication keys (i.e., auth keys) are required to connect a machine to a Tailnet programmatically. Auth keys can be provisioned in the admin console or through the Tailscale API, the latter of which Tailscale facilitates with a Go utility for accomplishing this task in automation.
Auth keys are tied to the user or tag identity they are provisioned with, so a new key must be generated to change a node’s identity. If a tag is not specified, the auth key and the resulting node share the identity of the user who provisioned the originating Trusted Key. Note that the user must be a tag owner to use a given tag.
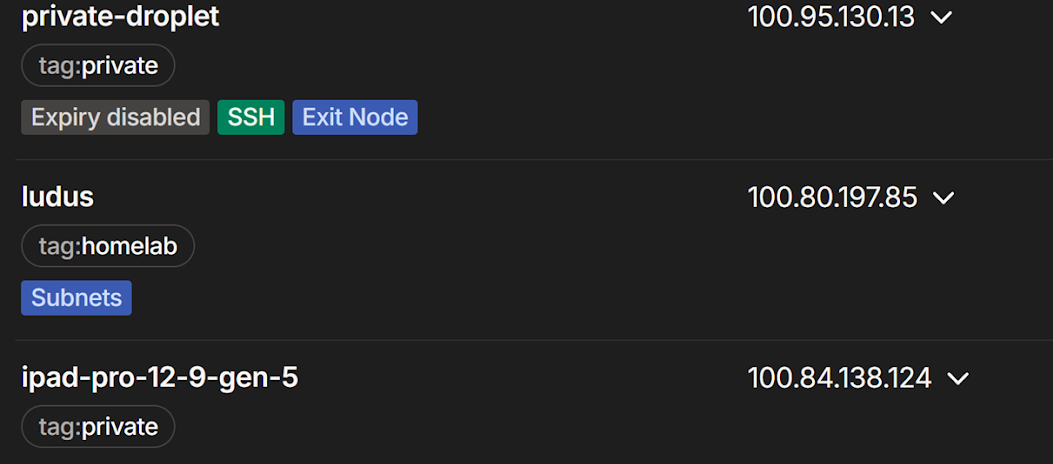
Going back to the machine listing image from earlier, the private-droplet node has the tag identity private assigned, because it was joined to the Tailnet with an auth key tagged private. Contrast that with the desktop-t1u24e3 node, which is joined as a user.
To provision auth keys, you have a couple of options (with varying opsec implications):
- Ephemeral – By default, nodes joined to the Tailnet stay on the machine list indefinitely. Ephemeral nodes are automatically removed from the devices list within 48 hours of inactivity, or immediately when
tailscale logoutruns - Reusable – By default, auth keys are one-time use. This option allows the key to be reused, which reduces the amount of anomalous auth key provisioning traffic if you will be repeatedly connecting a node to the Tailnet
- Preauthorize – If administrators have enabled manual approval for node access to the Tailnet, this will preapprove the node connecting with this auth key (user roles that can generate an auth key can also approve devices)
Using Tailscale Keys
You have discovered Tailscale keys and are ready to dig into what doors may have opened up for you. There are two types of access to explore, Tailscale API access and Tailnet access, but I will focus on the latter here. Begin by provisioning an auth key and connecting a machine to the key’s associated Tailnet. In my case, I’ve deployed a Debian machine on Digital Ocean with Golang and Tailscale CLI installed.
Use the following Tailscale Go utility command to generate a reusable, ephemeral auth key using a discovered Trusted Key pair. Note that you will need to use the -tags argument to specify any tag identities you want to assign to the machine.
export TS_API_CLIENT_ID=[client_id]
export TS_API_CLIENT_SECRET=[client_secret]
go run tailscale.com/cmd/get-authkey@latest -tags tag:private –reusable –ephemeral [-preauth]
Now you can connect your machine to the Tailnet with your new auth key:
tailscale up --auth-key=[Key]
--accept-routes –reset
[--advertise-tags=tag:private]
[--exit-node-allow-lan-access]
The tailscale up command connects your machine to the Tailnet and applies any tags specified when the auth key is generated. Alternatively, you can skip the auth key step and use the trusted key’s client secret by placing it in the --auth-key argument and specifying the tags you want to use with --advertise-tags:
tailscale up –auth-key=[Client_Secret] –advertise-tags=tag:secret –accept-routes –reset
The --accept-routes boolean argument instructs your machine to accept and configure routes to any subnets advertised and accessible in the Tailnet.
The --exit-node-allow-lan-access argument allows the node to access other systems on its local area network (LAN) and vice versa. This is useful if you want to proxy tooling from other systems through the Tailnet via SSH port forwarding or SOCKS proxying. Without this, the node would be inaccessible from other systems on the LAN.
Once connected, your machine is now a node on the Tailnet, and you can begin enumeration.
Tailnet Enumeration
As a node in a Tailnet, we can use the Tailscale CLI to interact with the node’s Tailscale daemon, which stores peer information that ultimately comes from the Tailscale control plane. Enumerate the access available to your node with:
tailscale status –json
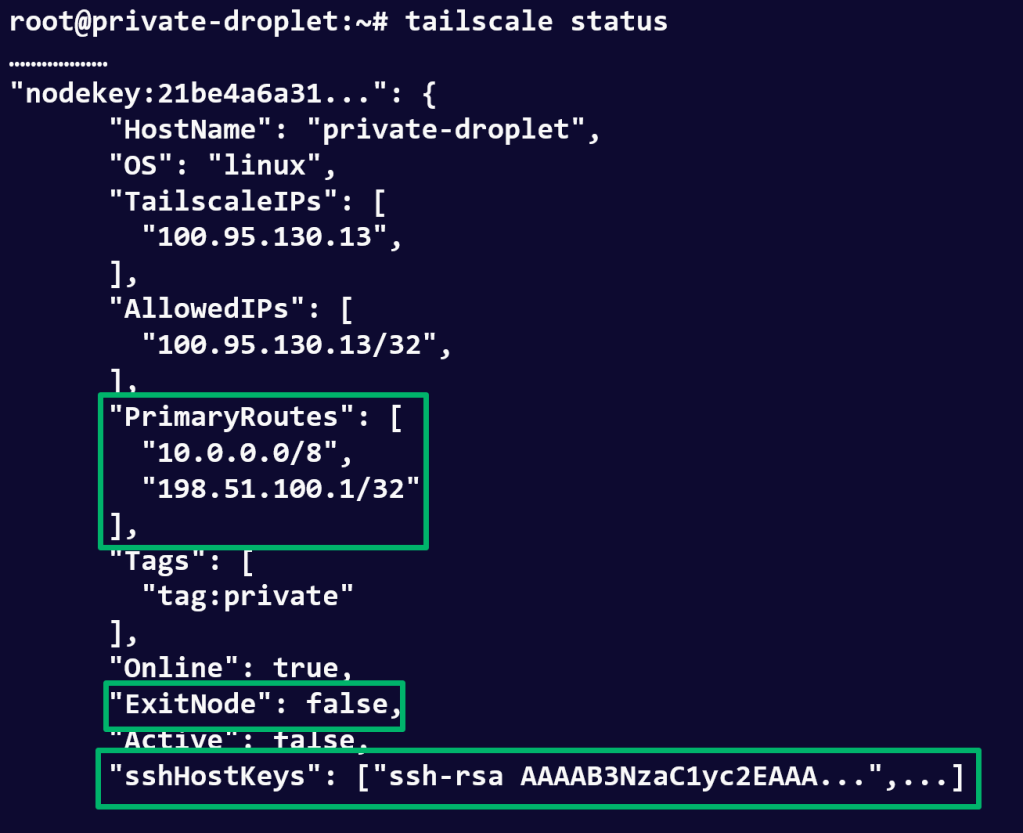
This command prints detailed information for each node in the Tailnet (shown below), including operating systems, tags, advertised routes, exit-node status, and SSH configuration. The following sections cover how to parse this information based on the node properties returned.
Other useful commands are listed below, most of which provide a subset of this information.
Exit Nodes
The ExitNode boolean property indicates whether a node is an exit node. As mentioned, exit nodes allow you to proxy internet-bound traffic through them. To use one, you need to disconnect your node with tailscale down and run the following command with the target exit node’s Tailscale IP address.
tailscale up --accept-routes --advertise-tags=tag:development --hostname=myhost –reset --exit-node=[exit_node_ip]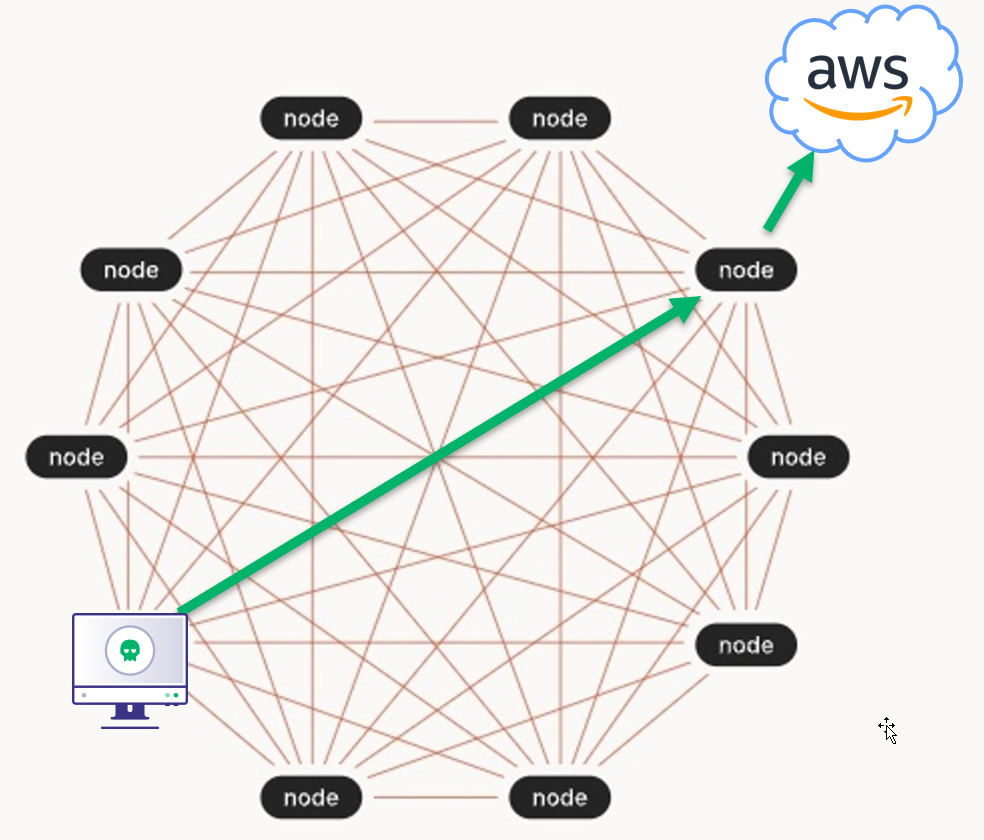
This can be advantageous in situations where the exit node’s public IP address is permitted to access IP-restricted cloud resources (e.g., AWS S3 buckets or Azure Key Vault keys).
Subnet Routers
Subnet routers are identified by a node’s PrimaryRoutes property, which lists the subnets that it provides access to. If you see this property, you can assume that you have access to these subnets and they are already configured on your node if it was joined with the --accept-routes argument.
Subnets could provide network access to internal corporate networks or cloud virtual networks where objectives or lateral movement opportunities are located. From this position, you can begin network enumeration or leverage previously compromised credentials to continue down your attack path.
Tailscale SSH
One of the more interesting Tailscale features for red teamers is Tailscale SSH, which allows SSH access to machines using Tailscale as the identity provider. In short, it allows you to connect passwordlessly to a host over SSH by just being connected to the Tailnet if:
- ACLs permit it
- The target node has Tailscale SSH enabled
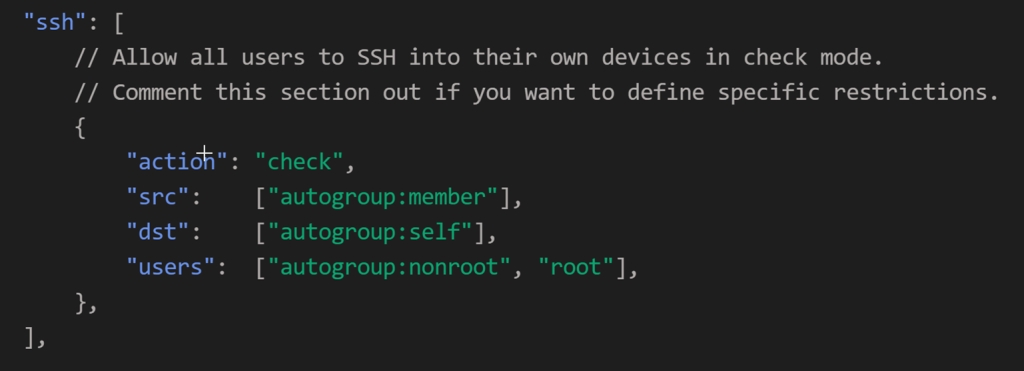
SSH access is defined inside the Tailnet’s access control policy in the ssh array. By default, nodes are permitted to SSH to themselves, but have the check action configured, which requires reauthentication to the Tailnet. The default check period is 12 hours, and it applies Tailnet-wide, so once a user passes one check, they can SSH to any device requiring a check without reverification.
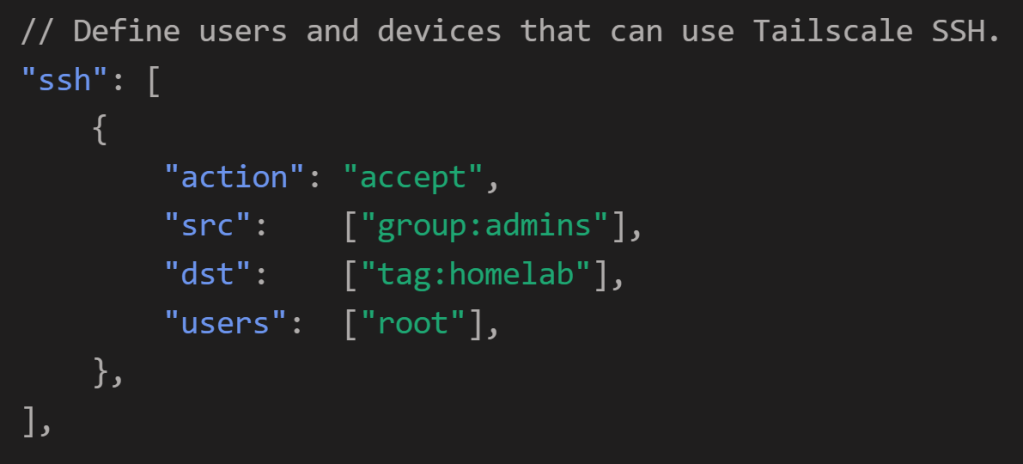
On the other hand, the accept action requires no verification from the user. In the following example, any node identity in the admins group can SSH as root to any node with the homelab tag if that node enabled SSH .
To leverage this, connect to the target host using its Tailnet IP address, which is listed in the tailscale status output.
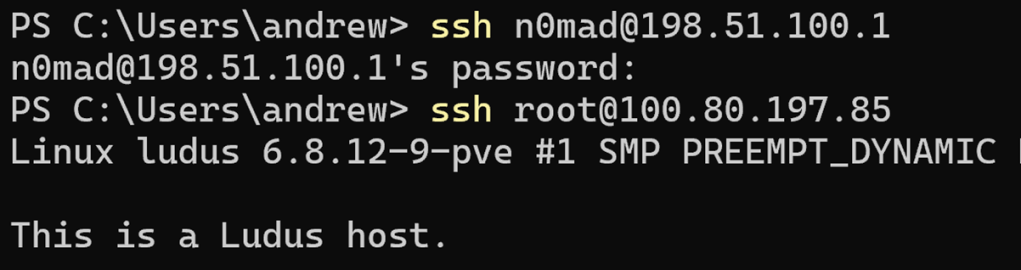
To demonstrate this, I’ll attempt to SSH to the Ludus node via its LAN IP address and its Tailnet IP address. Recall that one of the advertised routes was 198.51.100.1/32, which is the IP address of my Ludus node’s network interface.

And that the Ludus node’s Tailnet IP address is 100.80.197.85.
I first connect to the Ludus node’s network interface via its advertised route in the initial SSH attempt, which prompts for a password because Tailscale does not interject itself in the process. Next, I SSH to the same Ludus node via Tailscale SSH using its Tailnet IP address. Tailscale injects itself into the SSH attempt and uses your Tailnet identity to authenticate. Since the “action” in the modified SSH configuration is set to “accept”, I am not required to reauthenticate to Tailnet either. The end result is passwordless access to the Ludus node as the root user.
Closing Out
In this post, I covered how to join a machine to a Tailnet and enumerate that Tailnet for additional access. There are other Tailscale features not covered here that may also prove useful, and an entire web API that may be available to you if your Trusted Keys were provisioned with an overly permissive scope. Tailscale offers a potentially lucrative way to traverse otherwise disparate infrastructure in a target environment. As such, it is also worth understanding from this perspective for defenders building out remote access solutions based on Tailscale. Keep an eye out for a TailScale OpenGraph project that will be released to the OpenGraph library over the next few months.